Honda Civic: How to Replace a Motor Mount
Over time, the rubber inserts in an engine's motor mounts become cracked and brittle, causing your Honda to vibrate. This article shows how to properly replace every worn motor mount on your engine.
This article applies to the Honda Civic (1992 - 2000).
An engine generally has between three and four engine mounts to keep its vibrations from entering the cabin. When these fail everything inside the engine compartment shakes, causing the cabin to do the same. If not promptly fixed, scenarios can result in the mounts braking – causing severe damage to the engine. To avoid any of these problems, you have to take charge and replace them. The process is easy to do and requires having a hydraulic jack with a piece of wood positioned under the engine to support it, while each mount is simultaneously removed.

Materials Needed
- 3/8-inch ratchet
- Metric socket set
- Block of wood
- Breaker bar
- Torque wretch
- Pliers
- Screwdriver
- Hydraulic jack
- 19mm crescent wrench
Step 1 - Position the jack under the car
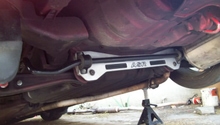
Place the flat piece of wood onto the hydraulic jack and position it under the car. Raise the jack just enough to support the engine.

Step 2 - Clear a route to the mount
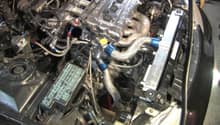
The right and left motor mounts will have obstructions in the way. Remove the cruise control assembly to make room for the left mount, the right mount has the intake piping routed on top of it. Remove the plastic piping to access it. The bottom mount is a bit more difficult and requires removing the brake booster hose, and temporarily relocating the throttle cable and a vacuum line.


Step 3 - Remove the motor mount brackets
The left and right motor mount brackets are held in place using three 17mm bolts. Loosen and remove them along with each bracket. The rear is tricky, using a elongated breaker bar remove the four 19mm bracket bolts. If you have access to a elbow adapter removing the bolts will become much easier.


Step 4 - Remove the mounts
With the bracket off, the 14mm bolts securing the mounts to the car can be accessed. Loosen the 14mm bolts and remove the mounts from the car.


Step 5 - Install the new mounts
Install each new mount into its location. Tighten the left and right 14mm mount bolts to 33ft/lbs. The lower mount requires the bolts to be tightened to 67 ft/lbs.


Step 6 - Reinstall the brackets and removed components
Reconnect each bracket and torque the left mount bracket bolts to 54 ft/lbs. The right requires 47 ft/lbs for the bracket and 54 ft/lbs for the pass through bolt. The rear requires its lower and upper 19mm bolts to be tighten to 61 ft/lbs. and the last 17mm bolt to 43 ft/lbs torque. Reinstall the cruise control assembly, intake pieces, brake booster and vacuum lines. Once everything is correctly tightened, lower the jack.

Related Discussions
- Replacing Engine Mounts - Honda-tech.com
- Motor Mounts Install Help!- Honda-tech.com
- Driver's Side Engine Mount - Honda-tech.com