
FAQ: How-To: LS 5th Gear Install guide! JDM B16 S1
 07-07-2003, 10:13 AM
#1
Thread Starter

Friday 7:45pm
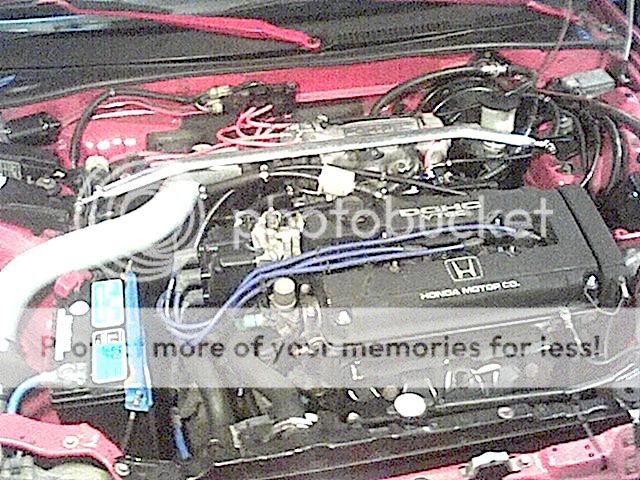
OK, I thought this might be a more interesting writeup if I posted as I
actually do the work.
Some of you know that I have a JDM B16A engine installed in my '88 CRX Si. The
JDM B16 came with two separate manual transmissions (for our purposes): The
YS1 or Y1 that had a 4.266 final drive, and the S1 or J1 that had a 4.400
final drive. In short, the larger (numerically) the final drive, the higher
your RPM will be at a given speed. In my case, 100 km/h is roughly 3600 rpm.
115 km/h is about 4000 rpm. This, coupled with the fact that I now drive 400+
km's a week on the highway, was making for a very slow, very annoyed Ian.
Something had to change.
Of the two transmissions above, I was cursed from the beginning with the S1
transmission's 4.400 final drive. There's a story behind why but I won't get
into it now. Suffice it to say, I never wanted this transmission, which is
geared strongly towards drag racing and acceleration rather than comfy
cruising or top speed. Obviously, I've always been interested in fixing this
5th-gear-highway-cruising problem.
The answer came in the form of information about the USDM Integra '90-'93 LS
transmission. Supposedly you can swap the 5th gear from an LS, which has a
very tall final drive ratio for very low highway RPM cruising (something like
4.166) into the S1, making a hybrid transmission that has a very short 1-4
gears and a taller 5th gear for that highway usage. Further investigation
revealed more info: Only the '90-'91 LS transmissions have the correct gears,
and further, the gears are no longer produced, meaning short supply. More
research revealed all that I needed were the main and counter gears. I won't
get into how the transmission works on my car, but suffice it to say, just the
two gears (supposedly) work. I obtained the part #s and went shopping.
Two days later, I am in possession of the last, absolutely finally produced
Integra LS 1990 5th gear and counter gear. Literally. There are no more
available in the States, and mine were shipped from Montreal and Toronto
respectively. The total, including 3 litres of Honda MTF, was $220 with tax
(dealer discount 'cause I shop there a lot ).
).
In case you're curious, the part #s are 23581-PS1-A00 and 23461-PS1-A01 for
the main and counter gears, respectively.
Main and counter gears, main is the taller gear. Note the helical thread on
the gears, which is what prevents gear whine from the transmission in the
forward gears:
In short, I have to remove the transmission, remove the endcap from the
transmission, remove the 5th gear and counter, install the new 5th and
counter, replace the cap, and reinstall the transmission.
I'll keep you posted as I get further along, so stay with us! This is gonna be
fun! Time to break out the coffee...
--------------------------
Friday 8:07 pm
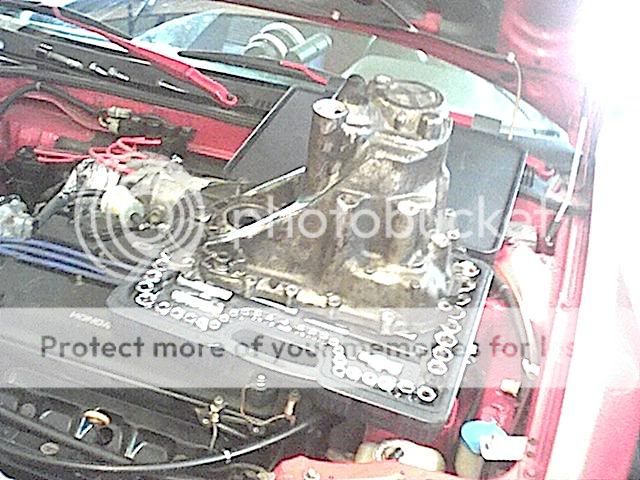
I've stripped the intake, removed the clutch cable, removed the battery +
battery tray, the battery wire (grounds to the transmission), and the upper
strut tower brace.
Making decisions as to whether it would be easier to actually remove the
transmission, or remove the rear crossmember, lower the engine in the bay by
unbolting the transmission mount, and replacing the 5th gear while the
transmission is still in the car. Pics!
Beginning the madness, it takes a certain strange kind of guy to waste an
entire weekend doing a silly, stupid thing like this, and I'm very appreciative
of my g/f for allowing me the time without getting mad at me:
Baring the surgical area. Even if you don't need to remove something
sometimes it can make the whole job faster if you remove it and put it out of
the way:
Another shot of the above, different angle. The baseball bat keeps my
hood from warping, before you make comments:

----------------------------------------
Friday 9:25pm
Took some time to talk on the phone so bear with me. Typing with oily hands
also dirties the keyboard tremendously.
Aaaanyways...
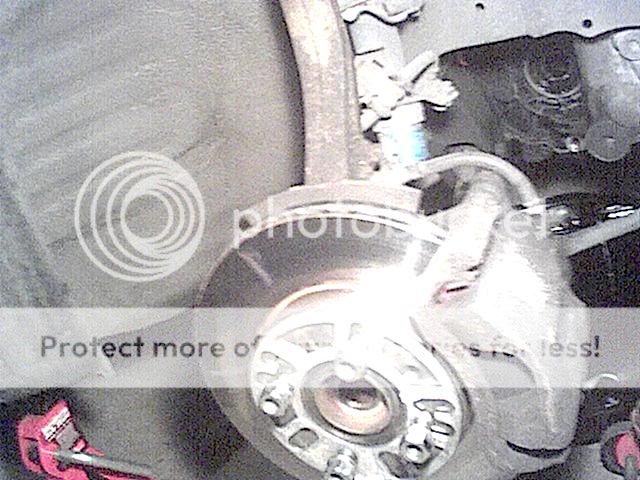
I have now removed both axles, the intermediate shaft, raised the car and
drained the transmission
Axles removed. Notice those big yummy DA brakes:
Transmission draining. Look at how evil my car is, all underlit like
that:

------------------------------------------
Friday 10:19pm
I have now removed the starter, removed the speedo cable, removed the shift
linkage, removed the transmission stiffener brackets, unplugged the backup
light switch, and am in the process of undoing the actual transmission bolts
as well as the engine mounts Pics!
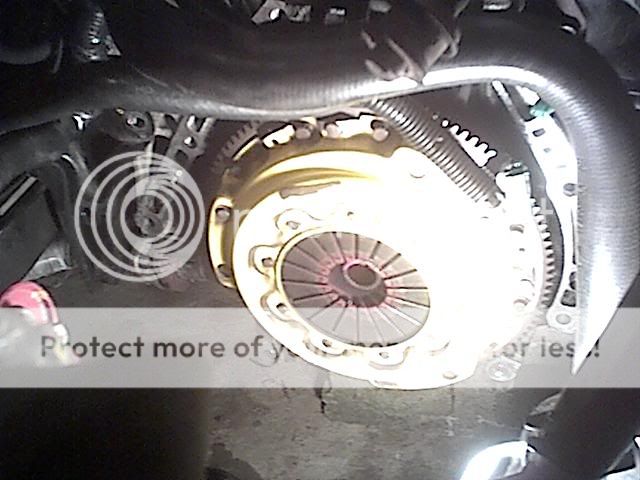
Removed the starter, you can see the bright yellow ACT clutch. Or, well,
you could if my camera didn't completely suck:
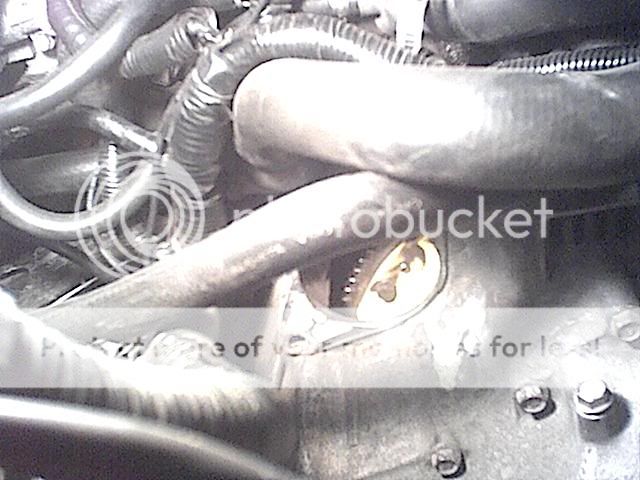
Unbolting the shift linkage (the part that sits above the exhaust tubing,
which is glowing brightly from the trouble light I'm using):
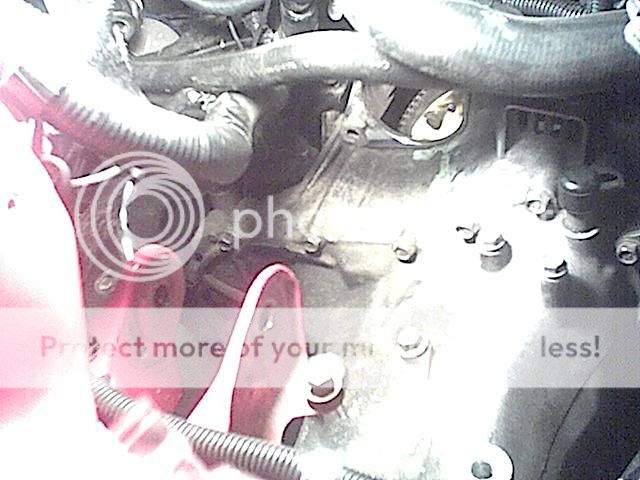
Removing the stiffener brackets that help the transmission stay firmly
bolted in place during hard shifts - they're the two loose bolts at the top
right of the picture, by the exhaust manifold:

Making sure the transmission and engine are both well-supported in order to
begin unbolting the transmission and engine mounts and undoing the
engine->transmission bolts:

------------------------------------
Saturday 12:08 pm.
 I can't remove the freakin' rear engine mount! It's stuck! I've taken
off the transmission mount and unbolted the rear engine mount but it's crammed
in too tight to remove the 2 pieces *sigh*...
--------------------------------------
Saturday 1:00 am
The saga continues... I have the trans pulling away from the engine right now,
after realizing I'm a freaking idiot and I don't need to touch that rear
mount. So much time wasted So now I'm done undoing the rest of the
engine->transmission and transmission->engine bolts, and removing the
flywheel/clutch plate cover that protects the assembly from road grime while
driving.
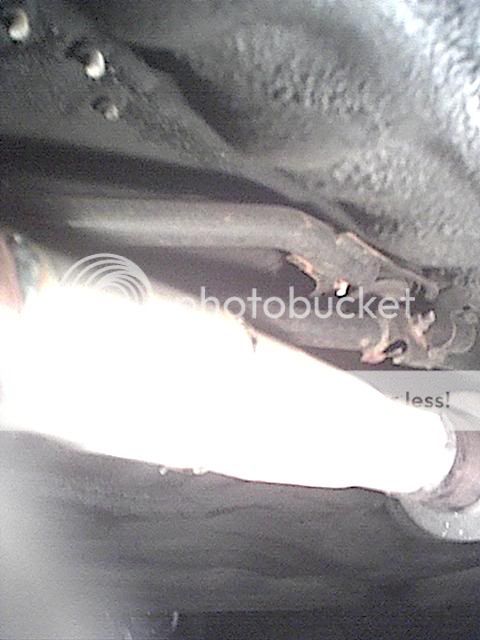
Transmission mount removed:
Transmission pulling away from engine. You have to jimmy it back and forth
to get enough play to pull it away. The plug there is the secondary O2 sensor
from my exhaust manifold:

------------------------------------------
Saturday 1:21 am
Good news! After h4x0r1ng at the bolts, the tranny is finally removed and is
now sitting on my work bench!
:doin' the banana dance:
Pics:
Tranny halfway out, it was resting half on the jack and half on the floor
at this point:
Used ACT clutch, anyone? Look at those teeth, plenty of life left:
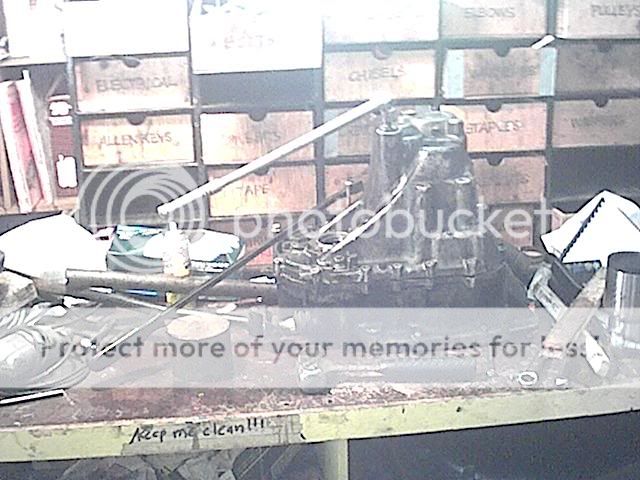
Tranny on the work bench, ready to be torn apart... it's judgement time
folks... but I'll probably leave this for tomorrow when I'm awake and know
what I'm doing:

-----------------------
Saturday 2:30 pm.
With a fresh pot of coffee made, it's time to begin anew! The first step is to
separate the transmission casing from the base, exposing the diff, main and
counter shafts as well as the shifter forks & rods. I'll post pics when I get
them apart
-----------------------
Saturday 3:40pm
GRAAAGH! Can't separate the casing Evidently this is what I need to do:
"There is also a bolt that holds the reverse idle gear in place. If you don't
remove it then the upper case will hang up when you try to remove it. The
reverse idle gear sits in a shift fork and you can't split the case. If you
remove that bolt and the spread the C ring with two screw drivers it will
open up no prob. Just pay attention to the location for everything. You will
have to remove the shift forks and linkage to pull the main and counter shafts
out. good luck" - hughsl from honda-tech.com
Only problem is, I don't know which gear is the reverse idler gear - I can't
see it - and I don't know where the C-clip is RRRGH!
Drinkin' a beer at 4 in the afternoon, trying not to scream and throw things
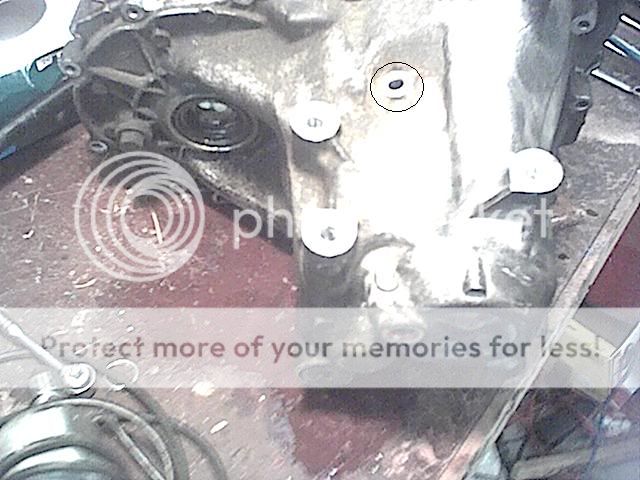
Anyway, I'm pretty sure this bolt hole (circled in the pic) is for the reverse
idler gear... there's a gear on the inside of the tranny that was held in
place with that bolt. I removed it now. I hope I was supposed to!
(*edit* This IS the bolt for the reverse idler gear... FYI!)
Reverse idler gear bolt hole, circled pic:
Taking a couple more pics 'cause I'm bored:
Differential gear, visible through the crack - this is what spins the
axles:
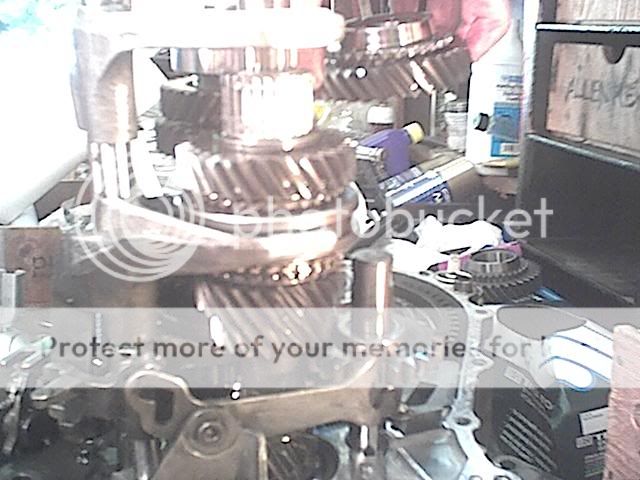
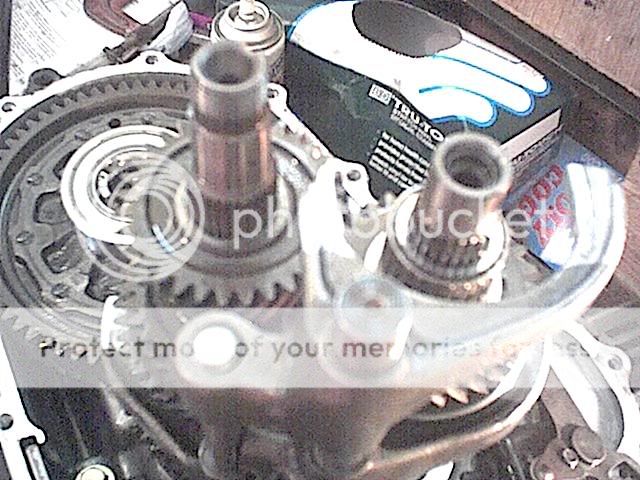
Visible through the crack are some of the mainshaft gears and a bit of the
gear selector forks (the forks move the gears around):

The baseball bat keeps the hood level, so it doesn't warp People love that
part though... heheh...
I think I might have found BOTH parts now - the reverse idler gear retaining
bolt AND the C-clip! GOD I love Honda-Tech.com!
I'll keep you all posted as to my continuing misadventures... stay tuned
-------------------------------------
Saturday 4:49 pm
TRANNY CASE IS REMOVED! :banana dance:
Thank God, again, for Honda-Tech! I wish I could show a close-up of how the
C-clip sits inside the end of the tranny casing (it's ingenious!) but I can't
get closeups with my crappy digital camera
Removing the small freeze plug in the end of the transmission casing, the
c-clip resides underneath:
Close-up of the freeze plug, it has a 3/8" hole in it for the socket to
fit inside. Mine had frozen solid and I needed to use a knife to scrape away
some road grime, some Liquid Wrench, a bracer bar and a 2' breaker bar:
[img][/img]
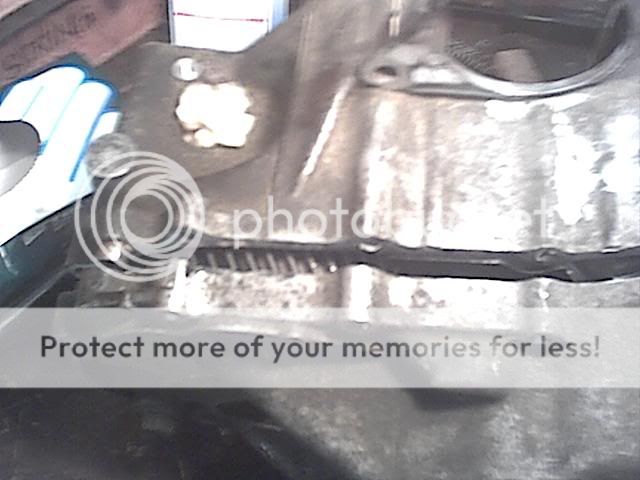
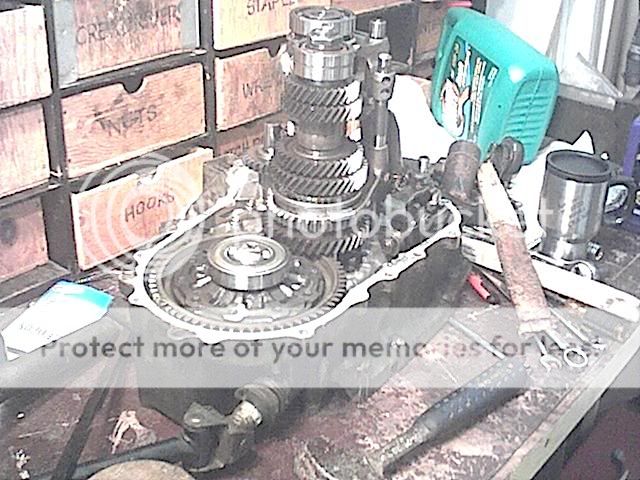
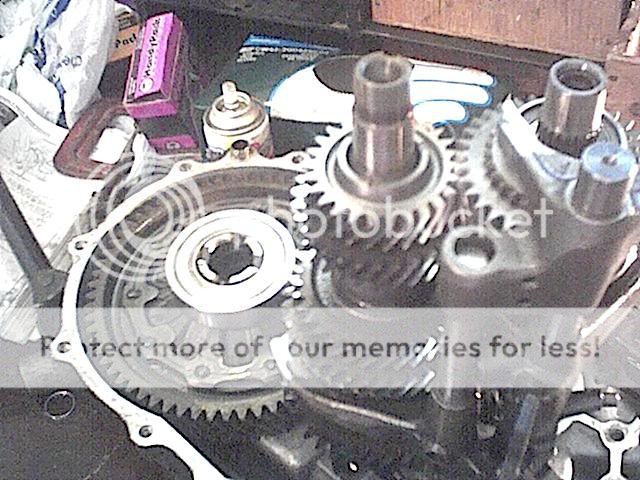
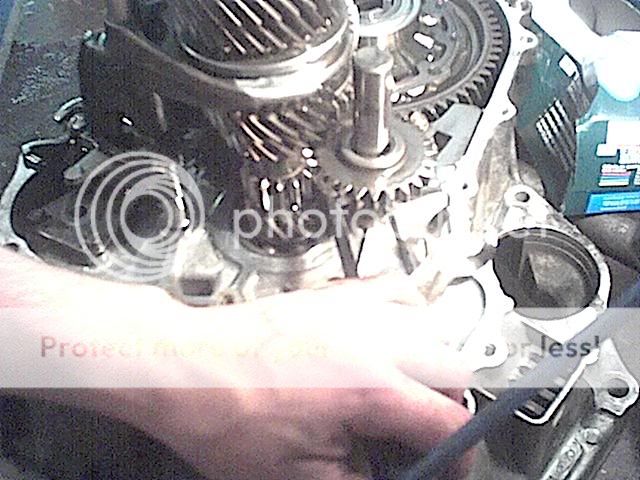
Case removed and sitting - neat huh:
Tranny guts exposed, oooh, look at the gearies:
-------------------------------------
7:16 pm
Success! Changed the countershaft and mainshaft gears over to the USDM S1
transmission units. Good highway RPM here I come... pics:
*note* Amusingly enough (though frightening at the time) the mainshaft bearing
POPS off the shaft if you tug at it. It literally flew 5-10' in the air, nearly
hit the roof of the garage, then fell down onto the counter and CRUSHED a beer
can in the process, before I caught it as it fell to the ground! Then I drank
the rest of the beer
After removing the mainshaft bearing, using a 2-jaw puller to remove the
synchro ring from the mainshaft:
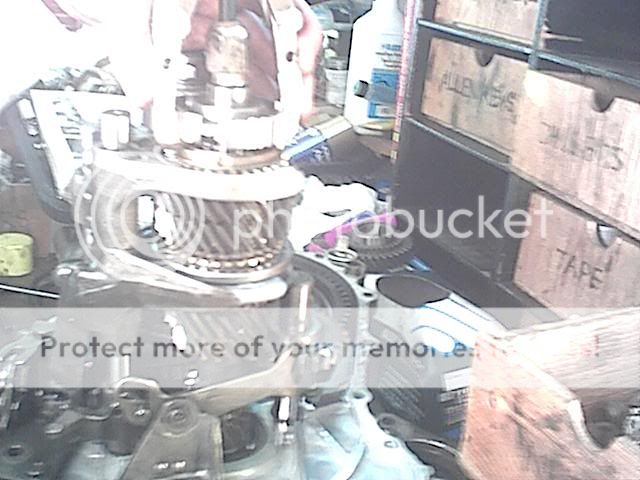
Synchro hub removed:
Main 5th gear removed, notice the needle bearings used on the mainshaft
(which are much stronger than round bearings for the type of load this
gear assembly sees):
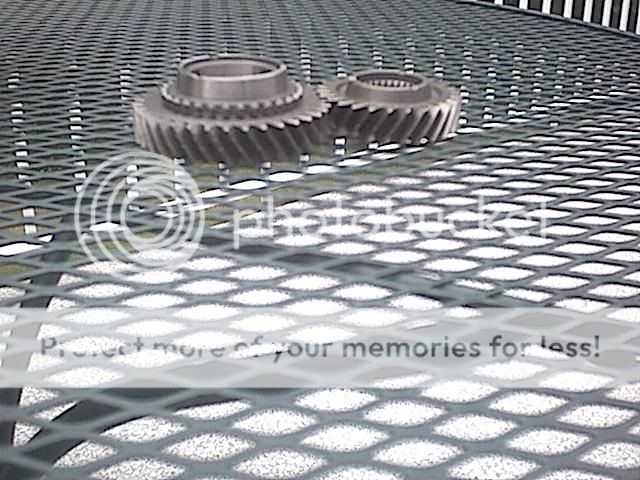
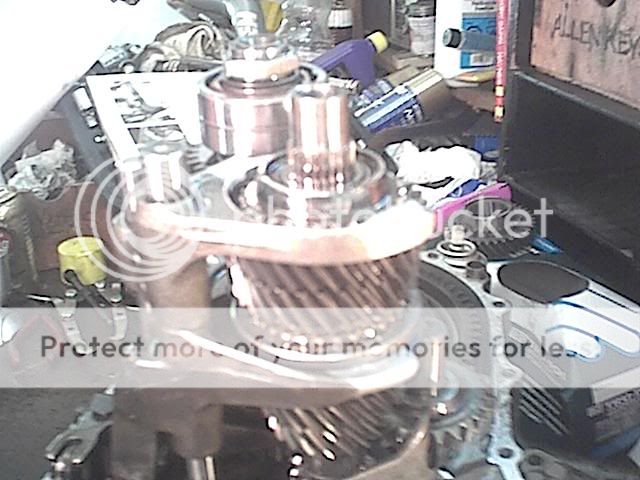
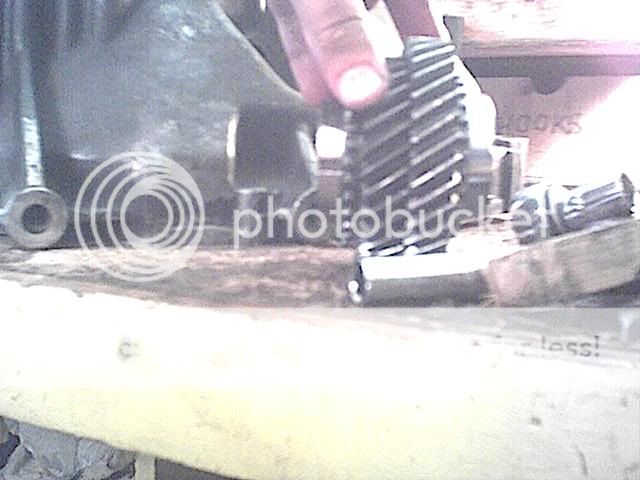
Comparing 5th gears, the taller (larger) gear is the new LS 5th gear:
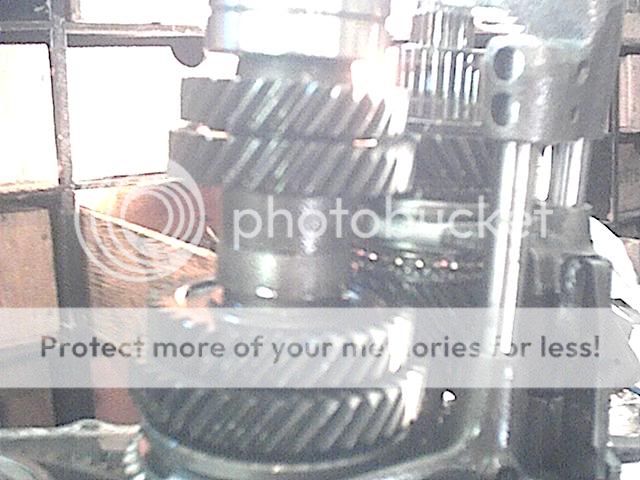
The countershaft assembly in all its glory, the 5th counter gear is the
topmost, smallest gear:
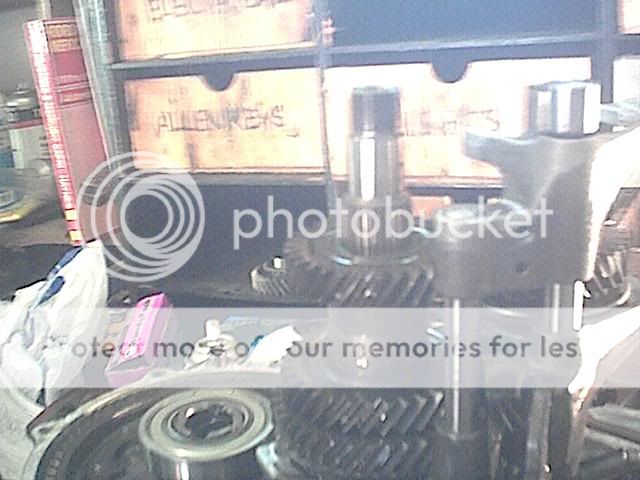
5th counter gear removed, and locknut removed:
Both gears removed, the topmost pincer of metal is the 5th gear selector
fork, that engages 5th gear when you move the shift lever:
The counter 5th gears, the LS unit is stacked on top and is smaller so that
it meshes correctly with the larger LS main gear. This is why you need both the main and counter gears for this swap - just the main gear alone would be too wide:

The LS 5th gears installed:
This is how I removed the locknut from the top of the countershaft, by
wedging a prybar between the reverse idler gears:
--------------------------------------------
Sunday 2:12 am - project COMPLETE! :notify: Good God I'm scared to actually try and
drive it now... many thanks to my brother Mr. S who came home mid-project from
vacation and was willing to jump in and help me out; I'd undoubtedly still be
working without him...
Time to wash my hands, give the car a final once-over and then road-test it...
Scary....
------------------------------------------
Sunday 2:37 am
Final installation review: Product is AWESOME! Tranny might feel a little
funny, but I think I adjusted the shift linkage a little too tight. Oh well
:banana dance: That's a 10-second fix!
As for the drive, well, I put it in reverse and went up the driveway, no
problems. At the top, I slowly ran through 1st, gingerly shifted to 2nd,
carefully put it into 3rd, took it up to 4th, and then had to brake for a
corner. I'm being very careful on the tranny to not run it high - I'm worried
about dirt/dust that got inside from being open for so long. I'll be changing
the fluid soon. Anyway, after the next corner, I took it up to 3k in 4th.
Usually a shift to 5th at this point puts me at about 65 km/h and 2500 rpm.
Boom, 5th gear engaged, and the rpms dropped to just under 2k 2k is now
70km/h!! I took it up to 100km/h (the car is dog-slow in 5th gear now )
and it's only 2900 rpm! It used to be 3800 rpm! HOLY MOMMA I love this
transmission now!
All in all, very worthwhile :D
Now, it's bedtime :zzz:
Modified by raene at 8:42 PM 3/20/2004
OK, I thought this might be a more interesting writeup if I posted as I
actually do the work.
Some of you know that I have a JDM B16A engine installed in my '88 CRX Si. The
JDM B16 came with two separate manual transmissions (for our purposes): The
YS1 or Y1 that had a 4.266 final drive, and the S1 or J1 that had a 4.400
final drive. In short, the larger (numerically) the final drive, the higher
your RPM will be at a given speed. In my case, 100 km/h is roughly 3600 rpm.
115 km/h is about 4000 rpm. This, coupled with the fact that I now drive 400+
km's a week on the highway, was making for a very slow, very annoyed Ian.
Something had to change.
Of the two transmissions above, I was cursed from the beginning with the S1
transmission's 4.400 final drive. There's a story behind why but I won't get
into it now. Suffice it to say, I never wanted this transmission, which is
geared strongly towards drag racing and acceleration rather than comfy
cruising or top speed. Obviously, I've always been interested in fixing this
5th-gear-highway-cruising problem.
The answer came in the form of information about the USDM Integra '90-'93 LS
transmission. Supposedly you can swap the 5th gear from an LS, which has a
very tall final drive ratio for very low highway RPM cruising (something like
4.166) into the S1, making a hybrid transmission that has a very short 1-4
gears and a taller 5th gear for that highway usage. Further investigation
revealed more info: Only the '90-'91 LS transmissions have the correct gears,
and further, the gears are no longer produced, meaning short supply. More
research revealed all that I needed were the main and counter gears. I won't
get into how the transmission works on my car, but suffice it to say, just the
two gears (supposedly) work. I obtained the part #s and went shopping.
Two days later, I am in possession of the last, absolutely finally produced
Integra LS 1990 5th gear and counter gear. Literally. There are no more
available in the States, and mine were shipped from Montreal and Toronto
respectively. The total, including 3 litres of Honda MTF, was $220 with tax
(dealer discount 'cause I shop there a lot
). In case you're curious, the part #s are 23581-PS1-A00 and 23461-PS1-A01 for
the main and counter gears, respectively.
Main and counter gears, main is the taller gear. Note the helical thread on
the gears, which is what prevents gear whine from the transmission in the
forward gears:
In short, I have to remove the transmission, remove the endcap from the
transmission, remove the 5th gear and counter, install the new 5th and
counter, replace the cap, and reinstall the transmission.
I'll keep you posted as I get further along, so stay with us! This is gonna be
fun! Time to break out the coffee...
--------------------------
Friday 8:07 pm
I've stripped the intake, removed the clutch cable, removed the battery +
battery tray, the battery wire (grounds to the transmission), and the upper
strut tower brace.
Making decisions as to whether it would be easier to actually remove the
transmission, or remove the rear crossmember, lower the engine in the bay by
unbolting the transmission mount, and replacing the 5th gear while the
transmission is still in the car. Pics!
Beginning the madness, it takes a certain strange kind of guy to waste an
entire weekend doing a silly, stupid thing like this, and I'm very appreciative
of my g/f for allowing me the time without getting mad at me:
Baring the surgical area. Even if you don't need to remove something
sometimes it can make the whole job faster if you remove it and put it out of
the way:
Another shot of the above, different angle. The baseball bat keeps my
hood from warping, before you make comments:
----------------------------------------
Friday 9:25pm
Took some time to talk on the phone so bear with me
. Typing with oily hands also dirties the keyboard tremendously.
Aaaanyways...
I have now removed both axles, the intermediate shaft, raised the car and
drained the transmission
Axles removed. Notice those big yummy DA brakes:
Transmission draining. Look at how evil my car is, all underlit like
that:
------------------------------------------
Friday 10:19pm
I have now removed the starter, removed the speedo cable, removed the shift
linkage, removed the transmission stiffener brackets, unplugged the backup
light switch, and am in the process of undoing the actual transmission bolts
as well as the engine mounts
Pics!Removed the starter, you can see the bright yellow ACT clutch. Or, well,
you could if my camera didn't completely suck:
Unbolting the shift linkage (the part that sits above the exhaust tubing,
which is glowing brightly from the trouble light I'm using):
Removing the stiffener brackets that help the transmission stay firmly
bolted in place during hard shifts - they're the two loose bolts at the top
right of the picture, by the exhaust manifold:
Making sure the transmission and engine are both well-supported in order to
begin unbolting the transmission and engine mounts and undoing the
engine->transmission bolts:
------------------------------------
Saturday 12:08 pm.
I can't remove the freakin' rear engine mount! It's stuck! I've taken off the transmission mount and unbolted the rear engine mount but it's crammed
in too tight to remove the 2 pieces
*sigh*...--------------------------------------
Saturday 1:00 am
The saga continues... I have the trans pulling away from the engine right now,
after realizing I'm a freaking idiot and I don't need to touch that rear
mount. So much time wasted
So now I'm done undoing the rest of the engine->transmission and transmission->engine bolts, and removing the
flywheel/clutch plate cover that protects the assembly from road grime while
driving.
Transmission mount removed:
Transmission pulling away from engine. You have to jimmy it back and forth
to get enough play to pull it away. The plug there is the secondary O2 sensor
from my exhaust manifold:
------------------------------------------
Saturday 1:21 am
Good news! After h4x0r1ng at the bolts, the tranny is finally removed and is
now sitting on my work bench!
:doin' the banana dance:
Pics:
Tranny halfway out, it was resting half on the jack and half on the floor
at this point:
Used ACT clutch, anyone? Look at those teeth, plenty of life left:
Tranny on the work bench, ready to be torn apart... it's judgement time
folks... but I'll probably leave this for tomorrow when I'm awake and know
what I'm doing:
-----------------------
Saturday 2:30 pm.
With a fresh pot of coffee made, it's time to begin anew! The first step is to
separate the transmission casing from the base, exposing the diff, main and
counter shafts as well as the shifter forks & rods. I'll post pics when I get
them apart
-----------------------
Saturday 3:40pm
GRAAAGH! Can't separate the casing
Evidently this is what I need to do: "There is also a bolt that holds the reverse idle gear in place. If you don't
remove it then the upper case will hang up when you try to remove it. The
reverse idle gear sits in a shift fork and you can't split the case. If you
remove that bolt and the spread the C ring with two screw drivers it will
open up no prob. Just pay attention to the location for everything. You will
have to remove the shift forks and linkage to pull the main and counter shafts
out. good luck
" - hughsl from honda-tech.comOnly problem is, I don't know which gear is the reverse idler gear - I can't
see it - and I don't know where the C-clip is
RRRGH!Drinkin' a beer at 4 in the afternoon, trying not to scream and throw things
Anyway, I'm pretty sure this bolt hole (circled in the pic) is for the reverse
idler gear... there's a gear on the inside of the tranny that was held in
place with that bolt. I removed it now. I hope I was supposed to!
(*edit* This IS the bolt for the reverse idler gear... FYI!)
Reverse idler gear bolt hole, circled pic:
Taking a couple more pics 'cause I'm bored:
Differential gear, visible through the crack - this is what spins the
axles:
Visible through the crack are some of the mainshaft gears and a bit of the
gear selector forks (the forks move the gears around):
The baseball bat keeps the hood level, so it doesn't warp
People love that part though... heheh...
I think I might have found BOTH parts now - the reverse idler gear retaining
bolt AND the C-clip! GOD I love Honda-Tech.com!
I'll keep you all posted as to my continuing misadventures... stay tuned
-------------------------------------
Saturday 4:49 pm
TRANNY CASE IS REMOVED! :banana dance:
Thank God, again, for Honda-Tech! I wish I could show a close-up of how the
C-clip sits inside the end of the tranny casing (it's ingenious!) but I can't
get closeups with my crappy digital camera
Removing the small freeze plug in the end of the transmission casing, the
c-clip resides underneath:
Close-up of the freeze plug, it has a 3/8" hole in it for the socket to
fit inside. Mine had frozen solid and I needed to use a knife to scrape away
some road grime, some Liquid Wrench, a bracer bar and a 2' breaker bar:
[img][/img]
Case removed and sitting - neat huh:
Tranny guts exposed, oooh, look at the gearies:
-------------------------------------
7:16 pm
Success! Changed the countershaft and mainshaft gears over to the USDM S1
transmission units. Good highway RPM here I come... pics:
*note* Amusingly enough (though frightening at the time) the mainshaft bearing
POPS off the shaft if you tug at it. It literally flew 5-10' in the air, nearly
hit the roof of the garage, then fell down onto the counter and CRUSHED a beer
can in the process, before I caught it as it fell to the ground! Then I drank
the rest of the beer
After removing the mainshaft bearing, using a 2-jaw puller to remove the
synchro ring from the mainshaft:
Synchro hub removed:
Main 5th gear removed, notice the needle bearings used on the mainshaft
(which are much stronger than round bearings for the type of load this
gear assembly sees):
Comparing 5th gears, the taller (larger) gear is the new LS 5th gear:
The countershaft assembly in all its glory, the 5th counter gear is the
topmost, smallest gear:
5th counter gear removed, and locknut removed:
Both gears removed, the topmost pincer of metal is the 5th gear selector
fork, that engages 5th gear when you move the shift lever:
The counter 5th gears, the LS unit is stacked on top and is smaller so that
it meshes correctly with the larger LS main gear. This is why you need both the main and counter gears for this swap - just the main gear alone would be too wide:
The LS 5th gears installed:
This is how I removed the locknut from the top of the countershaft, by
wedging a prybar between the reverse idler gears:
--------------------------------------------
Sunday 2:12 am - project COMPLETE! :notify: Good God I'm scared to actually try and
drive it now... many thanks to my brother Mr. S who came home mid-project from
vacation and was willing to jump in and help me out; I'd undoubtedly still be
working without him...
Time to wash my hands, give the car a final once-over and then road-test it...
Scary....------------------------------------------
Sunday 2:37 am
Final installation review: Product is AWESOME! Tranny might feel a little
funny, but I think I adjusted the shift linkage a little too tight. Oh well
:banana dance: That's a 10-second fix!
As for the drive, well, I put it in reverse and went up the driveway, no
problems. At the top, I slowly ran through 1st, gingerly shifted to 2nd,
carefully put it into 3rd, took it up to 4th, and then had to brake for a
corner. I'm being very careful on the tranny to not run it high - I'm worried
about dirt/dust that got inside from being open for so long. I'll be changing
the fluid soon. Anyway, after the next corner, I took it up to 3k in 4th.
Usually a shift to 5th at this point puts me at about 65 km/h and 2500 rpm.
Boom, 5th gear engaged, and the rpms dropped to just under 2k
2k is now 70km/h!! I took it up to 100km/h (the car is dog-slow in 5th gear now
) and it's only 2900 rpm! It used to be 3800 rpm! HOLY MOMMA I love this
transmission now!
All in all, very worthwhile :D
Now, it's bedtime :zzz:
Modified by raene at 8:42 PM 3/20/2004
Last edited by raene; 03-13-2010 at 05:33 PM.
 07-07-2003, 10:22 AM
#2
Honda-Tech Member

Nice write up but
<TABLE WIDTH="90%" CELLSPACING=0 CELLPADDING=0 ALIGN=CENTER><TR><TD>Quote, originally posted by raene »</TD></TR><TR><TD CLASS="quote">The baseball bat keeps the hood level, so it doesn't warp People love that
part though... heheh...</TD></TR></TABLE>
lol whats the bat all about, I never saw it in any pic. I'm thinking you might of been pretty tired when you wrote it up. Either way good job on swapping the gears out.
07-07-2003, 11:00 AM
#3
Thread Starter
Oh, there's a bat alright. Look at one of the topmost pics It's actually a genuine Louisville Slugger! Nothing but the best for my CRX!
I'd like to also extend my thanks to sleeper4dr - who sent me an email containing 3 separate pictures and explaining in detail how to remove the transmission casing! This kind of community is what H-T is all about, and so to everyone who was willing to take time and help out someone they don't even know - thanks to you Have a  on me!
It's actually a genuine Louisville Slugger! Nothing but the best for my CRX!I'd like to also extend my thanks to sleeper4dr - who sent me an email containing 3 separate pictures and explaining in detail how to remove the transmission casing! This kind of community is what H-T is all about, and so to everyone who was willing to take time and help out someone they don't even know - thanks to you
Have a on me!
07-07-2003, 11:24 AM
#6
Honda-Tech Member
man do i wish i knew about trannys because i really need this done....lucky man really lucky. maybe ill just save for a clutch and do this all at once...
07-07-2003, 11:52 AM
#7
Honda-Tech Member
excellent write up... someone needs to make it a sticky or a webpage that people can resource.
If you write it up into HTML, i could host it...
Hate losing articles like this when i need them.
If you write it up into HTML, i could host it...
Hate losing articles like this when i need them.
Trending Topics
07-07-2003, 12:09 PM
#8
Thread Starter
It IS written up in HTML That's the beauty of everything viewed online Just View Source.
If you really want I suppose I can make you an HTML file out of it, though...
That's the beauty of everything viewed online Just View Source. If you really want I suppose I can make you an HTML file out of it, though...
07-07-2003, 12:23 PM
#9
since pictures are good at dissappearing and stuff i have backed this up to my website just incase 8 months from now someone does a search and finds this info
http://texas.clubsi.com/brandon/crx/finaldrive
http://texas.clubsi.com/brandon/crx/finaldrive
07-07-2003, 12:24 PM
#10
Honda-Tech Member
<TABLE WIDTH="90%" CELLSPACING=0 CELLPADDING=0 ALIGN=CENTER><TR><TD>Quote, originally posted by raene »</TD></TR><TR><TD CLASS="quote">It IS written up in HTML That's the beauty of everything viewed online Just View Source. </TD></TR></TABLE>
***.
Something easier to upload. I don't want to play with it too much... :D
That's the beauty of everything viewed online Just View Source. </TD></TR></TABLE>***.
Something easier to upload. I don't want to play with it too much... :D
07-07-2003, 12:42 PM
#12
07-07-2003, 07:56 PM
#14
Honda-Tech Member
Join Date: Dec 2002
Location: PSL, florida, us
Posts: 4,183
Likes: 0
Received 0 Likes
on
0 Posts
dude, great write up. i could of helped you a little, but i was helping some friends over the long weekend. i like the part when the mainshaft bearring went flying, that happens to everyone who work on their trannie's for the first time! the only drawback to using the usdm s1/a1 5th gear, is that it's really tall. not like the usdm ys1 ls 5th, wich is more like the hydro gsr 5th gear!
07-07-2003, 11:41 PM
#15
Join Date: Jan 2003
Location: bowling green, ky, usa
Posts: 402
Likes: 0
Received 0 Likes
on
0 Posts
That was an absolutly excellent write up. What i'm wondering is what your gas mileage will be now. Make sure when you empty your first tank tell us how much your mileage went up too.
07-08-2003, 07:24 AM
#16
Honda-Tech Member
Great write up! 
This kind of info is what Honda-Tech is all about. This will help a lot of new guys.
This kind of info is what Honda-Tech is all about. This will help a lot of new guys.
07-08-2003, 07:42 AM
#17
Honda-Tech Member
Join Date: Dec 2001
Location: Tx, USA
Posts: 484
Likes: 0
Received 0 Likes
on
0 Posts
haha congrats on the install. i'm glad you got everything squared away and i'm glad i could help out.
it's like you said, <TABLE WIDTH="90%" CELLSPACING=0 CELLPADDING=0 ALIGN=CENTER><TR><TD>Quote, originally posted by raene »</TD></TR><TR><TD CLASS="quote">This kind of community is what H-T is all about.</TD></TR></TABLE>
and nice work on the write up.
congrats on the install. i'm glad you got everything squared away and i'm glad i could help out.it's like you said, <TABLE WIDTH="90%" CELLSPACING=0 CELLPADDING=0 ALIGN=CENTER><TR><TD>Quote, originally posted by raene »</TD></TR><TR><TD CLASS="quote">This kind of community is what H-T is all about.</TD></TR></TABLE>
and nice work on the write up.
07-08-2003, 08:20 AM
#18
Thread Starter
For the sake of completeness, I feel I should mention a couple more things... stuff that you'd get if you were following a manual in addition to this writeup, but if you read the writeup alone you wouldn't get.
1) When replacing the transmission casing, use lacquer thinner to clean the casing mating surfaces, and then use high-temp RTV sealant on the case. Otherwise, you'll be taking it all apart again to fix the leaks.
2) When the case is together, be careful to torque the case down as evenly as possible using bolts as far away from each other as possible. You don't want to warp the case. I don't know how to explain it better than that, but just try and make sure the case moves down evenly against the flywheel cover. Don't torque moving around the case; torque across the case. I used about 20 ft-lbs on the bolts and Loctite on the threads, because I couldn't find the torque specs anywhere.
3) When the case is together and the bolts are torqued and Loctited, before replacing the plug covering the C-clip make sure the C-clip has snapped into place around the countershaft bearing. If it hasn't, you'll need to wiggle the countershaft into position until you hear the C-clip snap. I did this by using a small prybar and a gentle force against the nut at the top of the countershaft assembly. A light pry up and towards the center of the case locked the C-clip with a very audible 'click'.
4) Replace the MTF shortly after doing this procedure. You might get a little dirt and dust inside the case - not a huge deal for a short period of time, but it could get ugly if left in there for too long.
5) There's a magnet in the bottom of the casing that you can pull out with a set of needle-nose pliers. This is the magnet that catches all the gear shavings from worn gears. I cleaned mine up while I had the tranny out and removed all the little shavings as best I could. Might want to do this as well!
6) The selector fork for 5th gear will prevent you from removing this gear. You can wiggle it out of the way by removing the little assembly that connects the shift linkage to the selector fork shafts, and then jimmying the shafts around (there's three separate shafts you can move up and down). I also removed the engagement linkage for the reverse idler gear, which made it easier to jimmy the shafts around. I can't give an exact formula for what I did because it was kind of like a puzzle cube Just fiddle with it and you can worm the gear out from the selector fork, I promise you!
That is all, and thanks for the support everybody!
1) When replacing the transmission casing, use lacquer thinner to clean the casing mating surfaces, and then use high-temp RTV sealant on the case. Otherwise, you'll be taking it all apart again to fix the leaks.
2) When the case is together, be careful to torque the case down as evenly as possible using bolts as far away from each other as possible. You don't want to warp the case. I don't know how to explain it better than that, but just try and make sure the case moves down evenly against the flywheel cover. Don't torque moving around the case; torque across the case. I used about 20 ft-lbs on the bolts and Loctite on the threads, because I couldn't find the torque specs anywhere.
3) When the case is together and the bolts are torqued and Loctited, before replacing the plug covering the C-clip make sure the C-clip has snapped into place around the countershaft bearing. If it hasn't, you'll need to wiggle the countershaft into position until you hear the C-clip snap. I did this by using a small prybar and a gentle force against the nut at the top of the countershaft assembly. A light pry up and towards the center of the case locked the C-clip with a very audible 'click'.
4) Replace the MTF shortly after doing this procedure. You might get a little dirt and dust inside the case - not a huge deal for a short period of time, but it could get ugly if left in there for too long.
5) There's a magnet in the bottom of the casing that you can pull out with a set of needle-nose pliers. This is the magnet that catches all the gear shavings from worn gears. I cleaned mine up while I had the tranny out and removed all the little shavings as best I could. Might want to do this as well!
6) The selector fork for 5th gear will prevent you from removing this gear. You can wiggle it out of the way by removing the little assembly that connects the shift linkage to the selector fork shafts, and then jimmying the shafts around (there's three separate shafts you can move up and down). I also removed the engagement linkage for the reverse idler gear, which made it easier to jimmy the shafts around. I can't give an exact formula for what I did because it was kind of like a puzzle cube
Just fiddle with it and you can worm the gear out from the selector fork, I promise you!That is all, and thanks for the support everybody!
 07-08-2003, 01:19 PM
#22
Honda-Tech Member
Join Date: Nov 2001
Location: OuT tHERE, TN, USA
Posts: 767
Likes: 0
Received 0 Likes
on
0 Posts
Cool:exclaim: My buddy has a USDM 90' S1 sitting around. I need to swap my y1 5th gear set with his. I like the fact that the shafts were not pulled for the swap. Makes it alot easier to reassemble.
07-09-2003, 11:03 AM
#23
Join Date: Jan 2003
Location: bowling green, ky, usa
Posts: 402
Likes: 0
Received 0 Likes
on
0 Posts
<TABLE WIDTH="90%" CELLSPACING=0 CELLPADDING=0 ALIGN=CENTER><TR><TD>Quote, originally posted by sleeper4dr »</TD></TR><TR><TD CLASS="quote">the synchro teeth on the 90-91 LS 5th are the exact same as the JDM S1/Y1/J1 trannies. if they weren't the same then this swap wouldn't work.</TD></TR></TABLE>
Wait a minute, if this is so, then why can't you use the 90-91 synchro's for our jdm trannies??
Wait a minute, if this is so, then why can't you use the 90-91 synchro's for our jdm trannies??
07-09-2003, 11:17 AM
#24
Honda-Tech Member
Join Date: Feb 2002
Location: BC
Posts: 5,723
Likes: 0
Received 0 Likes
on
0 Posts
Maybe just the 5th gear synchros are the same. I really want to do this to my car now... Raene owes me some help, now that I helped him wrestle with his tranny!
07-09-2003, 11:23 AM
#25
Thread Starter
Buddy, I 0wn your wiring harness... did I get paid for all the swap help you got? 
But I do appreciate your help and you know I'm willing to help out with your swap... BTW you still need to buy some work gloves, and soon...
But I do appreciate your help and you know I'm willing to help out with your swap... BTW you still need to buy some work gloves, and soon...