
Writeup: Clutch and Flywheel Install (another one)
 08-25-2006, 11:11 AM
#1
moderator emeritus
Thread Starter

did this one kinda quick for someone today. I know there is one in the FAQ already but it cant hurt to have another one.
Take negative off battery
remove starter

Remove battery and tray
remove intake
remove shift cable cotter pins
remove cables

remove cable bracket
unplug VSS and reverse light switch


remove slave cylinder and hardline bracket

loosen tranny mount

loosen rear torque bolt
loosen tranny pilot bolts (3 top tranny bolts)
loosen hub nuts on both sides
loosen wheel lugs
jack up the car as high as possible and place jackstands under the car securely
drain tranny oil
remove wheels
remove lower ball joint castle nut and cotter pin
remove passenger side tie rod
remove hub nut

use and ball joint separator here then
lift and spin hub out of the way while taking axle out
take a pry par and put it between the tranny and the end of the axle
- pop it out
driver side, same story cept the axles are a little different
when you get to removing the axle on the driver side, all you have to do is remove 3 bolts holding the intermediate shaft to the block. then pop it out
remove center crossbeam
remove engine/tranny torsion brace
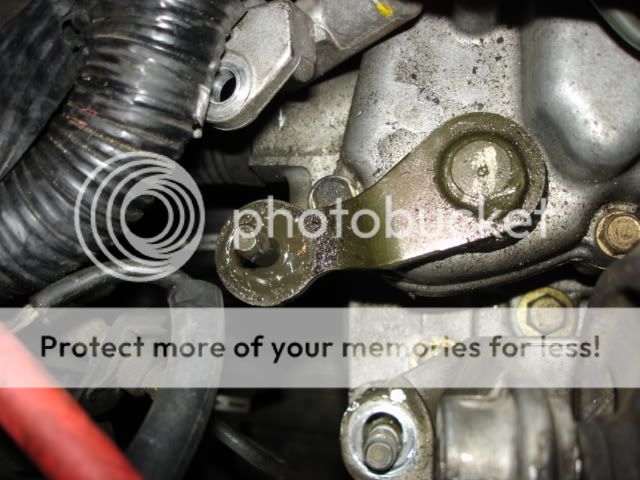
remove bolts from rear mount that attach to the tranny, there is one or two on the block
remove all bolts holding tranny to block.
THIS IS WHERE A TRANNY JACK COMES INTO PLACE
put the jack under the tranny to give it support while you remove the tranny mount
there are two studs coming out of the tranny. I removed them in order to give me enough clearance to pull the tranny out enough to clear the main shaft of the clutch assembly
once the mount is removed, use the pry bar and break the tranny free of the block.
- shouldnt take much force at all
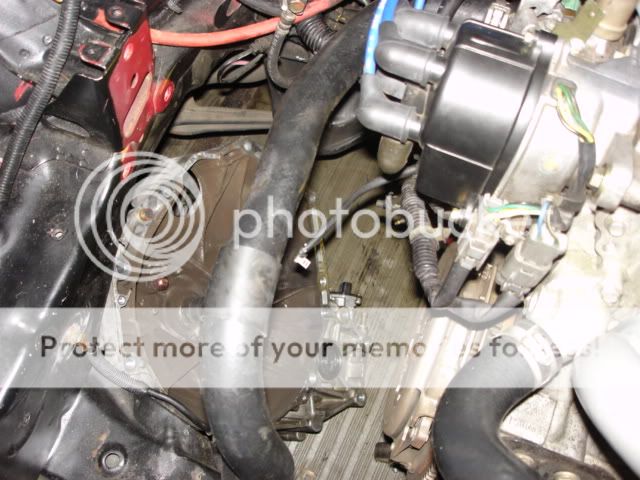
pull tranny away from block til the main shaft clears the clutch assembly
slowly lower the tranny while turning the tranny towards the back of the car in order to clear the shift fork of the crossmember
once you have the tranny down, pick up the tranny and remove the tranny jack.
set tranny on floor.
its nice to have an air gun here because trying to break the pressure plate and flywheel bolts free is kinda tough (the flywheel will spin). If you must, place a pipe with a crushed end on the flywheel teeth and the other end on the ground, held in place by whatever you can find....ghetto but it works.
anyway, get all the bolts off and remove flywheel and clutch. If you are only doing a clutch swap, still remove the flywheel to inspect it. You may need to take it to a machine shop it have it resurfaced.
now put everything back on in reverse order
Put "blue" locktite on the flywheel bolts and torque them to 76ft lbs in several steps in a crisscross pattern
IE: 30ft lbs, 55ft lbs, 76ft lbs

grab clutch assembly and use the alignment tool to hold the disk/puck to the flywheel. This will insure the main shaft goes in straight.

torque the pressure plate bolts to 19 ft lbs in several steps in a crisscross pattern.

remove shift fork, release bearing and spring
use break cleaner on spring and fork. Apply grease to fork and main shaft. Use sparingly on the shaft.
reinstall fork and spring
slide release bearing onto fork and push it down until you hear it click.
now put everything back together and remember to retorque the rear mount bolts.

i may be missing a few steps, but thats pretty much it. Just alot of tedious stuff.
Take negative off battery
remove starter
Remove battery and tray
remove intake
remove shift cable cotter pins
remove cables
remove cable bracket
unplug VSS and reverse light switch
remove slave cylinder and hardline bracket
loosen tranny mount
loosen rear torque bolt
loosen tranny pilot bolts (3 top tranny bolts)
loosen hub nuts on both sides
loosen wheel lugs
jack up the car as high as possible and place jackstands under the car securely
drain tranny oil
remove wheels
remove lower ball joint castle nut and cotter pin
remove passenger side tie rod
remove hub nut
use and ball joint separator here then
lift and spin hub out of the way while taking axle out
take a pry par and put it between the tranny and the end of the axle
- pop it out
driver side, same story cept the axles are a little different
when you get to removing the axle on the driver side, all you have to do is remove 3 bolts holding the intermediate shaft to the block. then pop it out
remove center crossbeam
remove engine/tranny torsion brace
remove bolts from rear mount that attach to the tranny, there is one or two on the block
remove all bolts holding tranny to block.
THIS IS WHERE A TRANNY JACK COMES INTO PLACE
put the jack under the tranny to give it support while you remove the tranny mount
there are two studs coming out of the tranny. I removed them in order to give me enough clearance to pull the tranny out enough to clear the main shaft of the clutch assembly
once the mount is removed, use the pry bar and break the tranny free of the block.
- shouldnt take much force at all
pull tranny away from block til the main shaft clears the clutch assembly
slowly lower the tranny while turning the tranny towards the back of the car in order to clear the shift fork of the crossmember
once you have the tranny down, pick up the tranny and remove the tranny jack.
set tranny on floor.
its nice to have an air gun here because trying to break the pressure plate and flywheel bolts free is kinda tough (the flywheel will spin). If you must, place a pipe with a crushed end on the flywheel teeth and the other end on the ground, held in place by whatever you can find....ghetto but it works.
anyway, get all the bolts off and remove flywheel and clutch. If you are only doing a clutch swap, still remove the flywheel to inspect it. You may need to take it to a machine shop it have it resurfaced.
now put everything back on in reverse order
Put "blue" locktite on the flywheel bolts and torque them to 76ft lbs in several steps in a crisscross pattern
IE: 30ft lbs, 55ft lbs, 76ft lbs
grab clutch assembly and use the alignment tool to hold the disk/puck to the flywheel. This will insure the main shaft goes in straight.
torque the pressure plate bolts to 19 ft lbs in several steps in a crisscross pattern.
remove shift fork, release bearing and spring
use break cleaner on spring and fork. Apply grease to fork and main shaft. Use sparingly on the shaft.
reinstall fork and spring
slide release bearing onto fork and push it down until you hear it click.
now put everything back together and remember to retorque the rear mount bolts.
i may be missing a few steps, but thats pretty much it. Just alot of tedious stuff.
Last edited by Dogginator; 11-11-2009 at 10:26 AM. Reason: restored to original

Trending Topics
 08-26-2006, 01:44 PM
#10
moderator emeritus
Thread Starter
<TABLE WIDTH="90%" CELLSPACING=0 CELLPADDING=0 ALIGN=CENTER><TR><TD>Quote, originally posted by flyrod »</TD></TR><TR><TD CLASS="quote">Nice writeup. This is a 5g, right? Don't forget to put oil back in the tranny!  Thanks for posting.</TD></TR></TABLE>
bahahaha, yea that and replace the cotter pins that are removed
Thanks for posting.</TD></TR></TABLE>bahahaha, yea that and replace the cotter pins that are removed
12-04-2008, 03:35 AM
#14
Honda-Tech Member
Join Date: Oct 2007
Location: Jacksonville, FL, USA
Posts: 73
Likes: 0
Received 0 Likes
on
0 Posts
HELMS HELMS HELMS!!!!!! Be thankful you are not doing an SH in the cold!!!! Good luck to you man!!! Mine is still cuasing grief pain and hell in a hand basket....
12-04-2008, 04:08 AM
#16
Honda-Tech Member
Join Date: Oct 2007
Location: Jacksonville, FL, USA
Posts: 73
Likes: 0
Received 0 Likes
on
0 Posts
I am still not done yet  .... 2 f'ing bolts on the bell housing on the backside....just a pain in my **** cuz I have an SH and I think I need to remove it
.... 2 f'ing bolts on the bell housing on the backside....just a pain in my **** cuz I have an SH and I think I need to remove it
12-04-2008, 05:18 AM
#17
Honda-Tech Member
ATTS strikes again. Sorry to hear that, Happy. Just loosen the ATTS unit (don't remove it) and pop it out of the differential to get access to the rear torque mount.
And belatedly: Nice thread, Blake.
And belatedly: Nice thread, Blake.
12-04-2008, 09:14 AM
#18
Honda-Tech Member
Join Date: Oct 2008
Location: Hastings, MN, United States
Posts: 42
Likes: 0
Received 0 Likes
on
0 Posts
i dont have a helms but i got a chilton, will that work?? i dont have money to buy a helms.. i just wish i had some pictures with the instructions... yea and its 20 degrees here too.. and snowing
12-04-2008, 09:23 AM
#19
Honda-Tech Member
Join Date: Oct 2003
Location: Chicago
Posts: 6,619
Likes: 0
Received 0 Likes
on
0 Posts

Thread
Thread Starter
Forum
Replies
Last Post
Ricey McRicerton
Honda Civic / Del Sol (1992 - 2000)
33
07-29-2012 06:46 AM
TeAm IllUsIonZ978
Tech / Misc
8
11-01-2002 03:19 PM
93, 98, accord, bearingpressure, clutch, clutchrelease, flywheel, honda, install, installing, plate, prelude, removal, spring, tech