
How to install wheel bearings/lower ball joints (pic intensive)
 03-21-2006, 10:03 AM
#1
After searching the usual spots for a lower ball joint replacement write up, I came up empty handed. I needed to replace a wheel bearing and 2 lower ball joints. The more I searched the more I read:
“I just get them done at a shop.”
Armed with my Helms, my tools, and the Force, I embarked on an enlightening journey to demystify the LBJ removal/install. As well as see how the wheel bearing removal/install went as well.
Let’s start with the wheel bearing first. The following assumptions are made:
1. Spindle has been removed from the vehicle
2. You have a hydraulic press
3. You have arbor plates
4. You have an assortment of pressing shims
5. Knuckle ring has been removed
6. Circlip has been removed
7. Screws that attached the splash guard from the spindle have been removed
a. Using a small vise grip, I was able to break them free and remove them
The tool called out for in the Helms to shim the spindle against the base is:
HUB DIS/ASSEMBLY BASE – Part # 07GAF-SD40700
When I took this part number to the Acura dealership, they told me that this part did not exist. They looked through their sources and could not find anything that would match up to it. The service rep was very helpful but could not get me this part. After some pondering I decided to go to Orchard Hardware Supply. They carry a lot of metal stock. What I found that worked PERFECTLY was:
PLAT STL-SQUARE by Steel Works
SKU # 1133032
The following is covered in the Acura Helms pages 18-13 through 18-15.
Some close-ups of the bars in action:
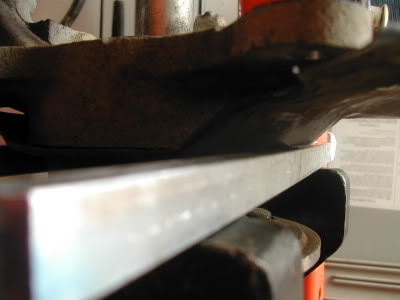
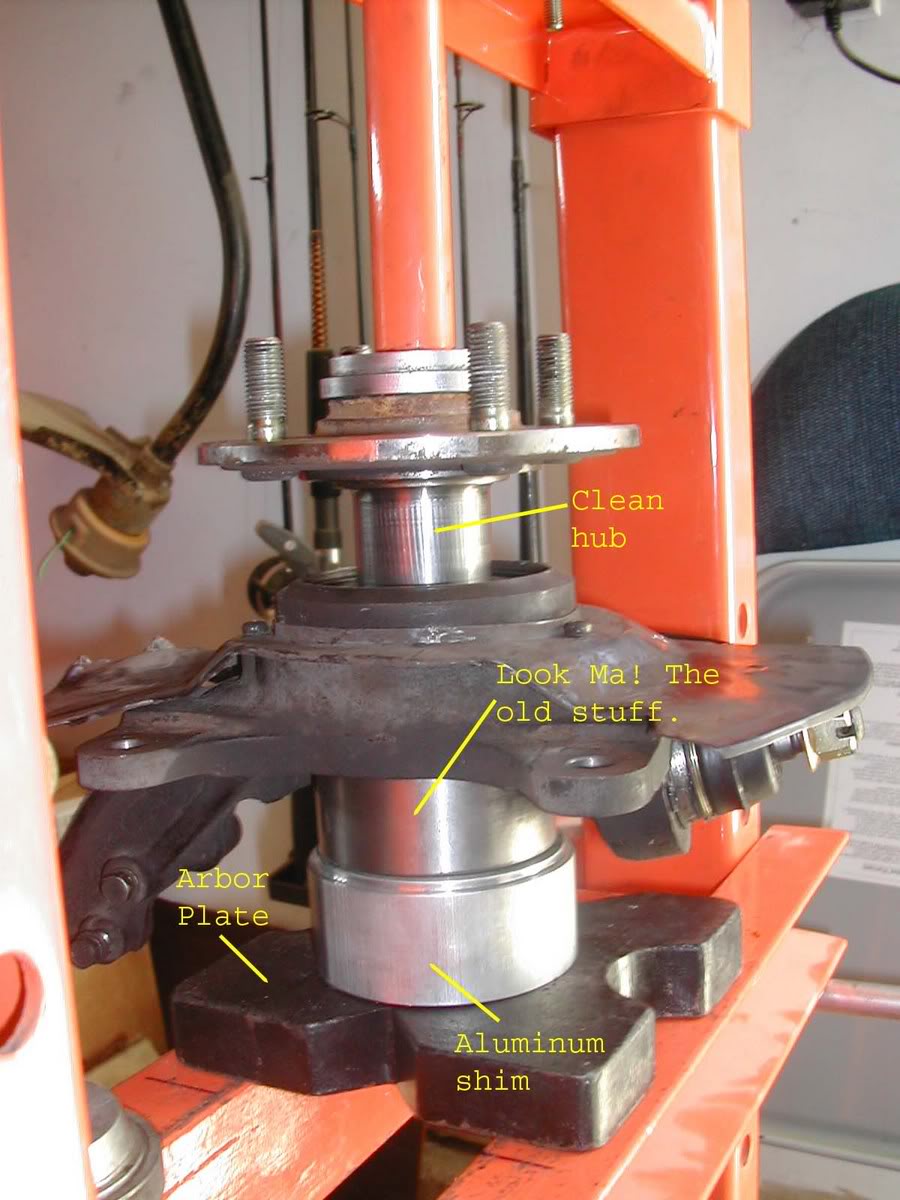
Now the big picture:
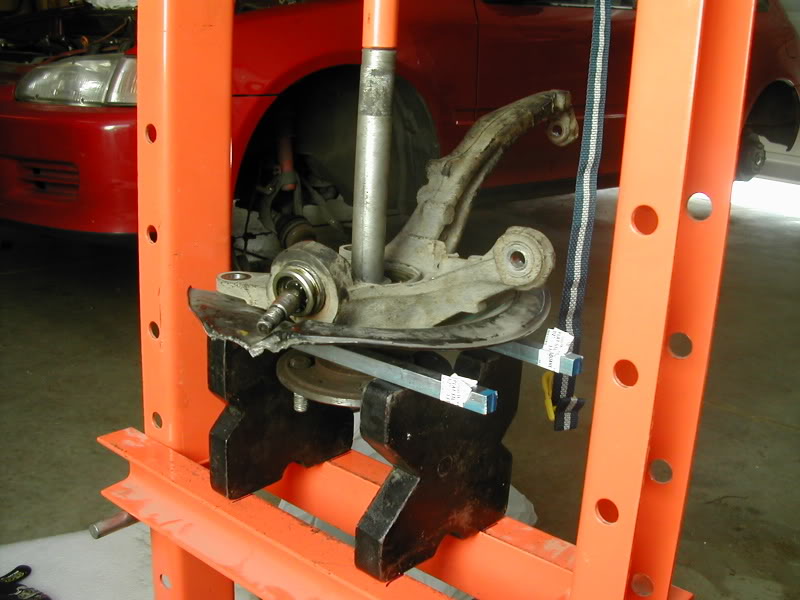
Yet another angle of the driver pushing out the hub:
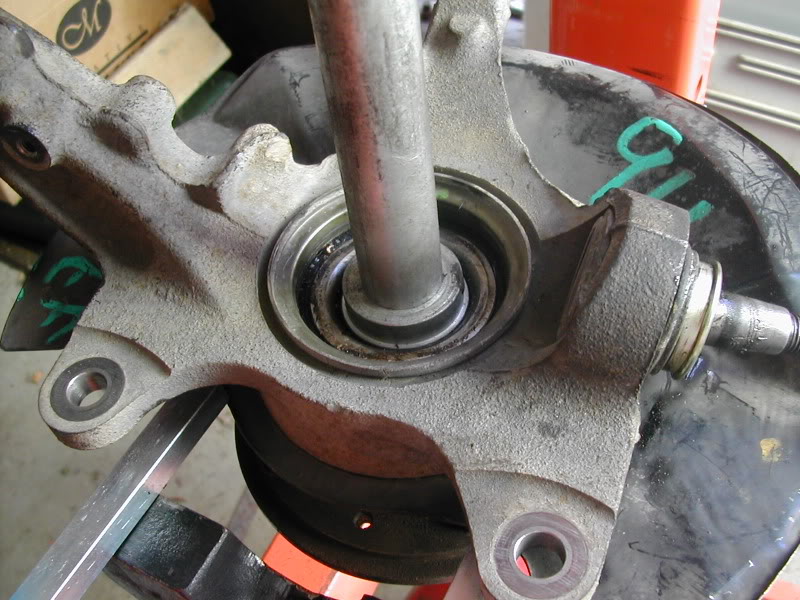
After the hub was pressed out, there was a piece that stayed with the hub:
Using a gear puller and some driver shims, I removed it from the hub. The whole assembly looked like this:
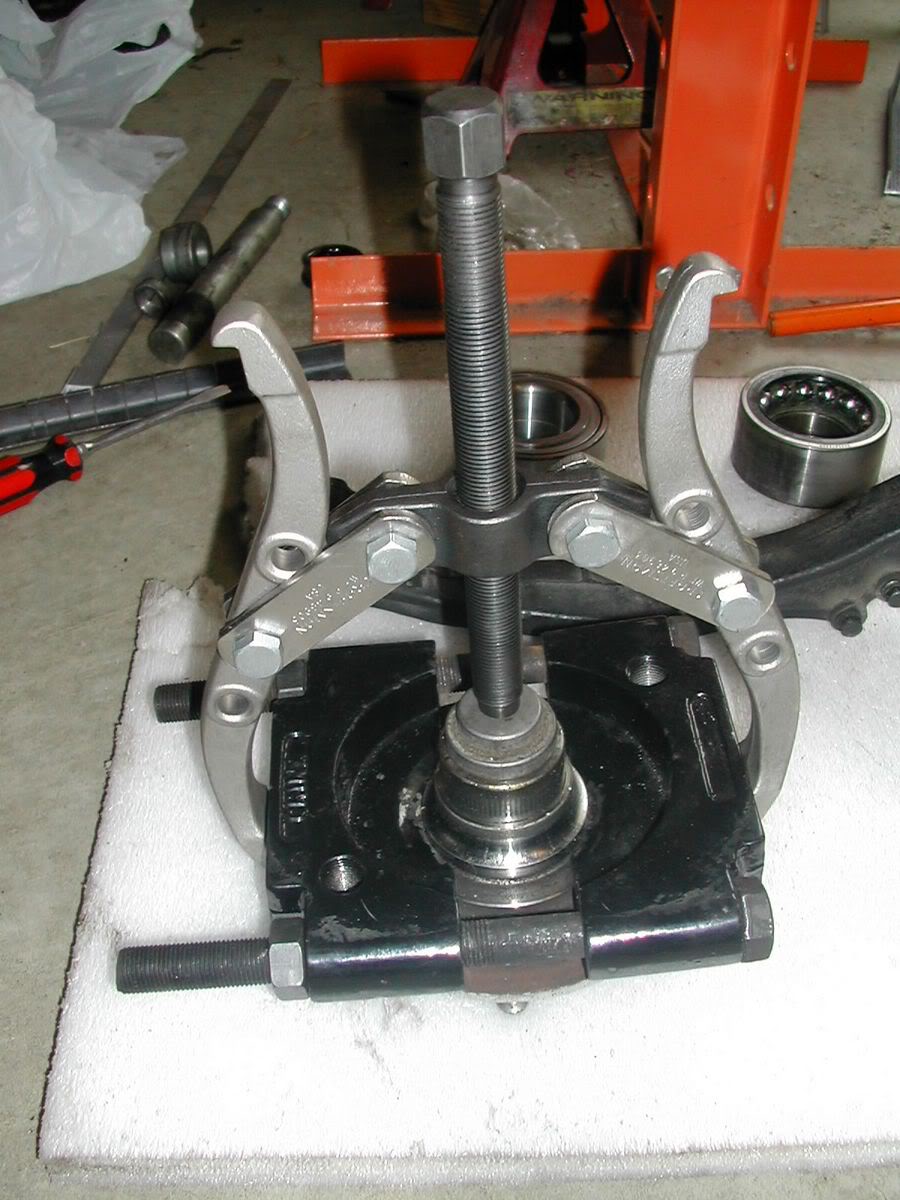
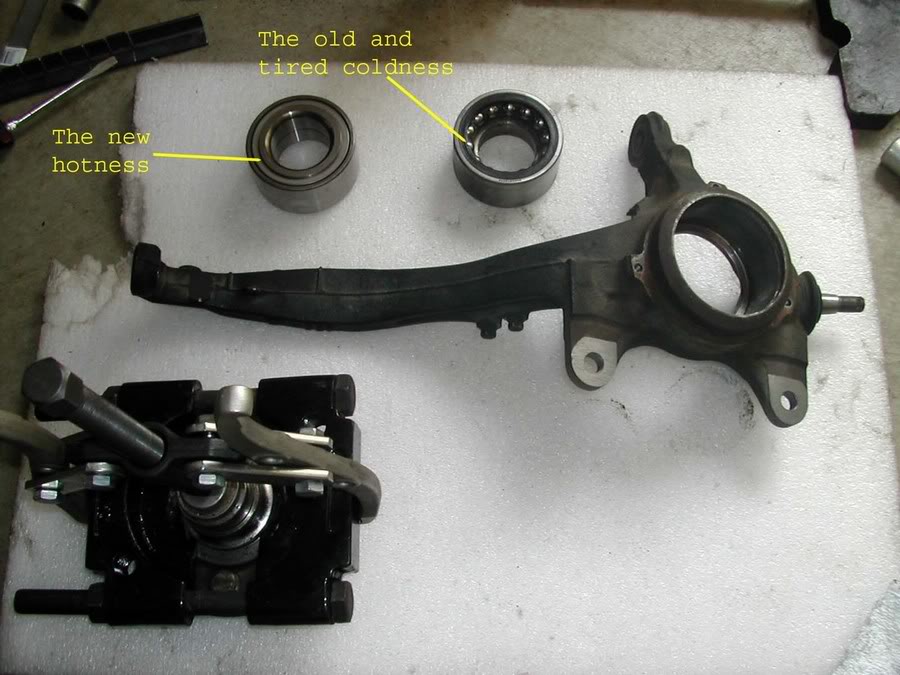
After the hub was cleared of the wheel bearing piece, the parts were laid out as such. Naked spindle and wheel bearings:
I kept the old wheel bearing because I used it as a backing when pressing in the new wheel bearing. Instead of using the tool called out for in the Helms:
SUPPORT BASE Part # 07965-SD90100
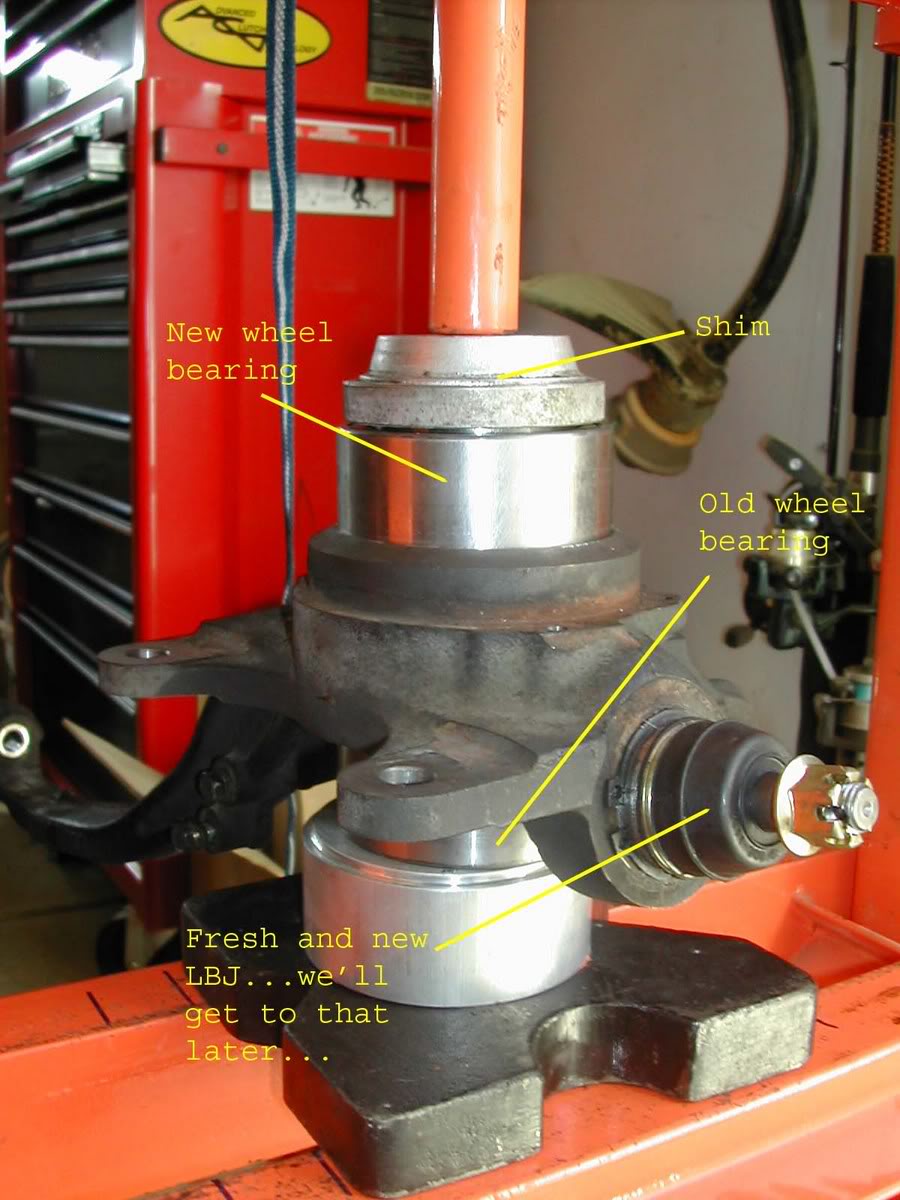
After the wheel bearing was installed, the circlip, splash guard and splash guard screws were installed. Now goes the hub goes in:
Presto ala KAZAM! The wheel bearing is done.
Now for the lower ball joint. For tiiite-ness factor, I’ll call it the LBJ. Both LBJs had the to be replaced due to damaged threads. I purchased the LBJs from Kragen. I was lucky that there were in stock. The person behind the counter told me that they are usually special order parts.
I started looking for a tool to press these out of the spindle as well as press them into the spindle. I came across this tool from Autozone (part # 27023):
The rental cost was $100.00. You get the money back after you return the rental tool. I tried to use this tool to remove the LBJ and I got absolutely no where. After getting quotes to remove the LBJ, I headed over to H-T to see what they had to say. After searching the “hammer” it out idea was beginning to sound good. The only issue with that is how am I going to stop the LBJ from moving on its axis.
After a little amount of profound brain activities in my head, I came up with this:
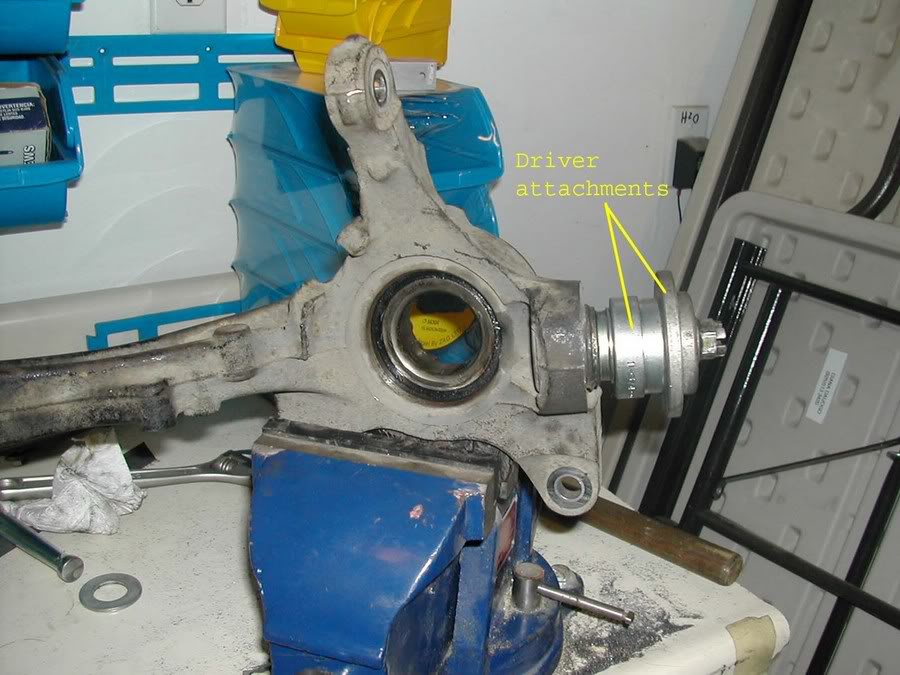
The LBJ has been secured by using an assortment of driver attachments. The attachments were secured to the LBJ using the caster nut.
After securing the LBJ, the BFH came out to play:
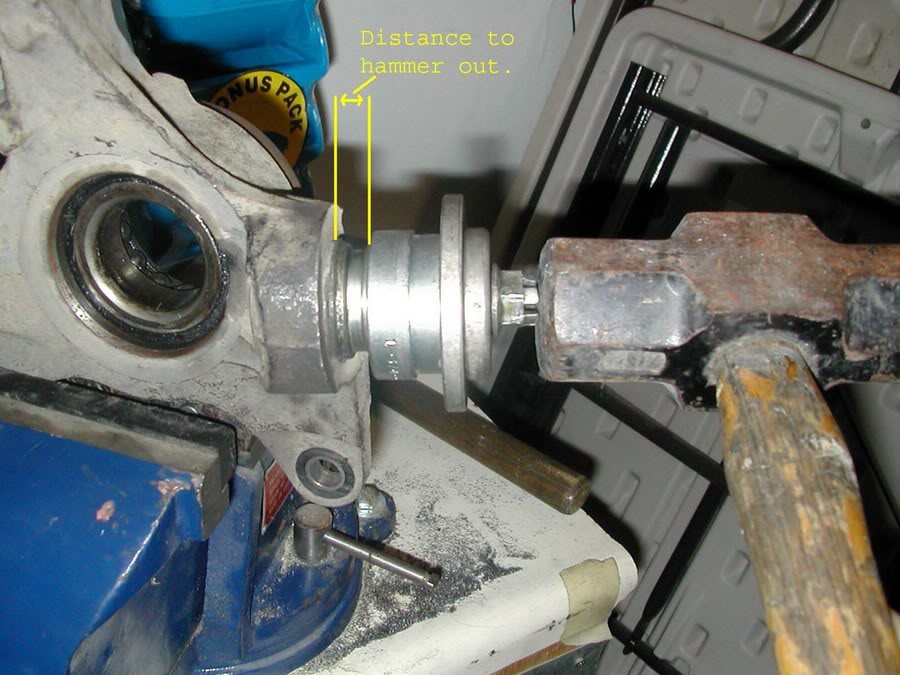
Once the “distance to hammer out” was reached, the LBJ was still in the spindle. Here is where a extra deep 17mm Craftsmen socket comes in handy. Slide the socket over the LBJ and hammer it out . (No pics )
Once the old and defunct LBJ comes out you need to prep the new LBJ so that it can be pressed in. You need to remove the retaining ring (use two needle nose pliers) and remove the boot. Be careful not to tear the rubber boot.
Place the new LBJ into the spindle where the old LBJ was hammered out. Attach the appropriate sleeve from the LBJ press so that the massive c-clamp tool will press evenly:
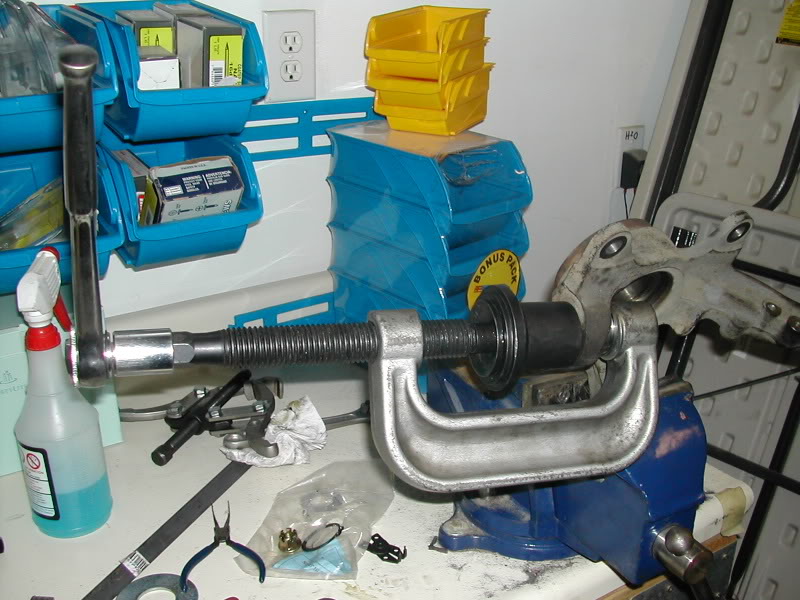
When using the above method, the tool does the job quite nicely. You will have to add a shim over the adapter so that the LBJ is completely pressed into the LBJ. Again, I did not take a picture of the extra shim that I added.
Within minutes, the LBJ was hammered out and pressed in.
M-
“I just get them done at a shop.”
Armed with my Helms, my tools, and the Force, I embarked on an enlightening journey to demystify the LBJ removal/install. As well as see how the wheel bearing removal/install went as well.
Let’s start with the wheel bearing first. The following assumptions are made:
1. Spindle has been removed from the vehicle
2. You have a hydraulic press
3. You have arbor plates
4. You have an assortment of pressing shims
5. Knuckle ring has been removed
6. Circlip has been removed
7. Screws that attached the splash guard from the spindle have been removed
a. Using a small vise grip, I was able to break them free and remove them
The tool called out for in the Helms to shim the spindle against the base is:
HUB DIS/ASSEMBLY BASE – Part # 07GAF-SD40700
When I took this part number to the Acura dealership, they told me that this part did not exist. They looked through their sources and could not find anything that would match up to it. The service rep was very helpful but could not get me this part. After some pondering I decided to go to Orchard Hardware Supply. They carry a lot of metal stock. What I found that worked PERFECTLY was:
PLAT STL-SQUARE by Steel Works
SKU # 1133032
The following is covered in the Acura Helms pages 18-13 through 18-15.
Some close-ups of the bars in action:
Now the big picture:
Yet another angle of the driver pushing out the hub:
After the hub was pressed out, there was a piece that stayed with the hub:
Using a gear puller and some driver shims, I removed it from the hub. The whole assembly looked like this:
After the hub was cleared of the wheel bearing piece, the parts were laid out as such. Naked spindle and wheel bearings:
I kept the old wheel bearing because I used it as a backing when pressing in the new wheel bearing. Instead of using the tool called out for in the Helms:
SUPPORT BASE Part # 07965-SD90100
After the wheel bearing was installed, the circlip, splash guard and splash guard screws were installed. Now goes the hub goes in:
Presto ala KAZAM! The wheel bearing is done.
Now for the lower ball joint. For tiiite-ness factor, I’ll call it the LBJ. Both LBJs had the to be replaced due to damaged threads. I purchased the LBJs from Kragen. I was lucky that there were in stock. The person behind the counter told me that they are usually special order parts.
I started looking for a tool to press these out of the spindle as well as press them into the spindle. I came across this tool from Autozone (part # 27023):
The rental cost was $100.00. You get the money back after you return the rental tool. I tried to use this tool to remove the LBJ and I got absolutely no where. After getting quotes to remove the LBJ, I headed over to H-T to see what they had to say. After searching the “hammer” it out idea was beginning to sound good. The only issue with that is how am I going to stop the LBJ from moving on its axis.
After a little amount of profound brain activities in my head, I came up with this:
The LBJ has been secured by using an assortment of driver attachments. The attachments were secured to the LBJ using the caster nut.
After securing the LBJ, the BFH came out to play:
Once the “distance to hammer out” was reached, the LBJ was still in the spindle. Here is where a extra deep 17mm Craftsmen socket comes in handy. Slide the socket over the LBJ and hammer it out . (No pics )
Once the old and defunct LBJ comes out you need to prep the new LBJ so that it can be pressed in. You need to remove the retaining ring (use two needle nose pliers) and remove the boot. Be careful not to tear the rubber boot.
Place the new LBJ into the spindle where the old LBJ was hammered out. Attach the appropriate sleeve from the LBJ press so that the massive c-clamp tool will press evenly:
When using the above method, the tool does the job quite nicely. You will have to add a shim over the adapter so that the LBJ is completely pressed into the LBJ. Again, I did not take a picture of the extra shim that I added.
Within minutes, the LBJ was hammered out and pressed in.
M-

The following 2 users liked this post by TGO-MD:
03-21-2006, 10:29 AM
#3
Member
Join Date: Mar 2003
Location: Norwalk, IA
Posts: 1,094
Likes: 0
Received 0 Likes
on
0 Posts
Sweet write up I have done all of that before it is fun! Man that is a good idea with the gear puller and driver shims setup after you get the hub pressed out and need to remove the part of the bearing that stays with the hub. Also that looks like almost the same Harbor Freight press I use lol. 
03-21-2006, 04:58 PM
#6
Honda-Tech Member
<TABLE WIDTH="90%" CELLSPACING=0 CELLPADDING=0 ALIGN=CENTER><TR><TD>Quote, originally posted by TGO-MD »</TD></TR><TR><TD CLASS="quote">After searching the usual spots for a lower ball joint replacement write up, I came up empty handed. I needed to replace a wheel bearing and 2 lower ball joints. The more I searched the more I read:
“I just get them done at a shop.”
Armed with my Helms, my tools, and the Force, I embarked on an enlightening journey to demystify the LBJ removal/install. As well as see how the wheel bearing removal/install went as well.
Let’s start with the wheel bearing first. The following assumptions are made:
1. Spindle has been removed from the vehicle
2. You have a hydraulic press</TD></TR></TABLE>
...
STOP READING
Hence, “I just get them done at a shop.”
03-21-2006, 05:02 PM
#7
Join Date: Dec 2005
Location: CA, USA
Posts: 1,245
Likes: 0
Received 0 Likes
on
0 Posts
<TABLE WIDTH="90%" CELLSPACING=0 CELLPADDING=0 ALIGN=CENTER><TR><TD>Quote, originally posted by suspendedHatch »</TD></TR><TR><TD CLASS="quote">...
STOP READING
Hence, “I just get them done at a shop.”</TD></TR></TABLE>
lol precisely
56K = owned on this thread
STOP READING
Hence, “I just get them done at a shop.”</TD></TR></TABLE>
lol precisely
56K = owned on this thread
Trending Topics
03-23-2006, 09:42 AM
#9
You spy correctly. Trout, bass, and deep sea fishing.
Can't beat running 4lb test with a 2lb leader and landing a fiesty one. The sound of the drag being pulled by the fish is almost if not as good as the sound of mad vTAk.
M-
Can't beat running 4lb test with a 2lb leader and landing a fiesty one. The sound of the drag being pulled by the fish is almost if not as good as the sound of mad vTAk.
M-
09-18-2007, 01:21 PM
#10
Join Date: Jan 2007
Posts: 1
Likes: 0
Received 0 Likes
on
0 Posts
Please help ....... I currently have the knuckle off the car and in a press. It is setup identical to TGO-MD's second pic. The problem that I am having is that I can't get the hub to budge, but the two metal support rods are bending like crazy. I bought 1/2" x 1/2" stainless steel 416, Grainger Item #5UE11 and they cost me $20 bucks each. I can't comprehend anything being strong enough to withstand the necessary force to get the hub out. What am I missing? Anyone else have this problem?
 11-30-2007, 07:01 AM
#17
Honda-Tech Member
Join Date: Oct 2004
Location: Bay in CA
Posts: 557
Likes: 0
Received 0 Likes
on
0 Posts
"LBJ has been secured by using an assortment of driver attachments"
What are those driver attachments? and where would I find them? Also what is that adapter you used on the C clamp to press the LBJ back in? Did you do your own UBJ too?
What are those driver attachments? and where would I find them? Also what is that adapter you used on the C clamp to press the LBJ back in? Did you do your own UBJ too?
 02-01-2008, 11:55 AM
#21
Honda-Tech Member
Join Date: Oct 2002
Location: chicago burbs, Il, USA
Posts: 5,150
Likes: 0
Received 23 Likes
on
23 Posts
if you don't have access to a small enough or thin enough gear puller to pull the bearing race, cut a slot in the race with a cut off wheel, place a cold cut chissel in the slot and whack it with a hammer. the race will snap right off.
Takes less than 1/2 the time as the puller.
it was also a great tme to upgrade the wheel studs.
but great write up, reminded me of when I did mine.
Takes less than 1/2 the time as the puller.
it was also a great tme to upgrade the wheel studs.
but great write up, reminded me of when I did mine.
02-01-2008, 06:47 PM
#22
Honda-Tech Member
Join Date: Oct 2002
Location: Sacramento, Ca
Posts: 2,258
Likes: 0
Received 0 Likes
on
0 Posts
<TABLE WIDTH="90%" CELLSPACING=0 CELLPADDING=0 ALIGN=CENTER><TR><TD>Quote, originally posted by akandok »</TD></TR><TR><TD CLASS="quote">I also wanted to know where you get these shims and attachments</TD></TR></TABLE>
 06-14-2008, 07:15 PM
#25
Honda-Tech Member
<TABLE WIDTH="90%" CELLSPACING=0 CELLPADDING=0 ALIGN=CENTER><TR><TD>Quote, originally posted by TGO-MD »</TD></TR><TR><TD CLASS="quote">After the wheel bearing was installed, the circlip, splash guard and splash guard screws were installed</TD></TR></TABLE>
dont forget that circlip!
dont forget that circlip!

