
FAQ Thread by the forum members of Honda-tech
 07-08-2003, 09:59 AM
#1
I said I don't want a title!
Thread Starter

<FONT SIZE="3">Honda-tech readers:
Several members of this forum have setup an FAQ for those who are looking to gain knowledge on the 01-05 Civic (all besides the Si hatchbacks). This is for the 2 door and 4 door Civics from those years.
Please read and don't be afraid to ask any questions. Thanks to .Red.EM2 for getting the ball rolling.
Thanks,
Your 01-05 Civic Mod, Todd00.</FONT>
 04-25-2006, 04:02 PM
#2
Honda-Tech Member
<U><FONT SIZE="3">DIY: Brake Replacement.</FONT></U>
Well, the time has finally come and here I am giving you guys a bit of my mind. Here's a how-to on brake replacement if you don't already know how to do it.
Here's the tools you're going to need:
jack and jack stands, 19mm and 17mm sockets, 3/8 or 1/2 drive ratchet, a c-clamp and SPECIFICALLY a #3 phillips head screwdriver, and a big f'in hammer.
Here's the order in which you perform the swap, assuming you know how to take the tire off with the 19mm socket and a ratchet, preferablly a 1/2 inch drive.
1. When you do this, turn the steering wheel in the opposite direction of the side of the car you're working on, (ie. Working on the right side of the car, turn the wheel to the left.) This allows you to access the 2 17mm bolts that allow you to remove the caliper and bracket assembly.
2. Use a c-clamp and press the caliper piston back into its bore to aid with replacing the caliper to the spindle later on in the process.
3. There are 4 bolts that hold the caliper assembly to the spindle, you want to leave the 2 12mm bolts alone. The only bolts you need to remove to do this are the 17mm bolts that hold the caliper/bracket assembly to the spindle. It just takes more time, and runs the risk of losing bolts if you take the 12mm bolts out. plus you have to take the bracket off for rotor removal. So just remove the whole thing and save time and possible lost parts.
4. So anyways, save yourself the time, and remove the 17mm ones and pull the ENTIRE bracket and caliper assembly off the spindle and hang it on the strut assembly, or hang it by a piece of coat hanger, or strong wire. Avoid twisting the soft rubber hose excessively.
5. Here's where the #3 Phillips headed screwdriver and the B.F.H comes in handy.
The rotor on the 7th Gen's are screwed to the hub, so take the #3 P.H and use the hammer to gently seat the screwdriver into the screw, you will feel when it gets a tight fit. (Hint: Do not miss this step, because i stripped out 2 of my screws by NOT doing this. So there again, save yourself the anger, and do this.)
6. After the screws are removed, gently tap the rotor, and it will come loose from the hub.
7. Spray the new rotor front and back with Brake parts cleaner ($1.59 a can at O'Reilly's) Wait till it dries.
8. Replace the screws to the rotor/hub. Get them finger tight and repeat the step with the hammer to help tighten them down to spec (7.2 lb-Ft, 9.8 Nm) I wound up having to go to the store in the middle of the first side and buy a 3/8ths drive socket with a #3 Phillips Head on it. This helps, as its a bear to get the screws off without a little leverage provided by the ratchet.
9. Replace the pads in the caliper the same way they came out (Wear sensor torward the caliper piston)
10. Pull the caliper/bracket (should still be one piece) down and bolt it back to the spindle assembly with the 17mm bolts and torque to spec. (79.6 lb.Ft, 108 Nm, or 966 in.lb)
11. Give everything one final spray with brake cleaner and replace the wheel and torque to specs (79.6 lb.Ft., 108Nm.)
Congratulations, you have just done one side of your cars brakes. Just repeat the same procedure for the other side, and youll be cruising in no time.
Here is an exploded parts diagram on the brakes for the EM/Es family.

Modified by .Red.EM2 at 2:46 PM 8/28/2006
Well, the time has finally come and here I am giving you guys a bit of my mind. Here's a how-to on brake replacement if you don't already know how to do it.
Here's the tools you're going to need:
jack and jack stands, 19mm and 17mm sockets, 3/8 or 1/2 drive ratchet, a c-clamp and SPECIFICALLY a #3 phillips head screwdriver, and a big f'in hammer.
Here's the order in which you perform the swap, assuming you know how to take the tire off with the 19mm socket and a ratchet, preferablly a 1/2 inch drive.
1. When you do this, turn the steering wheel in the opposite direction of the side of the car you're working on, (ie. Working on the right side of the car, turn the wheel to the left.) This allows you to access the 2 17mm bolts that allow you to remove the caliper and bracket assembly.
2. Use a c-clamp and press the caliper piston back into its bore to aid with replacing the caliper to the spindle later on in the process.
3. There are 4 bolts that hold the caliper assembly to the spindle, you want to leave the 2 12mm bolts alone. The only bolts you need to remove to do this are the 17mm bolts that hold the caliper/bracket assembly to the spindle. It just takes more time, and runs the risk of losing bolts if you take the 12mm bolts out. plus you have to take the bracket off for rotor removal. So just remove the whole thing and save time and possible lost parts.
4. So anyways, save yourself the time, and remove the 17mm ones and pull the ENTIRE bracket and caliper assembly off the spindle and hang it on the strut assembly, or hang it by a piece of coat hanger, or strong wire. Avoid twisting the soft rubber hose excessively.
5. Here's where the #3 Phillips headed screwdriver and the B.F.H comes in handy.
The rotor on the 7th Gen's are screwed to the hub, so take the #3 P.H and use the hammer to gently seat the screwdriver into the screw, you will feel when it gets a tight fit. (Hint: Do not miss this step, because i stripped out 2 of my screws by NOT doing this. So there again, save yourself the anger, and do this.)
6. After the screws are removed, gently tap the rotor, and it will come loose from the hub.
7. Spray the new rotor front and back with Brake parts cleaner ($1.59 a can at O'Reilly's) Wait till it dries.
8. Replace the screws to the rotor/hub. Get them finger tight and repeat the step with the hammer to help tighten them down to spec (7.2 lb-Ft, 9.8 Nm) I wound up having to go to the store in the middle of the first side and buy a 3/8ths drive socket with a #3 Phillips Head on it. This helps, as its a bear to get the screws off without a little leverage provided by the ratchet.
9. Replace the pads in the caliper the same way they came out (Wear sensor torward the caliper piston)
10. Pull the caliper/bracket (should still be one piece) down and bolt it back to the spindle assembly with the 17mm bolts and torque to spec. (79.6 lb.Ft, 108 Nm, or 966 in.lb)
11. Give everything one final spray with brake cleaner and replace the wheel and torque to specs (79.6 lb.Ft., 108Nm.)
Congratulations, you have just done one side of your cars brakes. Just repeat the same procedure for the other side, and youll be cruising in no time.
Here is an exploded parts diagram on the brakes for the EM/Es family.
Modified by .Red.EM2 at 2:46 PM 8/28/2006
05-10-2006, 06:29 AM
#4
Honda-Tech Member
This thread is a place to post ANY Frequently asked Question.
Any time you have something you need to know, like how to's, DIY's, and general topics that get posted in the main all the time, Post them here. Makes it a lot less fustrating.
Any time you have something you need to know, like how to's, DIY's, and general topics that get posted in the main all the time, Post them here. Makes it a lot less fustrating.
05-10-2006, 05:04 PM
#5
Junior Member
Join Date: Mar 2006
Location: Chicago South Subs, IL
Posts: 560
Likes: 0
Received 0 Likes
on
0 Posts
Resetting the Maintenance Required Light
(Ref. Owner's Manual pages 67-68) The maintenance required light in our dash is a reminder to bring the car in for scheduled maintenance (every 10,000 miles). The light will flash after start up for 10 seconds once you are 2000 miles from the car's scheduled maintenance. Once you pass the scheduled maintencance mark (every 10,000 miles) without having the maintenanced performed and/or the light reset by the dealer, it will remain on forever unless reset. To reset it yourself, press and hold down the odometer button as you start your car. Continue holding it for 10 seconds and the light will reset itself. You DO NOT have to take the car in for it to be reset. Scheduled maintenance is like oil/filter changes, belts, etc. Look in your owner's manual (pages 194-198).
(Ref. Owner's Manual pages 67-68) The maintenance required light in our dash is a reminder to bring the car in for scheduled maintenance (every 10,000 miles). The light will flash after start up for 10 seconds once you are 2000 miles from the car's scheduled maintenance. Once you pass the scheduled maintencance mark (every 10,000 miles) without having the maintenanced performed and/or the light reset by the dealer, it will remain on forever unless reset. To reset it yourself, press and hold down the odometer button as you start your car. Continue holding it for 10 seconds and the light will reset itself. You DO NOT have to take the car in for it to be reset. Scheduled maintenance is like oil/filter changes, belts, etc. Look in your owner's manual (pages 194-198).
05-14-2006, 08:47 AM
#6
Junior Member
Join Date: Sep 2005
Location: Camden, North Carolina, United States
Posts: 303
Likes: 0
Received 0 Likes
on
0 Posts
I have a frequently asked question...I'm getting that ever so common popping noise when i turn my wheel ever since i lowered the car...i'm aware of what needs to be done (lining up the arrows or whatever), but i have no idea how to do it...there supposedly was a DIY for this on 7thgen, but the link is dead....a DIY on this would be great if someone is up to it....thanks for any help 
05-20-2006, 10:11 AM
#7
<FONT SIZE="4">DIY: Turn Off Automatic A/C Turn-On</FONT>
What you will need: Two Fingers
Time Needed: 10 seconds.
Annoyed with how you can't turn off the A/C when you turn to defog? Here's the override (realize that A/C expediates the defog process).
These steps are taken from a discussion thread on 2k1civic.com
1. Turn Car Off
2. Turn Temperature **** To Full Blue (All the way to the left - Counter-Clock Wise)
3. Turn Vent **** To Off (All the way to the left - Counter-Clock Wise)
4. Hold Down Air Recirculation Button As Well As A/C Button
5. Keep Both Buttons Depressed and Start Car
6. Keep Both Buttons Depressed for 7 Seconds
7. *AC LIGHT SHOULD BLINK*
You will now have control of your A/C regardless of what setting you are in, to revert back, simply repeat the procedue.
~Credit goes to: Ghosty's Tutorial.
( http://madstatic.com/2k1civic/diy/acdisable/ )
The following users liked this post:
Trending Topics
05-31-2006, 09:33 PM
#9
<FONT SIZE="4">FYI: 7th Gen Civic Chassis Codes</FONT>
Chassis | Motor | Region | Years Made | Model Type
ES1 | 1.7L | USDM/CAD/JDM | All | 4-door DX/LX (JDM Ferio)
ES2 | 1.7L (Vtec) | USDM/CAD/JDM | All | 4-door EX (JDM Ferio)
EM2 | 1.7L | USDM | All | 2-door HX/DX/LX
EM2 | 1.7L (Vtec) | USDM | All | 2-door EX (CAD Si)
EP1 | 1.4L | JDM | All | 3-door
EP2 | 1.6L | JDM | All | 3-door
EP3 | K20A3 | USDM | 2002+ | 3-door Si
EP3 | K20C1 | JDM | All | 3-door Type-R
EU7 | 1.4L | JDM | All | 5-door (Ferio)
EU8 | 1.6L | JDM | All | 5-door (Ferio)
Modified by toyomatt84 at 12:45 AM 6/1/2006
07-11-2006, 05:49 AM
#10
Member
Join Date: Mar 2003
Location: nyc, USA
Posts: 1,444
Likes: 0
Received 0 Likes
on
0 Posts
Does your car have these symptoms?
CEL Code : P1361 Camshaft Position (CMP) Sensor A (Top Dead Center (TDC) Sensor) Intermittent Interruption
(car shakes, then RPM tach drops down to the last bar, if you accelerate the car ONLY goes 10-15mph tops even when floored & it feels as if your car became a 2cyl engine, & if you open your hood the temperature is so hot, even the plastic (fuse covers, stock intake box) feels soft and so hot that you cannot touch it.)
::ATTN:: for those who got their codes scanned at Autozone... please double check the codes when you get back home on the internet... the code they gave me for P1361 on their system was "Ignition Coil malfunction" i saw it for myself. but when you check the H-T's ECU its a whole different ballgame.
it turns out its a very known problem for the 01 & 02 civics, it wasnt a thermostat prob as a couple of member suggested to get that checked, it was a TDC sensor (top dead center) located right behind the timing belt shield. but i did check on the thermostat by doing the upper hose diagnostic.
so in the end if this does happen to your car change it a.s.a.p cause i delayed it and it couldve been fixed with a 70-90$ part... that sensor failure damaged my catalytic converter (used 200$)(new 750$), needed a valve adjustment (90$), 4x coils & 4x plugs (190$) all these parts gets damaged eventually if you drive it for a while. i was stranded more than 2 hrs away from home when it happened to me and that was all it took to ruin all those parts.
incase anyone has the same prob as me, ill post a small write up cause it seems like theres not much write-ups & diy's for this generation civic.
difficulty: 2 of 5
parts: TDC Sensor 70-90$ depending on which dealer, ive called 3 with all different prices. (its made by mitsubishi?)
tools: ratchet with 10mm & a 1in or smaller extension, & a screwdriver
1. remove valve cover 5 10mm bolts, (doesnt have to be fully off just enough for the groove of the shield to be removed.)
2. there is a grommet and a plug to the right side if youre standing in front looking down at the vehicle unplug those.
3. remove 3 10mm screws holding the shield.
4.move power steering reservoir over to the side for easy access.
5. if you fully taken off the valve cover then it shouldnt be difficult to remove the shield. but if you just slightly lifted the right edge like i did, pull shield off while lifting the valve cover & shimmy it around the a/c hoses.
6. once the shields off its 1 more 10mm bolt holding down the tdc sensor, reverse for install and start the car to check for cel's and inspect for leaks if youve damaged/changed the valve cover gasket while removing. voila! cars back to normal
07-11-2006, 02:20 PM
#11
Honda-Tech Member
<FONT SIZE="4">HONDA CHASSIS CODES........</FONT>
List of Honda and Acura CHASSIS codes with their corresponding OEM stock engines. Any body style Honda or Acura from 1988 to 2005 can be found here. Feel free to PM me if I forgot any.
4G (1988-1991)
ED3 1.5L USDM All 4-door DX/LX
ED4 1.6L USDM All 4-door EX
ED6 1.5L USDM All 3-door Standard
ED7 1.6L USDM All 3-door Si
ED8 1.5L USDM All CRX standard / HF
ED9 1.6L USDM All CRX Si
EE2 1.5L USDM All Wagon
EE4 1.6L USDM All Wagon 4WD
EE8 B16A EDM All Civic VTi
EF1 D13B JDM All Civic 3-door/4-door
EF2 D15B JDM All Civic 3-door/4-door
EF3 ZC JDM All Civic Si 3-door/Civic Si Extra 3-door
EF5 ? JDM All Civic 4-door 4wd
EF6 D15B JDM All Civic ? / CR-X
EF7 ZC JDM All Civic ? / CR-X Si
EF8 B16A JDM All CR-X SiR
EF9 B16A JDM All Civic SiR
5G (1992-1995)
EG1 D15B JDM All 3-door/4-door/CR-X
EG1 D15B7 USDM 1993-1995 del Sol S
EG2 B16A JDM All 3-door/4-door/CR-X
EG2 B16A3 USDM 1994-1995 del Sol VTEC (DOHC)
EG3 D13B JDM All 3-door/4-door
EG4 D15B JDM All 3-door/4-door/CR-X
EG5 D16Z6 EDM All 3-door/4-door
EG6 B16A JDM All 3-door/4-door/CR-X
EG7 D13B JDM All 3-door/4-door
EG8 D15B JDM All 3-door/4-door/CR-X
EG8 D15B7 USDM All 4-door DX/LX
EG9 B16A JDM All 3-door/4-door/del Sol CR-X
EH1 ZC JDM All 4-door/4WD
EH2 D15B8/D15Z1/D15B7 USDM All 3-door CX/VX/DX
EH3 D16Z6 USDM 1993-1995 3-door Si
EH6 D16Z6 USDM 1993-1995 del Sol Si
EH9 D16Z6 USDM All 4-door EX
EJ1 D16Z6 USDM All 2-door EX
EJ2 D15Z1 USDM All 2-door DX
6G (1996-2000)
EG1 D16Y7 USDM 1996-1997 del Sol S (SOHC)
EG2 B16A2 USDM 1996-1997 del Sol VTEC (DOHC)
EH6 D16Y8 USDM 1993-1995 del Sol Si (SOHC)
EJ1 D16A JDM All 2-door
EJ3 ? JDM All 2-door / 4WD
EJ6 D16Y7 CANADA All 2-door DX/Si
EJ6 D17A7 CANADA 2000 2-door DX-G/ 3-door CX-G
EJ6 D16Y7 CANADA 1996-1998 3-door CX
EJ6 D16Y7 CANADA 1999-2000 3-door CX/DX
EJ6 D16Y7 CANADA 2000 3-door SE
EJ6 D16Y7 CANADA All 4-door LX/EX
EJ6 D16Y7 USDM All 3-door CX/DX
EJ6 D16Y7 USDM All 4-door DX/LX
EJ6 D16Y7 USDM 1999 4-door DX-V
EJ7 D16Y5 USDM All 2-door HX (VTEC-E)
EJ8 D16Y8 CANADA All 2-door EX
EJ8 D16Y8 USDM All 2-door/4-door EX
EK2 D13B JDM All 3-door/4-door
EK3 D15B JDM All 3-door/4-door
EK4 B16A JDM All 3-door/4-door
EK5 D16A JDM All 4-door 4WD/LEV
EK8 D16A JDM All 4-door 4WD/LEV
EK9 B16B JDM All 3-door Type-R
EM1 B16A2 CANADA 1999-2000 2-door SiR
EM1 B16A2 USDM 1999-2000 2-door Si
7G (2001+)
ES1 D17A1 1.7L USDM All 4-door DX/LX
EM2 D17A1 1.7L USDM All 2-door HX
EM2 D17A2 USDM All 2-door EX
EP1 1.4L JDM All 3-door
EP2 1.6L JDM All 3-door
EP3 K20A3 USDM 2002+ 3-door Si
EP3 K20C1 JDM All 3-door Type-R
EU7 1.4L JDM All 5-door
EU8 1.6L JDM All 5-door
With enough research, (3 weeks worth), I have found these chassis Codes. Feel free to let me know if I forgot anything up to an '05.
Modified by Red_EM2 at 9:01 PM 7/12/2006
Modified by Red_EM2 at 8:20 PM 7/30/2006
Modified by .Red.EM2 at 12:24 AM 8/25/2006
07-12-2006, 12:14 PM
#12
Honda-Tech Member
Note: Engines are noted as VTEC or otherwise, where applicable.
A list of engine codes out of Hondas and Acuras. Any motor you want, you can find what it came out of here, so you can look for that car for the motor.
Please feel free to add to this if it is a real Honda or Acura motor.
Source: http://en.wikipedia.org/wiki/List_of_Honda_engines
<U>Honda/ Acura 4 cyl Engine codes</U>
A-series
86+ A16A1 Accord 1.6 EDM
84-87 A18A1 Prelude USDM
85-89 A20 Accord CARB EDM USDM
86+ A20A1 Accord 2.0 EFI EX EDM USDM
86+ A20A2 Accord 2.0 EFI EX EDM
88-89 A20A3 Accord USDM
86+ A20A4 Accord 2.0 EXi
B-series
1996 1.5 L B15 (Honda City - Asia) SOHC VTEC and SOHC non-VTEC
89-92 B16A Civic SiR JDM
90-93 B16A Integra RSi/XSi JDM
92-95 B16A Civic SiR II JDM
89-92 B16A1 Civic VT EDM
90-91 B16A1 Civic SiR JDM
91-95 B16A2 Civic Vti EDM
99-00 B16A2 Civic Si USDM
94-97 B16A3 Del Sol VTEC USDM
94-97 B16A3 Del Sol Vti-T EDM
94-97 B16A3 Del Sol Vti-T EDM
96-00 B16A4 Civic SiR II JDM
97-01 B16B Civic Type-R JDM
92-93 B17A1 Integra GS-R USDM
90-91 B18A1 Integra GS USDM
92-93 B18A1 Integra GS USDM
94-95 B18B1 Integra USDM
96-00 B18B1 Integra USDM
95-97 B18C Integra GS-R JDM
96-00 B18C Integra Type R JDM
94-00 B18C1 Integra GS-R USDM
95-9 B18C3 Integra Type R JDM
97+ B18C4 Civic 1.8 Vti EDM
97;98;00 B18C5 Integra Type R USDM
96+ B18C6 Integra Type R JDM
96+ B18C7 Integra Type R JDM
87-89 B20 Accord 2.0i EDM
85-87 B20A1 Prelude Fi EDM
86+ B20A1 Prelude 2.0i EDM
87+ B20A2 Accord 2.0i EX EDM
90-91 B20A3 Prelude 2.0 S USDM
88+ B20A4 Prelude 2.0
90-91 B20A5 Prelude 2.0 Si USDM
88-89 B20A5 Prelude Si USDM
87-92 B20A7 Prelude 2.0i EDM
88+ B20A8 Accord 2.0i EDM
87-92 B20A9 Prelude 4WS 2.0i EDM
97-98 B20B CR-V USDM
97+ B20B3 CR-V RD1 EDM
97-98 B20B4 CR-V
B20Z SMX JDM
90-91 B21A1 Prelude Si USDM
D-series
1991 1.4 L D14 (Civic)
84-87 1.5 L D15A2 (CRX) HF
91-99 1.5 L D15B (Civic) VTi VTEC
88-91 1.5 L D15B2 (Civic) DX/LX, (CRX) DX
88-89 1.5 L D15B6 (Civic) HF, (CRX) HF
92-95 1.5 L D15B7 (Civic) DX/LX
92-95 1.5 L D15B8 (Civic) CX
92-95 1.5 L D15Z1 (Civic) VX VTEC-E
86-87 1.6 L D16A1 (Integra) DOHC
88-89 1.6 L D16A3 (Integra) DOHC
88-91 1.6 L D16A6 (Civic) Si, (CRX) Si
88-89 1.6 L D16A8 (Integra) DOHC
88-89 1.6 L D16A9 (Integra) DOHC
96-00 1.6 L D16Y5 (Civic) HX VTEC-E
96-00 1.6 L D16Y7 (Civic) DX/LX/CX
96-00 1.6 L D16Y8 (Civic) EX VTEC
92-95 1.6 L D16Z6 (Civic) EX/Si, Del Sol Si VTEC
01-05 1.7 L D17A1 (Civic) DX/LX
01-05 1.7 L D17A2 (Civic) EX VTEC/VTEC-II
01-05 1.7 L D17A6 (Civic) HX VTEC-E
04-05 1.7 L D17A7 (Civic) GX
E-series
1973 1.2 L EB (Civic)
2000 1.0 L EC (Insight) Hybrid
1975 1.5 L ED (Civic) CVCC
1976 1.6 L EF (Accord)
1980 1.3 L EJ (Civic)
1979 1.8 L EK (Accord/Prelude)
1980 1.5 L EM (Civic) CVCC
1984 1.4-1.5 L EW4 (Civic)
1983 1.8 L ES (Accord/Prelude)
1985 1.8 L ET (Prelude)
1984 1.3 L EV (Civic)
1984 1.5 L EW (Civic/CRX)
F-series
1988 2.0 L F20 (Accord) VTEC
1990 2.2 L F22 (Accord/Prelude/CL) VTEC & Non-VTEC
1998 2.3 L F23 (Accord/CL) VTEC
2000 2.0 L F20C (S2000) VTEC
2003+ 2.2 F22 S2000 VTEC
G-series
1996 2.5 L G25 (TL)
H-series
92-96 H22A Prelude VTEC JDM
94-97 H22A AccordSiR JDM
97-01 H22A PreludeSiR JDM
97-01 H22A PreludeType S JDM
97-01 H22A AccordType R JDM
92-96 H23A1 PreludeSi; SE USDM
93-96 H22A1 PreludeVTEC USDM
97-01 H22A4 Prelude USDM
97-01 H22A4 PreludeSH USDM
97-01 H22A5 Prelude EDM
97-01 H22A7 AccordEuro R EDM
92-96 H23A2 PreludeAccord 2.3i EDM
93+ H23A3 Accord2.3l EDM
J-series
1998 1.6 L J (HR-V)
1998 1.6 L JS (HR-V)
2001 1.6 L JS4 (HR-V) VTEC
K-series
(03+) 01+ K20A Integra TYPE-R; Civic TYPE-R; Accord Euro R JDM
01-04 K20A2 RSX Type S USDM
01+ K20A3 Integra IS JDM
01+ K20A3 RSX Base, Civic Si USDM
03+ K24A Accord; Accord Wagon JDM
03+ K24A2 TSX 200 USDM
(03+) 02+ K24A3 CRV; Element; Accord
05+ K20Z1 RSX Type S USDM
(07+) K23A1 RDX
06+ K20Z3 Civic Si
L-series
2001 1.3 L L13A (Fit/Jazz) - engine marketed as 1.4L in certain regions
2002 1.2 L L12A (Jazz)
2002 1.5 L L15A (Fit/Fit Aria/Airwave/Mobilio)
N-series
04-06 2.2 L N22A1 FR-V (EDM)/Edix (JDM) - diesel i-CTDi (Common Rail Direct Fuel Injection)
R-series
2006 1.8 L R18A1 (Honda Civic) i-VTEC
2006 2.0 L R20 (Honda Stream) i-VTEC
<U>Honda V6 engines</U>
C-series - 90� SOHC/DOHC
1985-1990 2.0 L C20 (Honda Legend)
1983-1988 2.5 L C25 (Legend/Rover 825/Sterling 825L/Sterling SL)
1986-1997 2.7 L C27 (Legend/Accord/Rover 827/Sterling 827L/Sterling SL/Rover Vitesse/Rover Coupe)
1991-2004 3.0 L C30 (NSX/Legend)
1991-2005 3.2 L C32 (Legend/TL/RL/NSX)
1996-2004 3.5 L C35 (RL/Legend)
J-series - 60� SOHC
1999 2.5 L J25 (Inspire/Saber)
1998-2006 3.0 L J30 (Accord/CL/TL)
1999-2006 3.2 L J32 (TL/CL)
1998-2006 3.5 L J35 (OdysseyPilot/Ridgeline//MDX/Acura RL/Saturn VUE)
Modified by Red_EM2 at 1:54 PM 7/25/2006
07-26-2006, 02:45 PM
#13
Honda-Tech Member
These are the paint codes and colors on our EM2's. Enjoy.
NOTE: Not all color codes are USDM colors. Colors known to me as USDM are in BOLD
01-05 EM2 Coupes and ES Sedans
DESCRIPTION_______________________CODE____YEARS
Clover Green Pearl Metallic Clearcoat____G-95P___01-02
Eternal Blue Pearl Clearcoat_____________B-96P___01-04
Euro Yellow Pearl Metallic Clearcoat_____Y-62P___02
Fiji Blue Pearl__________________________B-529P__04
Firepepper Red Pearl Clearcoat___________R-507P__02
Fluorite Silver Metallic_________________-----___04 (Hybrid)
Galapagos Green Metallic Clearcoat_______G-511M__03-04
Inca Pearl Clearcoat_____________________Y-61P___01-02
Magnesium Metallic_______________________NH-675M_04
Milano Red Tricoat/Clearcoat_____________R-81____03
Naples Gold Metallic Clearcoat___________YR-524M_02
Nighthawk Black Pearl Clearcoat__________B-92P___01-04
Noble Green Pearl Clearcoat______________G-508P__02
Opal Silver Blue Metallic Clearcoat______BG-51M__02-04
Radiant Ruby Pearl_______________________-----___02-04
Rallye Red_______________________________R -513___01-04
San Marino Red Clearcoat_________________R-94____02
Satin Silver Metallic Clearcoat__________NH-623M_01-04
Shoreline Mist Metallic__________________YR-528M_03-04
Taffeta White____________________________NH -578__01-04
Titanium Metallic Clearcoat______________YR-525M_01-03
Vivid Blue Pearl Clearcoat_______________B-520P__03-04
Vintage Plum Pearl Clearcoat_____________RP-32P__00-02
Modified by Red_EM2 at 7:07 PM 7/29/2006
08-15-2006, 11:02 AM
#15
Honda-Tech Member
<FONT SIZE="3">DIY: Oil change</FONT>
Here is a little piece of easy maintenance you can do on your own to save some money.
Go to your local auto parts store and buy 4 quarts of your choice synthetic oil, and a Mobil 1 M1-110 Filter or whatever filter you want, other tham Fram, and pay attention. I use all Mobil 1 stuff in my car, just my preference.
<U>Other tools needed: 17mm socet or wrench, MAYBE a oil filter wrench, and a drain pan.</U>
1. Secure the car up on some jackstands or ramps, with the rear tires chocked or otherwise secured.
2. Crawl under the car at the engine end (you'd be suprised how many times this HAS NOT been done).Find the writing on the bottom of the oil pan that says "Engine oil". There will be a plug right there next to the writing. Use a 3/8 drive 17mm socket and ratchet to remove that plug while your drain pan sits underneath ready to catch the outcoming oil.
3. Loosen the oil cap slightly to remove the vacuum from the system, and let it "drain 'til it drips" Then replace the oil plug with a fresh metal gasket if needed.
4. Here's where you have to get on your back again. If you have a lift, lucky you.
Crawl underneath the car, and look up torward the engine bay. The oil filter on the d17a is located above the driver side driveshaft axle.if you find the harmonic collar on the axle, look right above it, and thats the oil filter.
5. Twist it counterclockwise to loosen it, with the drain pan in a location to catch the excess oil coming out of the engine and its filter.
6. I found personally that the easiest way to get at the filter, without making oil have to run down your arm, is to come in under the car from behind the drivers side wheel and go up OVER the halfshaft and remove it that way.
7. When you have done that, take some of the FRESH engine oil you bought, and put some on the rubber gasket on the oil filter for ease ofinstallation and removal later one. Replace the new filter, turning it clockwise onto the mount stud.
8. Before you come up top to put new oil in, Check all connections and everything to prevent leaks. Tighten the Drain plug to 33 lb/ft for US LX and LX SE and DX, and VP. Canadian model DX, REVERB and LX. On the US EX and EX SE, and HX and Canadian Si: 29 lb/ft.
9. Refill the engine with the following amounts of oil: US LX and LX SE and DX, and VP and Canadian DX, REVERB and LX the specs with filter: 3.4 US quarts.
On On the US EX and EX SE, and HX and Canadian Si: It requires 3.7 US Qt.
Start of by just adding a little more than 3 quarts.
10. After doing that, start the car and let IDLE for a few seconds to fill the oil filter, then shut it off. After doing that, pull the dipstick and add oil as needed.
You're done.
08-15-2006, 02:58 PM
#16
Honda-Tech Member
Welcome to Honda-Tech, the best internet source for Honda and Acura information. This is the forum that covers the 2001-2005 Non-Si Honda Civic. We commonly refer to them as the EM2 and ES1, which is the chassis code of the car. EM2 is the coupe, ES1 is the sedan.
If you are reading this, you are probably ready to start a thread that asks a question. Well, hold on a minute, and let us explain something real quick.
If you have a general question, such as:
"How can I get more power from my 01-05 Civic"
"What intake is best for me?"
"What exhausts are available?"
What engine swaps are available?"
"Can I put a B series in my EM2?"
"How do I...." Or anything else that asks opinions on parts, or anything like that.
We have a special section just for you. Its called the FAQ thread. Any thing pertaining to a GENERAL question can usually be answered there. If it can't be, then we have a very special feature called stickies. It is always at the top of the forum for ease of access. Along with the FAQ section, we also have a picture thread, an Engine Swap Thread, a Rim thread, and something to explain how VTEC in our cars works.
Below is a screen shot of what I am talking about.

Also, if your question cannot be answered in the stickies, we have yet ANOTHER feature for you to utilize. It�s called the search feature, and there are 2 types of searches. Quick Search and Full Search.
Let's say you have a question about what kinds of engine swaps are available. If you type in "swap" or "engine" or even "upgrade" in the quick search field, then you will come up with several threads of days gone by that may be able to answer your question.
The search engine isn�t that good right now, but you can still use it. It will be upgraded soon from the word on the street.
The reason of the importance of the search feature is because the regulars here like (Fredis) fventura03, (Matt) and my self, Kevin, along with a couple others, get tired of seeing the SAME THING over and over and over again. If you take the time to search and don�t come up with what you are looking for, post it in a new thread.
<U>Cliff's Notes:</U> If you have a question, search and use the stickies. If you still hanve not found what you are looking for, ask it in a question in the forum in a understandable way.
If you are reading this, you are probably ready to start a thread that asks a question. Well, hold on a minute, and let us explain something real quick.
If you have a general question, such as:
"How can I get more power from my 01-05 Civic"
"What intake is best for me?"
"What exhausts are available?"
What engine swaps are available?"
"Can I put a B series in my EM2?"
"How do I...." Or anything else that asks opinions on parts, or anything like that.
We have a special section just for you. Its called the FAQ thread. Any thing pertaining to a GENERAL question can usually be answered there. If it can't be, then we have a very special feature called stickies. It is always at the top of the forum for ease of access. Along with the FAQ section, we also have a picture thread, an Engine Swap Thread, a Rim thread, and something to explain how VTEC in our cars works.
Below is a screen shot of what I am talking about.
Also, if your question cannot be answered in the stickies, we have yet ANOTHER feature for you to utilize. It�s called the search feature, and there are 2 types of searches. Quick Search and Full Search.
Let's say you have a question about what kinds of engine swaps are available. If you type in "swap" or "engine" or even "upgrade" in the quick search field, then you will come up with several threads of days gone by that may be able to answer your question.
The search engine isn�t that good right now, but you can still use it. It will be upgraded soon from the word on the street.
The reason of the importance of the search feature is because the regulars here like (Fredis) fventura03, (Matt) and my self, Kevin, along with a couple others, get tired of seeing the SAME THING over and over and over again. If you take the time to search and don�t come up with what you are looking for, post it in a new thread.
<U>Cliff's Notes:</U> If you have a question, search and use the stickies. If you still hanve not found what you are looking for, ask it in a question in the forum in a understandable way.
08-16-2006, 11:23 PM
#17
<FONT SIZE="6">FYI: D17 types</FONT>
D17A1 - (Non-Vtec)
∙ Found in: 2001-2005 Honda Civic DX/LX
+ Displacement : 1668 cm�
+ Bore and Stroke : 75 mm X 94.4 mm
+ Compression : 9.5:1
+ Power : 115 hp @ 6100 rpm & 110 ft/lb @ 4500 rpm
+ Valvetrain : SOHC
+ Fuel Control : OBD-2 MPFI
D17A2 - (Vtec)
∙ Found in: 2001-2005 Honda Civic EX
+ Displacement : 1668 cm�
+ Bore and Stroke : 75 mm X 94.4 mm
+ Compression : 9.9:1
+ Power : 127 hp @ 6300 rpm & 114 ft/lb @ 4400 rpm
+ Valvetrain : SOHC VTEC
+ Fuel Control : OBD-2 MPFI
D17A6 - (Vtec-E)
∙ Found in: 2001-2005 Honda Civic HX
+ Displacement : 1668 cm�
+ Bore and Stroke : 75 mm X 94.4 mm
+ Compression : 9.9:1
+ Power : 117 hp @ 6100 rpm & 111 ft/lb @ 4500 rpm
+ Valvetrain : SOHC VTEC-E
+ Fuel Control : OBD-2 MPFI
D17A7 - (Non-Vtec)
∙ Found in: 2004-2005 Honda Civic GX [Uses CNG (Compressed Natural Gas)]
+ Displacement : 1668 cm�
+ Bore and Stroke : 75 mm X 94.4 mm
+ Compression : 12.5:1
+ Power : 100 @ 6100 rpm & 98 ft/lb @ 4000 rpm
+ Valvetrain : SOHC
+ Fuel Control : OBD-2 MPFI
08-21-2006, 09:06 PM
#18
<FONT SIZE="6">FYI: EM2 Badges</FONT>
One of the more common questions is "Where do I get an EM2 badge? Is it JDM/UKDM?". The answer is, NO! The EM2 badges that have been popping up are all sourced from one location. They're cheap to buy.
http://www.youremblem.com/
One of the more common questions is "Where do I get an EM2 badge? Is it JDM/UKDM?". The answer is, NO! The EM2 badges that have been popping up are all sourced from one location. They're cheap to buy.
http://www.youremblem.com/
08-27-2006, 01:08 PM
#19
Honda-Tech Member
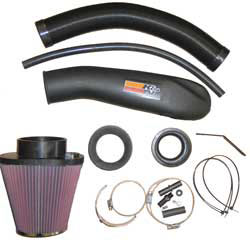
Here is a list compiling all the intakes and exhausts that fit our cars. Feel free to add some as you know they fit our cars.
<U>INJEN INTAKES:</U>
Short Ram IS Series:

Cold Air RD Series:

<U>K&N Intakes:</U>
FIPK System:
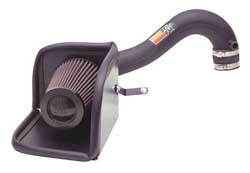
Typhoon SRI:
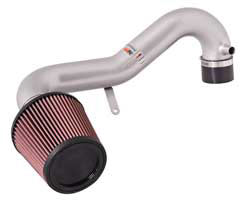
Typhoon CAI:
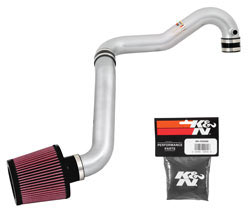
57i SRI:
<U>AEM Intakes:</U>
V2:
AEM SRI and CAI: Could not find model specific piture.

<U>EXHAUST SYSTEMS:</U>
APEXi World sport 2:

GReddy SP2:

GReddy EVO2:

Thermal R&D:

5Zigen Fireball:

APEXi GT Spec:

DCSports SCS:

Espelir JGT500R:

HKS HiPower:

RS*R Ex-Mag

RS*R GT2:

Magnaflow:

Tanabe Super Hyper Medallion:

Tanabe Super Racing Medallion:

Tanabe Concept G:

Skunk2 Mega Power:

Modified by .Red.EM2 at 4:25 PM 8/27/2006
Modified by .Red.EM2 at 4:27 PM 8/27/2006
<U>INJEN INTAKES:</U>
Short Ram IS Series:
Cold Air RD Series:
<U>K&N Intakes:</U>
FIPK System:
Typhoon SRI:
Typhoon CAI:
57i SRI:
<U>AEM Intakes:</U>
V2:
AEM SRI and CAI: Could not find model specific piture.
<U>EXHAUST SYSTEMS:</U>
APEXi World sport 2:
GReddy SP2:
GReddy EVO2:
Thermal R&D:
5Zigen Fireball:
APEXi GT Spec:
DCSports SCS:
Espelir JGT500R:
HKS HiPower:
RS*R Ex-Mag
RS*R GT2:
Magnaflow:
Tanabe Super Hyper Medallion:
Tanabe Super Racing Medallion:
Tanabe Concept G:
Skunk2 Mega Power:
Modified by .Red.EM2 at 4:25 PM 8/27/2006
Modified by .Red.EM2 at 4:27 PM 8/27/2006
08-27-2006, 01:52 PM
#20
Honda-Tech Member
This is a question we awnser almost every day. "What swaps can I do to my civic.
Here is a picture tutorial on engines you can swap out for the unloved d17a1/2.
K20a. JDM ITR 2.0l

K20a2 USDM Civic Si

K20A3, USDM Civic Si, and RSX non-Type S.

K24, Accord, Element, CRV, TSX.
.jpeg)
All of these engines will fit in our cars with little to no modification. All you would need:
Mounts, ECU with harnesses, Transmission, Driveshafts, Shift Linkages (If using 6 speed transmission). And if you have an automatic EM/ES, you will need shift linkages, shifter base, shift lever, clutch master and slave cylinders, clutch cable, clutch pedal.
Anything I may have missed, correct me so I can fix it.
Here is a picture tutorial on engines you can swap out for the unloved d17a1/2.
K20a. JDM ITR 2.0l
K20a2 USDM Civic Si
K20A3, USDM Civic Si, and RSX non-Type S.
K24, Accord, Element, CRV, TSX.
All of these engines will fit in our cars with little to no modification. All you would need:
Mounts, ECU with harnesses, Transmission, Driveshafts, Shift Linkages (If using 6 speed transmission). And if you have an automatic EM/ES, you will need shift linkages, shifter base, shift lever, clutch master and slave cylinders, clutch cable, clutch pedal.
Anything I may have missed, correct me so I can fix it.
09-01-2006, 12:11 AM
#21
Honda-Tech Member
Well, I got home from work about 3:00 p.m. today. And decided to lay down and take a nap. Did not wake up until 2 am. And when I woke up, this was sitting outside my door:

A brand new Neuspeed front upper strut bar from Paul at Dezod Motorsports.
Here is what all it came with

The bar itself, 4 rubber caps, a 6mm nut, and instructions.
<U>Tools needed: </U>
3/8ths drive ratchet, 14mm DEEP WELL socket, and a 10mm socket (for the clutch resivoir re-placement on 01-02 models)
<U>Installation:</U>
Obviously, pop the hood and look at the shock tower. there are 3 bolts, and standing in front of the car, you will need to remove the 2 OUTER MOST bolts on the tower.

Then, test fit the bar, and move the clutch fluid resevoir FORWARD to fit the bar. On the 01-02, you need to UNBOLT the resevoir, and use the supplied 6mm nut to rebolt it to a hole in the fenderwell.
The easiest way I found to get the bar to fit perfectly, was to LOOSEN, not remove, but LOOSEN the other 3rd bolt on the drivers side strut tower and jack the driver side of the car up, taking the weight off the strut. Then the bar will fit without a problem.
After that, bolt everything back down, and torque the strut mount bolts to 36 lb/ft. of Torque.Then, install the black rubber caps that came with the kit for a clean installation.
Finished product:

<U>TEST DRIVE:</U> Took my car down my "relaxation" road, a curvy, hilly street with no traffic inlets, stop lights, or stop signs. Some of the curves are sloping, sweeping, flat, and long.
The bar DOES make a difference in performance. The sloppiness in the front end that I was telling you guys about is virtually gone. The bar tightens the steering response, as well as virtually eliminating nearly all of the slop feeling in the wheel.
Another very easy and quick modification to the suspension that actually makes a difference.
A brand new Neuspeed front upper strut bar from Paul at Dezod Motorsports.
Here is what all it came with
The bar itself, 4 rubber caps, a 6mm nut, and instructions.
<U>Tools needed: </U>
3/8ths drive ratchet, 14mm DEEP WELL socket, and a 10mm socket (for the clutch resivoir re-placement on 01-02 models)
<U>Installation:</U>
Obviously, pop the hood and look at the shock tower. there are 3 bolts, and standing in front of the car, you will need to remove the 2 OUTER MOST bolts on the tower.
Then, test fit the bar, and move the clutch fluid resevoir FORWARD to fit the bar. On the 01-02, you need to UNBOLT the resevoir, and use the supplied 6mm nut to rebolt it to a hole in the fenderwell.
The easiest way I found to get the bar to fit perfectly, was to LOOSEN, not remove, but LOOSEN the other 3rd bolt on the drivers side strut tower and jack the driver side of the car up, taking the weight off the strut. Then the bar will fit without a problem.
After that, bolt everything back down, and torque the strut mount bolts to 36 lb/ft. of Torque.Then, install the black rubber caps that came with the kit for a clean installation.
Finished product:
<U>TEST DRIVE:</U> Took my car down my "relaxation" road, a curvy, hilly street with no traffic inlets, stop lights, or stop signs. Some of the curves are sloping, sweeping, flat, and long.
The bar DOES make a difference in performance. The sloppiness in the front end that I was telling you guys about is virtually gone. The bar tightens the steering response, as well as virtually eliminating nearly all of the slop feeling in the wheel.
Another very easy and quick modification to the suspension that actually makes a difference.
09-03-2006, 08:42 AM
#23
Join Date: Sep 2006
Location: Kissimmee, Florida, USA
Posts: 110
Likes: 0
Received 0 Likes
on
0 Posts
Here is the only COMPLETE FAQ with real info on how to build your d17 the right way.
No short cuts where taked when building this engine, Sleeves whether are needed or not they are there doing their job.
All my parts where research and developed from scratch other than the obious (turbo,block, guard and,,, just it) I didn't purchase any bolt on parts.
The need of notching the D17 was first discovered and done by yours truly the same goes for the ARP studs, fuel system, intakes etc.
Pistons developed specialy for me by Racing Enginering out Florida and they have being already avilable since 2004
NOW THIS ENGINE IS ON A FULL STREET TUNED CAR. This engine is driven almosty every day for the last 2 years with no problems at all.
(exteremely relaiable)
Fully functional with A/C and all the amenities, the motor is done done no excuses here!
I'll be at NOPI 2006 in Atlanta and I'm driving there and back to Florida for anyone that cares to check it out in person.
Well, I read all the stories of engines go bad after turbocharging.
I figured since some of you already bought the turbo kit and had a bad experience with the engine cause of improper installation or to much boost is time to rebuild.
If you are going to all the trouble get it done, then do it right with the proper internals.
I had my engine done in preparation for a turbo and I would like to share my experience with the project.
Project starting date Jan 03
First it will help to get a Honda Factory service manual, it will be your bible when building your engine
You can order one from www.factoryautomanuals.com
Is better to get a motor to work with , keep your original as spare.
Q: Were can I find another motor?
A: By now you may be able to get one at the auto recyclers.
Try your local places or the website http://car-part.com/ there is a lot of places that will have one for sure.
I bought my block and head from a car that blew a head gasket after an accident and ran with it for awhile the insurance paid for a new one.
I got it for $600.00 back in 2003 now you may find them a lot cheaper.
Q: Can I use my own block?
If you didn't have a major malfunction that cracked the block or sleeves you may still use your own motor.
You may have a mechanic take it out of your car or if you have the tools and garage rent an engine hoist and do it your self.
Q: Once I have the block what do I do?
A: Since my stock engine was running fine and I purchase the block I was able to safe money by take in it apart in my garage.
I bought an engine stand for $80.00 an the Honda service manual for $100.00
It was very educational and a lot of fun striping that block bare.
I could do no harm since it was already messed up.
(note) save all the screws, bolts and extra parts you'll need them on the future.
Q:What parts do I need and were do I get them?
A: At the time there was no pistons or sleeves for this block so I hit the web and started calling manufacturers.
I found a place in Lake Worth Florida were they do research and design parts for well known manufacturers.
The place is call Race Engineering Tel: (561) 533- 5500 ask for Jonh if you call him, deffinately tell him I, Hector told you about them and he'll work you a discount also tell him about our 7thgencivic site.
Any way I took the bare block to him with a stock piston.
And they designed a full floating piston and had Wiseco build it.
(Full floating piston are pistons that use a losse connecting pin that attaches them to the rod as opposed to the pressure conecting rods from stock reducing friction,they are a bit noisy and rattle when the engine is cold)
At the time I went for a bigger size piston 76mm (stock 75.02mm)

Piston part # XT- 519P76 Wiseco 76mm 9:01 compression about $450.00
I check my compression at about 95 lbs after installing this pistons
(stock 135- 145 lbs)
Wiseco now makes 75mm pistons (stock size)
Tell them that you are turbocharging and they will recomend the right set of rings and gap clearence.
depending on how much HP and size of turbo you'll be using the type of rings will be suggested.
Heat will expand and contract this rings so gap and type of rings will make a difference if you are racing at the track of just if you just driving day to day
Definately talk to the ppl at Racing Eng. for your application
Sleeves part #DS-300-010 Darton flanged sleeve from a D16- 75mm
I had to bore this babes out to 76mm to fit my oversized pistons.
Skip this step if you are using 75mm pistons.
About $210 a set of 4
Rods where already available CR- BR3740B Crower Billet Honda 1.7 $600.00
The good thing about Racing Engineering is that they will give you all the specs and measurements that you need for the machine shop.
This sure helps if you are not a car guru.
Q: And theeeen?
Take the block and parts to a machine shop and give them the specs that you'll get from Racing Eng. along with the Honda service manual
The block will have to be bored to fit the sleeves about 78mm and the cranck shaft line honed.
Also make sure the shop resurface the top of your block so is nice and flat.
Sleeves pressed in and bore out to fit the size piston you choose 75mm or 76mm and the bottom of sleeves noched to make room for the crower bigger rods to clear ( bigger rods will touch the bottom of the sleeves as they turn up and down,


I found this out the hard way half way into the install.
Q: Now that I have all done how do I put it all together?
A; I deffinately recomend getting a good shop to do the job.
Make sure they are proficient in Hondas and take with you the service manual and ask them to see it carefully and use all the torque recomendations.

I would also purchase a gasket kit and new cranck shaft bearings $160.00
Check the manual book to learn how to order your bearings they come in colors yellow brown green etc.There are numbers on the block and the camsaft as well as on the rods.
The bearings can be any combination of colors and almost unique to your block.VERY IMPORTANT!
I went OEM you may choose after market.
KMS Block Guard if you want one, $40.00 http://www.7thgencivic.com/for...guard
The BG is an insurance agains cathastorphic failure on your internals.
It sort of keeps thing togerher.
It works great on racing cars one 1/4 of mile at the time, but on a daily driver can get the engine overheated on hot days
(there has being issues with Block Guard heating up the head because it obstructs the free flow of water to the head)
So I modifed the BG to flow more water by opening the holes on a side to side configuration as shown below

Also I intalled a huge superthin front pusher fan placed between the intercooler and the A/C core Autozone $50.00
Now you can apply a Nippon head gasket sold at the dealership $40.00.

Follow up with a set of ARP heat studsARP headstuds
ARP part # 2084301 Honda D-16 HSK for 1.6 SHOC vtec application. 10 studs
NOTE: ARP makes two types Z&Y (OURS is Z) about a $100.00

Q: What about the head?

I had the head P&P and valves installed a month later and end up having a shop make an Intake manifold with a big throttle body 75mm

But that will be another FAQ all together.
P&P Head KMS
If I was you I would only have my head cleaned and a 3 angle valve job just to get the thing going again without spending more money.
Can always take the head out later and deal with it like I did.
Before the mechanic installs the engine I ask for a full day with it to polished the block and the head cover


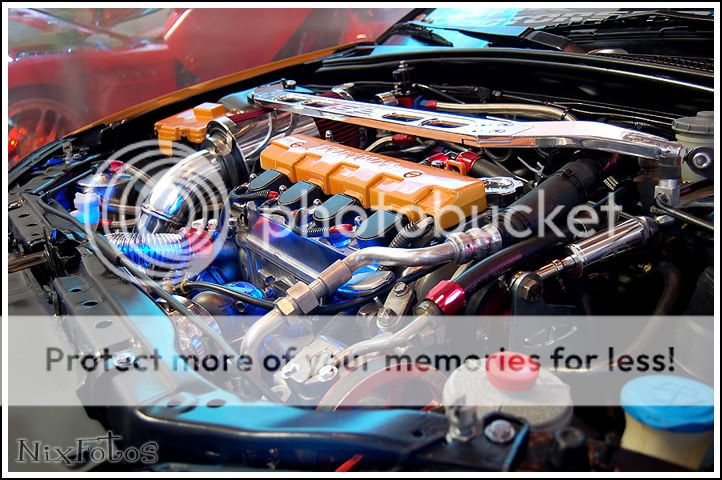
My engine installed looks like this

Just need that turbo now. Sep 04
But I know that engine will take it for sure.
I didn't bother on dyno it cause of the low compresion configuration and would do good numbers.
Price for all the labor varies from shop to shop.
So get quotes before you start doing anything.
A year later here is the turbo June 05


Update July 4-05
I'm working on a better fuel system and with the help of Optos electronics installed by optos I should be doing about 250hp hopefully.
UPDATE JULY 2006 fuel system taking care off, the return line was installed, on the bottom left you'll see a canister that holds a liter of fuel ready available for when boosting at WOT won't dry out your line.
A Walbro 240 intank pump and a Mighty might inline pump is installed on front with a custom made fuel rail with RC 540 injectors and a Aeromotive fuel pressure regulator holding 40 lbs of pressure.

Now Feb 06 after installing an EMS AEM and all the necessary additions like high flow fuel rail, Koyo radiator for cooling I started to dyno it at low 300 whp.


This is the final result on the car.

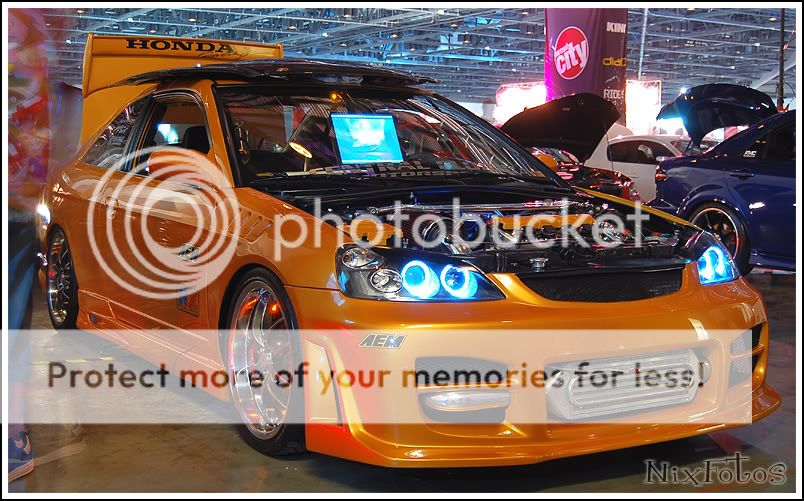

modifing the vic and representing Since 2001
I hope it help I got more info as soon as I can post like a regular member.
It's being a bit frustrating not being able to PM and post like a regular member.
What do I need to do?
Modified by supermex at 9:54 AM 9/3/2006
No short cuts where taked when building this engine, Sleeves whether are needed or not they are there doing their job.
All my parts where research and developed from scratch other than the obious (turbo,block, guard and,,, just it) I didn't purchase any bolt on parts.
The need of notching the D17 was first discovered and done by yours truly the same goes for the ARP studs, fuel system, intakes etc.
Pistons developed specialy for me by Racing Enginering out Florida and they have being already avilable since 2004
NOW THIS ENGINE IS ON A FULL STREET TUNED CAR. This engine is driven almosty every day for the last 2 years with no problems at all.
(exteremely relaiable)
Fully functional with A/C and all the amenities, the motor is done done no excuses here!
I'll be at NOPI 2006 in Atlanta and I'm driving there and back to Florida for anyone that cares to check it out in person.
Well, I read all the stories of engines go bad after turbocharging.
I figured since some of you already bought the turbo kit and had a bad experience with the engine cause of improper installation or to much boost is time to rebuild.
If you are going to all the trouble get it done, then do it right with the proper internals.
I had my engine done in preparation for a turbo and I would like to share my experience with the project.
Project starting date Jan 03
First it will help to get a Honda Factory service manual, it will be your bible when building your engine
You can order one from www.factoryautomanuals.com
Is better to get a motor to work with , keep your original as spare.
Q: Were can I find another motor?
A: By now you may be able to get one at the auto recyclers.
Try your local places or the website http://car-part.com/ there is a lot of places that will have one for sure.
I bought my block and head from a car that blew a head gasket after an accident and ran with it for awhile the insurance paid for a new one.
I got it for $600.00 back in 2003 now you may find them a lot cheaper.
Q: Can I use my own block?
If you didn't have a major malfunction that cracked the block or sleeves you may still use your own motor.
You may have a mechanic take it out of your car or if you have the tools and garage rent an engine hoist and do it your self.
Q: Once I have the block what do I do?
A: Since my stock engine was running fine and I purchase the block I was able to safe money by take in it apart in my garage.
I bought an engine stand for $80.00 an the Honda service manual for $100.00
It was very educational and a lot of fun striping that block bare.
I could do no harm since it was already messed up.
(note) save all the screws, bolts and extra parts you'll need them on the future.
Q:What parts do I need and were do I get them?
A: At the time there was no pistons or sleeves for this block so I hit the web and started calling manufacturers.
I found a place in Lake Worth Florida were they do research and design parts for well known manufacturers.
The place is call Race Engineering Tel: (561) 533- 5500 ask for Jonh if you call him, deffinately tell him I, Hector told you about them and he'll work you a discount also tell him about our 7thgencivic site.
Any way I took the bare block to him with a stock piston.
And they designed a full floating piston and had Wiseco build it.
(Full floating piston are pistons that use a losse connecting pin that attaches them to the rod as opposed to the pressure conecting rods from stock reducing friction,they are a bit noisy and rattle when the engine is cold)
At the time I went for a bigger size piston 76mm (stock 75.02mm)
Piston part # XT- 519P76 Wiseco 76mm 9:01 compression about $450.00
I check my compression at about 95 lbs after installing this pistons
(stock 135- 145 lbs)
Wiseco now makes 75mm pistons (stock size)
Tell them that you are turbocharging and they will recomend the right set of rings and gap clearence.
depending on how much HP and size of turbo you'll be using the type of rings will be suggested.
Heat will expand and contract this rings so gap and type of rings will make a difference if you are racing at the track of just if you just driving day to day
Definately talk to the ppl at Racing Eng. for your application
Sleeves part #DS-300-010 Darton flanged sleeve from a D16- 75mm
I had to bore this babes out to 76mm to fit my oversized pistons.
Skip this step if you are using 75mm pistons.
About $210 a set of 4
Rods where already available CR- BR3740B Crower Billet Honda 1.7 $600.00
The good thing about Racing Engineering is that they will give you all the specs and measurements that you need for the machine shop.
This sure helps if you are not a car guru.
Q: And theeeen?
Take the block and parts to a machine shop and give them the specs that you'll get from Racing Eng. along with the Honda service manual
The block will have to be bored to fit the sleeves about 78mm and the cranck shaft line honed.
Also make sure the shop resurface the top of your block so is nice and flat.
Sleeves pressed in and bore out to fit the size piston you choose 75mm or 76mm and the bottom of sleeves noched to make room for the crower bigger rods to clear ( bigger rods will touch the bottom of the sleeves as they turn up and down,
I found this out the hard way half way into the install.
Q: Now that I have all done how do I put it all together?
A; I deffinately recomend getting a good shop to do the job.
Make sure they are proficient in Hondas and take with you the service manual and ask them to see it carefully and use all the torque recomendations.
I would also purchase a gasket kit and new cranck shaft bearings $160.00
Check the manual book to learn how to order your bearings they come in colors yellow brown green etc.There are numbers on the block and the camsaft as well as on the rods.
The bearings can be any combination of colors and almost unique to your block.VERY IMPORTANT!
I went OEM you may choose after market.
KMS Block Guard if you want one, $40.00 http://www.7thgencivic.com/for...guard
The BG is an insurance agains cathastorphic failure on your internals.
It sort of keeps thing togerher.
It works great on racing cars one 1/4 of mile at the time, but on a daily driver can get the engine overheated on hot days
(there has being issues with Block Guard heating up the head because it obstructs the free flow of water to the head)
So I modifed the BG to flow more water by opening the holes on a side to side configuration as shown below
Also I intalled a huge superthin front pusher fan placed between the intercooler and the A/C core Autozone $50.00
Now you can apply a Nippon head gasket sold at the dealership $40.00.
Follow up with a set of ARP heat studsARP headstuds
ARP part # 2084301 Honda D-16 HSK for 1.6 SHOC vtec application. 10 studs
NOTE: ARP makes two types Z&Y (OURS is Z) about a $100.00
Q: What about the head?
I had the head P&P and valves installed a month later and end up having a shop make an Intake manifold with a big throttle body 75mm
But that will be another FAQ all together.
P&P Head KMS
If I was you I would only have my head cleaned and a 3 angle valve job just to get the thing going again without spending more money.
Can always take the head out later and deal with it like I did.
Before the mechanic installs the engine I ask for a full day with it to polished the block and the head cover
My engine installed looks like this
Just need that turbo now. Sep 04
But I know that engine will take it for sure.
I didn't bother on dyno it cause of the low compresion configuration and would do good numbers.
Price for all the labor varies from shop to shop.
So get quotes before you start doing anything.
A year later here is the turbo June 05
Update July 4-05
I'm working on a better fuel system and with the help of Optos electronics installed by optos I should be doing about 250hp hopefully.
UPDATE JULY 2006 fuel system taking care off, the return line was installed, on the bottom left you'll see a canister that holds a liter of fuel ready available for when boosting at WOT won't dry out your line.
A Walbro 240 intank pump and a Mighty might inline pump is installed on front with a custom made fuel rail with RC 540 injectors and a Aeromotive fuel pressure regulator holding 40 lbs of pressure.
Now Feb 06 after installing an EMS AEM and all the necessary additions like high flow fuel rail, Koyo radiator for cooling I started to dyno it at low 300 whp.
This is the final result on the car.
modifing the vic and representing Since 2001
I hope it help I got more info as soon as I can post like a regular member.
It's being a bit frustrating not being able to PM and post like a regular member.
What do I need to do?
Modified by supermex at 9:54 AM 9/3/2006
09-03-2006, 10:11 AM
#24
Grace Under Pressure
Join Date: May 2006
Location: The Fugitive Motel
Posts: 2,519
Likes: 0
Received 0 Likes
on
0 Posts
Mad props to you and your engine build dude. I guess someone's gotta do it first!
I know you've been flamed for your exterior mods, but it's clear its also a show car...
Love all the work thats gone into the motor build
I know you've been flamed for your exterior mods, but it's clear its also a show car...
Love all the work thats gone into the motor build
09-03-2006, 05:49 PM
#25
Join Date: Sep 2006
Location: Kissimmee, Florida, USA
Posts: 110
Likes: 0
Received 0 Likes
on
0 Posts
I get it all the time just don't take it seriously, to each it's own.
The car was a show car first, it was feature on Honda tuning and on TV couple of times and little by little is turning into a race car.
I like the JDM styles but frankly is kindda of lazy to me.
Only put a few bolt on things and there you go you have a JDM.
I would be impress if they make JDM's with the right side steering wheel, and a turbo or K series engine now that will be something
But like I said to each it's own, I;m not hating or flaming I actualy like some of the carts I seen here nice and clean.
Peace