
1998-2002 Honda Accord Ignition Switch Replacement
 07-27-2008, 11:00 PM
#1
Honda-Tech Member
Thread Starter

Join Date: Jul 2008
Location: SLO, CA
Posts: 16
Likes: 0
Received 0 Likes
on
0 Posts
***
I migrated this repair guide over to iFixit, where I've re-written it with a bit more detail and uploaded higher resolution pictures (click on each picture to view it at 1600x1200). I left the original post as-is.
Check it out here: http://www.ifixit.com/Guide/Repair/I...-Switch/3285/1
Thank you to all who posted kind words in this thread. I'm very glad I was able to help you out!
***
Hi guys,
This is my first post. I definitely utilized this forum as a source of information (and inspiration) in the past, and so I wanted to contribute to the general collective knowledge contained over here.
In the past couple of months my 1998 Honda Accord Dx started shutting itself off at random times -- on freeway onramps, while parked and idling, etc. -- so I did some research and found that the electrical portion of the ignition switch had been recalled. I called up Honda of America and found that my car had already been serviced for this recall, meaning I was on my own to fix this problem.
So I did some more research on the internet to verify that the ignition switch was indeed the problem. At that point I had two choices: I could pay the dealer $100 for them to figure out the problem, and *possibly* honor the recall a second time(provided they found the problem in the first place). Or I could buy the part for $61 and do the repair myself. I chose the latter since I really want to learn about cars as much as possible, and I will be assured that the job was done properly (or at least learn from my mistakes
 ).
).So without further ado, here's how to fix the ignition switch on a '98-'02 Accord...
DISCLAIMER: This posting is for educational purposes only, and I take no responsibility for your actions. You can't blame me if your car blows up or if your airbag deploys, or for any other reason whatsoever. Perform this repair at your own risk

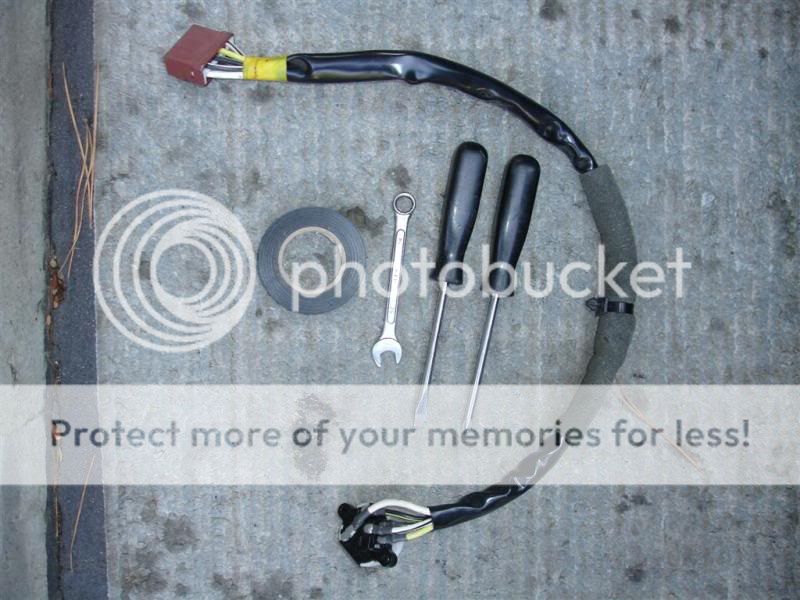
The tools and materials you will need:
1. 10mm wrench
2. Phillips head screwdriver
3. Flat-blade screwdriver
4. Electrical tape
5. Honda Accord electrical portion of the ignition switch
6. Multimeter for continuity testing (not pictured)
1. Disconnect the battery. This is especially important because you're going to be working near the airbag. Do not touch any yellow wires under the dash -- they're for the airbag (or so I've heard). As you can see, I keep my battery in tip-top shape. The grime acts as a blanket layer of protection against the elements

2. Remove the driver's side fuse panel cover.
 \\
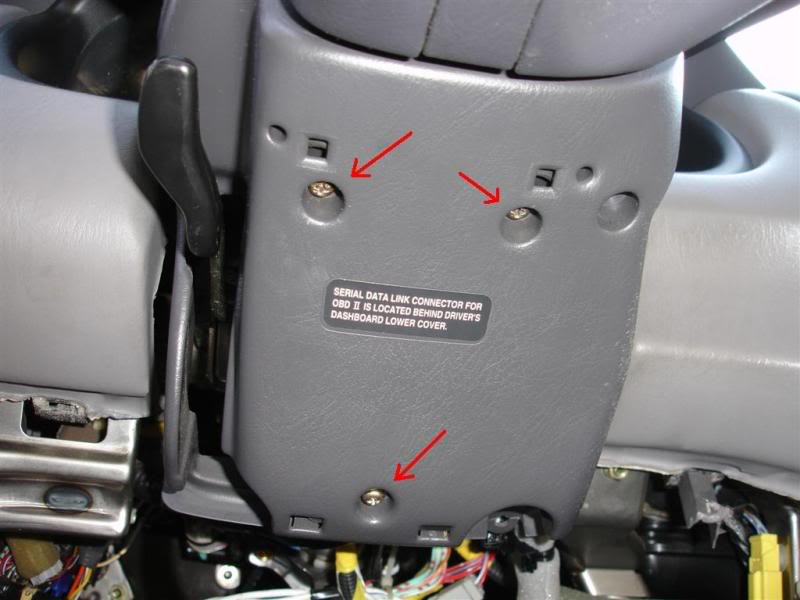
\\3. Remove the two retaining screws that hold the driver's side lower panel.


4. Remove the last retaining screw that's located under the radio.

5. Now the driver's side lower panel can be removed. Begin on the left side and gently pull it off, so that all of the retaining clips are released.


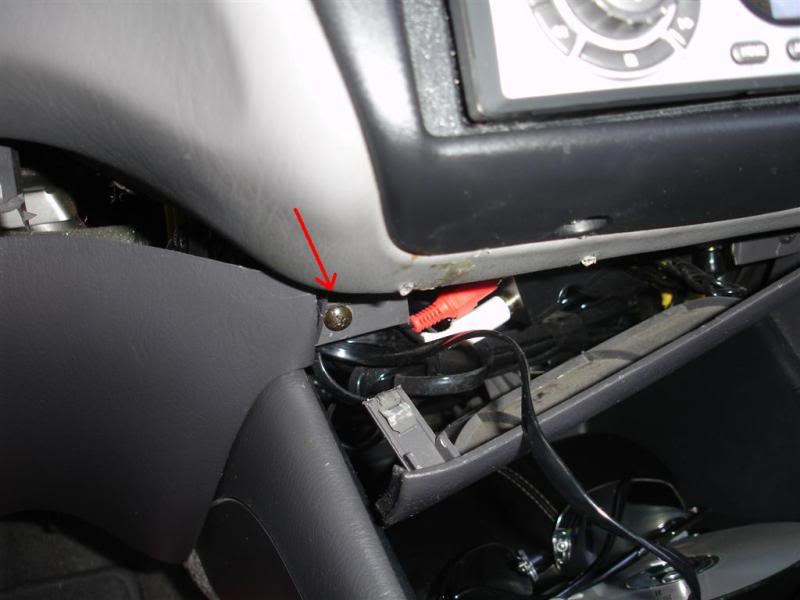
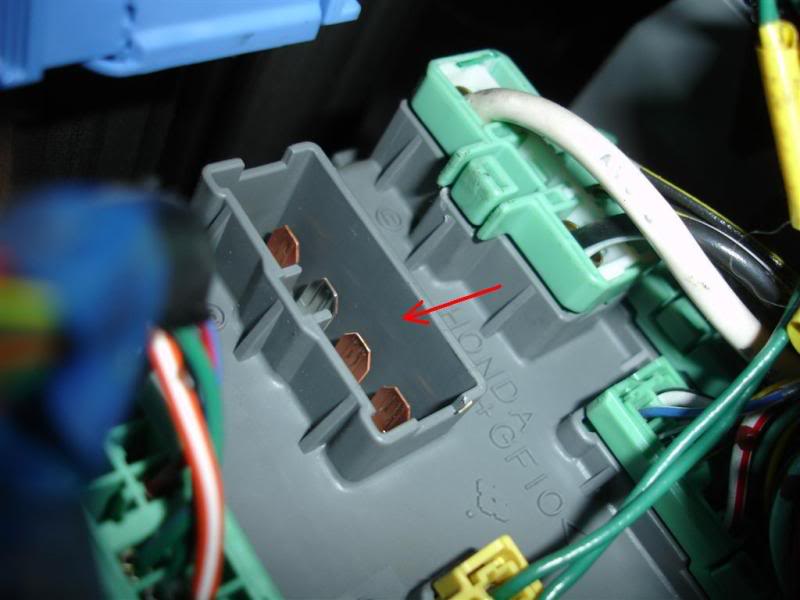
6. The ignition switch can now be unplugged for testing. The switch connects to the rear of the driver's side fuse panel. Shine a flashlight and find the following connector:

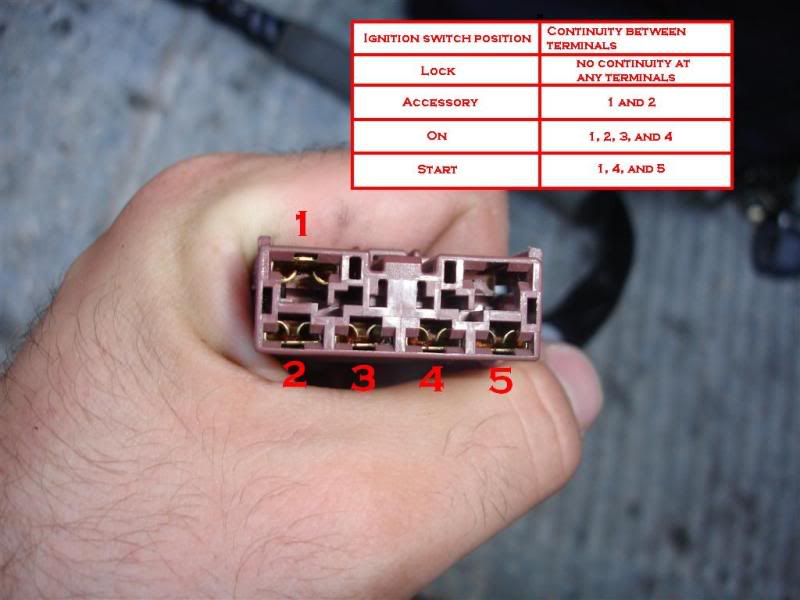
7. Now it's testing time. Use the pictures below as guidance to see if the switch is defective. The key should be placed into the ignition switch and turned to the appropriate position; then continuity should be tested between each of the points as outlined in the guide. I posted a few sample readings for general guidance.
I do want to mention that this testing should be performed as thoroughly as possible, since the switch may appear to be fine at first. I got lucky in the sense that the switch immediately failed one of the tests. The best way to test the switch is to plug in the multimeter leads into the 1 and 4 terminals, and then to cycle between "On" and "Start". Eventually the multimeter should read "no continuity" in the "On" position, indicating that the switch is bad.


8. Of course proceed at this point only if the switch failed one of the continuity tests. Also make sure that the ignition switch is in the "Lock" position before proceeding any further.
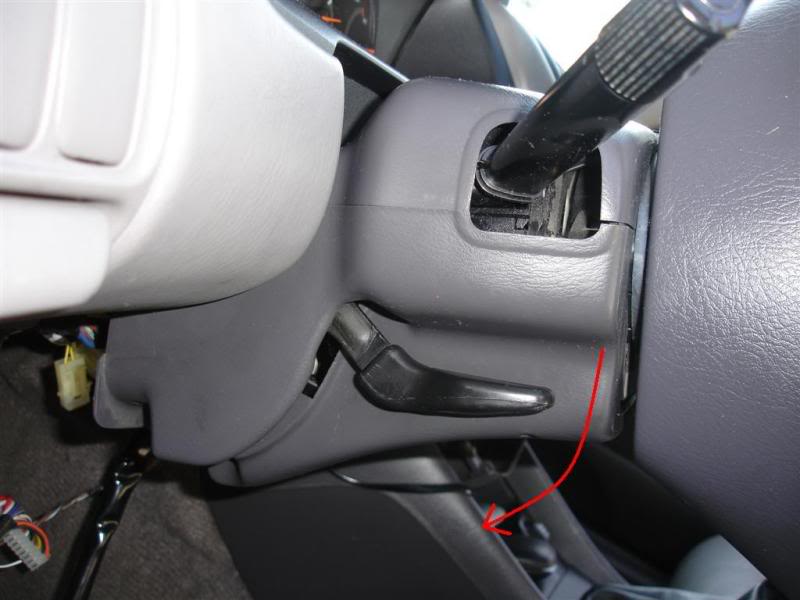
Lower the steering wheel adjustment lever all the way down, and then remove the three screws on the lower steering rack cover. Pop the lower cover off the top cover, giving you access to the electrical portion of the ignition switch.
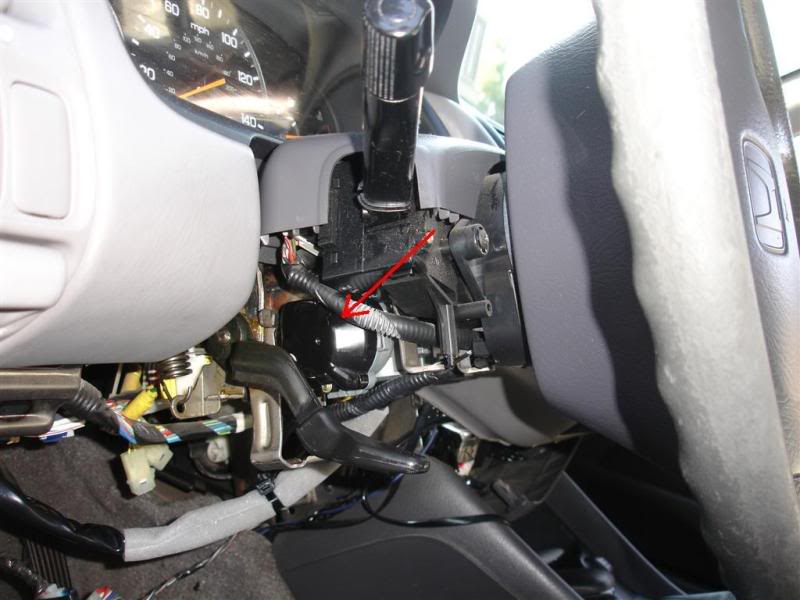
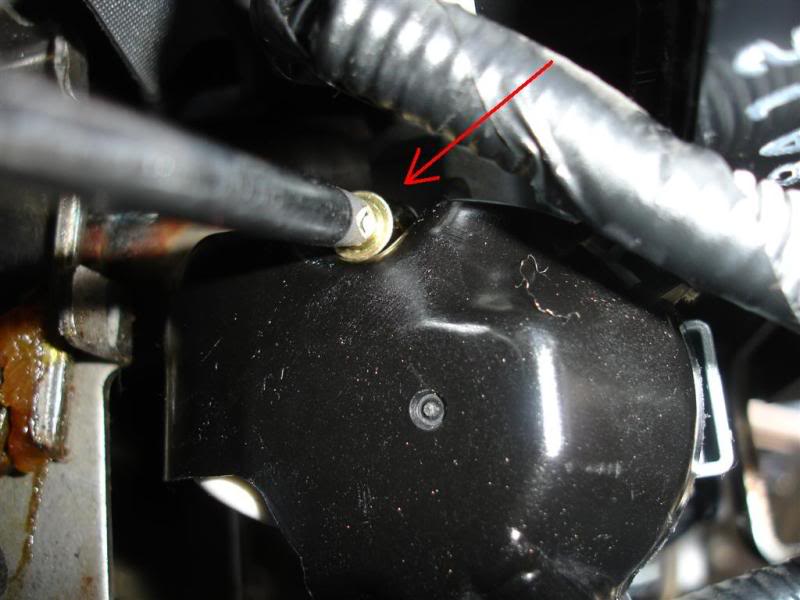
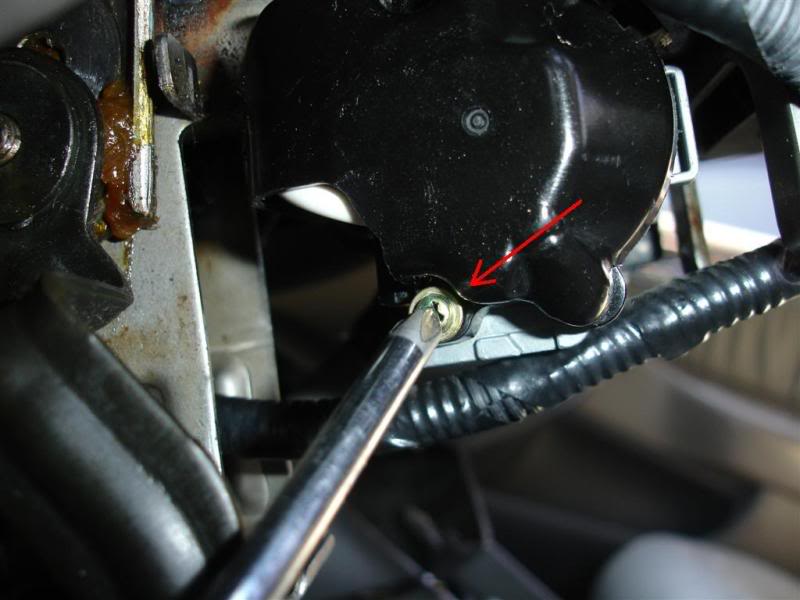
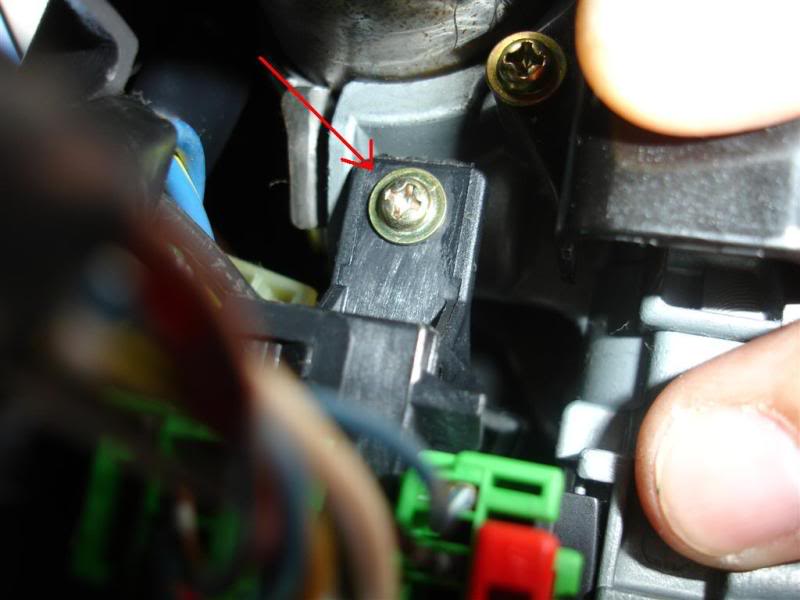
9. The electrical portion of the ignition switch can now be removed. Unscrew the two screws that hold the ignition switch cover (and switch itself) in place. The cover should be loose on the swtich, however there is another screw holding it in place behind the steering wheel. I found this screw by feeling around for it after realizing the cover is still being held in place by something. It was not necessary to remove this screw to replace the switch, so I'll leave it up to you whether or not you want to remove it. The screw is in such a pain in the *** place that I figured it would be harder to screw it back in place after removing it than just bending the ignition switch cover backwards and removing the switch.

While in at general area, make sure not to touch the steering column adjustment grease. I found it to be very greasy, as grease should be


10. At this point you can test the new switch for continuity, just to make sure it's 100% functional before putting it into the car. Follow the same steps outlined in step #7 except use the flat blade screwdriver to switch between ignition positions. You'll notice that the switch clicks just like it does when you insert your key into the steering column ignition. If the continuity tests pass, you can proceed with installing it into your car.
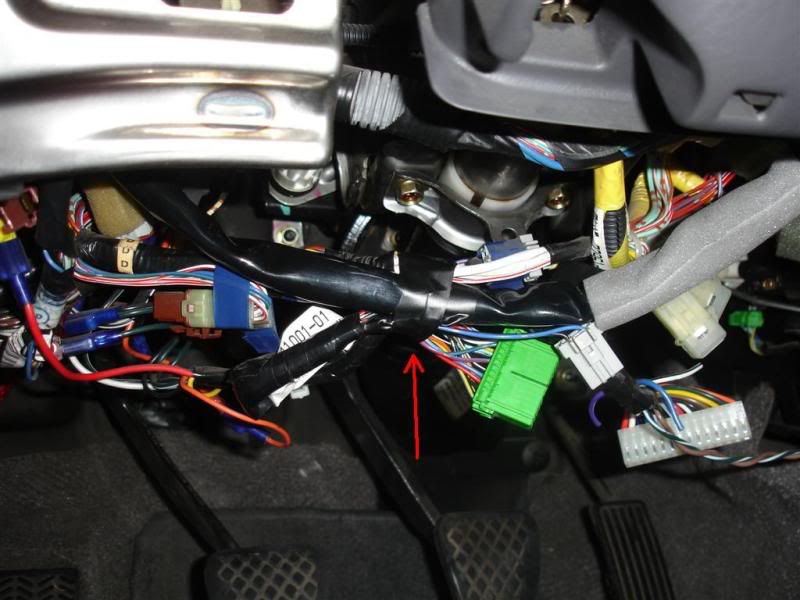
Once you remove the old switch from its cover, plug in the new switch connector into the rear of the fuse panel and connect the other side to the steering column.
*Make sure* that the new switch is in the "Lock" position. To make sure it is in the "Lock" position, use the flat blade screwdriver to gently twist the switch counter-clockwise until it will twist no more, ensuring that the switch is in the "Lock" position.
Route the wiring in the same manner the old switch wiring was routed, insert the switch into the steering column, and put back the ignition switch cover and screws.
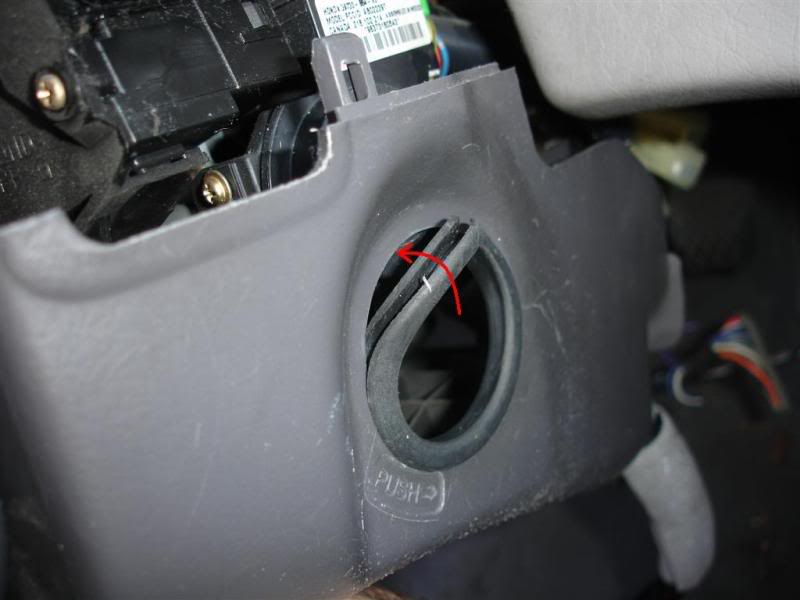
11. Use the electrical tape to corral any of the loose wiring. Put all paneling back the way it was by following the above directions in reverse. Make sure that the rubber O-ring around the ignition switch is properly seated against the switch when putting back the lower steering wheel cover.
The whole ordeal took me about 2 hours, start to finish. I had the most trouble with the third ignition switch screw and the ignition switch cover. The cover was a pain in the *** to displace enough to remove the old ignition switch. Aside from that, everything else was pretty straightforward, even though I didn't have directions like these to guide me. Hopefully some of you guys can save some cash by doing this yourselves instead of playing the guessing game with what's going to happen with the dealer. Of course you can go through all this trouble and find out it's not the switch causing you troubles.
I've been driving the car for about 3-4 days without a single mishap. Usually the car would turn off at least once a day so I'm giving it a clean bill of health as of today. I'll update this posting should any future mishaps develop.
It was a really great learning experience, especially because I also came to the startling realization of how easy it is to "hot-wire" a Honda.

Enjoy!
Modified by Mad Medicine at 12:05 AM 7/28/2008
Modified by Mad Medicine at 12:13 AM 7/28/2008
Modified by Mad Medicine at 10:36 PM 8/18/2008
Last edited by Mad Medicine; 07-13-2010 at 10:00 AM.
 08-03-2008, 09:57 AM
#3
Honda-Tech Member
Thread Starter
Join Date: Jul 2008
Location: SLO, CA
Posts: 16
Likes: 0
Received 0 Likes
on
0 Posts
Hey thanks for the kind words. I'm hoping the tutorial helps the people that have the same problem. If I do any future repairs/modifications to the car, I'll make sure to post them here
08-22-2008, 09:14 PM
#4
Honda-Tech Member
Thread Starter
Join Date: Jul 2008
Location: SLO, CA
Posts: 16
Likes: 0
Received 0 Likes
on
0 Posts
How come this thread is [Archived]? Does that mean it's not viewable to the general public?
09-26-2008, 11:44 AM
#5
Join Date: Sep 2008
Location: PITTSBURGH, PA, ALLEGHENY
Posts: 1
Likes: 0
Received 0 Likes
on
0 Posts
Mad Medicine..first of all great post! I do have one question that you didn't cover. With your digital multimeter what did you set it too? I assume Ohms but if so was it 2K, 200k, or something else?? I bought one from Radio Shack and it has like 8 different ohm settings.
Thanks!
Thanks!
10-12-2008, 01:40 PM
#6
Honda-Tech Member
Thread Starter
Join Date: Jul 2008
Location: SLO, CA
Posts: 16
Likes: 0
Received 0 Likes
on
0 Posts
Sorry for the late reply RJ, I didn't get notified that someone posted on the forum...
To answer your question, I set the multimeter to the lowest Ohm setting. I don't have the multimeter in front of me, so I can't be specific as to what value that is, but I do know for sure it should be the lowest. Depending on the multimeter features, you can also set it to the "continuity check" should the multimeter have that option. I have a $4 Harbor Freight multimeter, and needless to say it doesn't have a continuity check feature
In a "perfect" system there should be no resistance between the multimeter leads if they are connected together -- 0 Ohms. The wire itself provides some resistance, hence you see the 0.03 Ohm reading when the path between leads is connected. However, the multimeter jumps to 1 when the path between multimeter leads is disconnected, indicating that there is no continuity in the wires.
And by the way, I've been driving the car now for almost two months with no shut-offs. I'm happy that this problem is gone -- I didn't like my car shutting off as I was entereing a busy freeway...
12-14-2008, 11:10 AM
#7
Junior Member

Join Date: Dec 2008
Posts: 1
Likes: 0
Received 0 Likes
on
0 Posts
Great job and thanks!
I performed this job 2 years ago and at that time, I could not find out any thing really helpful. It was a very hard chore for me.
This is a great post and I'm going to print it out and put it with my repair manual.
Thanks!
I performed this job 2 years ago and at that time, I could not find out any thing really helpful. It was a very hard chore for me.
This is a great post and I'm going to print it out and put it with my repair manual.
Thanks!
Trending Topics
05-27-2009, 06:17 PM
#8
Honda-Tech Member

Join Date: May 2009
Posts: 5
Likes: 0
Received 0 Likes
on
0 Posts
Hello all,
Mad Medicine... perfect post. It was extremely helpful today.
I just want to bring up one thing that may be helpful for people doing this job in the future. Your mention in your paragraph below that the screw is in a pain in the *** place. Yes it is! When I saw where it is and tried to get a small screw driver to it, I decided to go ahead and try to bend the cover back. Well, guess what. It broke. Luckily, it broke in a spot where I could still attach the one easy screw that holds the cover and the switch. I then just used tape to keep both pieces together. No big deal but thought this bit of info might be useful.
Thanks again Mad Medicine!
==============================================
"It was not necessary to remove this screw to replace the switch, so I'll leave it up to you whether or not you want to remove it. The screw is in such a pain in the *** place that I figured it would be harder to screw it back in place after removing it than just bending the ignition switch cover backwards and removing the switch."
05-27-2009, 08:10 PM
#9
Junior Member
Join Date: Jul 2006
Location: Madison, MS., U.S.
Posts: 206
Likes: 0
Received 0 Likes
on
0 Posts
Great write-up, man. I've seen this happen more than a few times at work. Even after the recall has already been done, and it does it again. It sucks
06-08-2009, 07:41 PM
#10
New User

Join Date: Jun 2009
Posts: 4
Likes: 0
Received 0 Likes
on
0 Posts
just wanted to thank the OP for his in depth tutorial.
i just replaced mine today and so far its working great.
awesome pics!
thanks,
matt
i just replaced mine today and so far its working great.
awesome pics!
thanks,
matt
06-22-2009, 08:24 AM
#13
New User

Join Date: Jun 2009
Posts: 1
Likes: 0
Received 0 Likes
on
0 Posts
This just happened to me yesterday. My 1998 Accord shut off while driving 60 MPH down the highway, but started back up immediately on it's own. About a mile down the road, I noticed a faint burning smell & saw a very slight plume of smoke coming from behind the steering wheel. I pulled over, shut off the car and had it towed home. It starts when the key is cranked, but immediately dies. I wasn't aware of the recall, but will call the dealership today regarding it. If they won't fix it, this write-up is just what I was looking for. Thanks for the immaculate write-up.
MP
Edit: Dealership wasn't much help, they wanted me to tow my car there to look at it (25 miles, at my expense of course). I found the part at the local Costless Auto Parts store for $49.99, so decided to do it myself. I didn't bother with the continuity testing as when I removed the old wiring, I could smell & see the burnt switch (the part under the ignition switch cover from the above step #9). From start to finish, it took me about 50 minutes, but I also have an alarm that is connected to this wiring that I had to reassemble to the new wiring. The slowest part for me was actually just removing/replacing the top screw from the ignition switch cover as I didn't have a screwdriver that could reach it properly and had to use a ratchet wrench with a phillips head screwdriver bit. Thanks again to Mad Medicine for the great post!
Last edited by misterpinkey; 06-22-2009 at 05:28 PM. Reason: Adding follow-up details.
07-21-2009, 07:28 PM
#14
Trial User

Join Date: Jul 2009
Posts: 2
Likes: 0
Received 0 Likes
on
0 Posts
wow you are a life saver my man, this has been bothering me for a good 2 months now, my 98 accord dies whenever she likes and i could not figure out the problem! I'll follow this tutorial step by step and post updates.
thanks a million
- fourbanger
thanks a million
- fourbanger
07-30-2009, 12:46 PM
#15

Join Date: Jul 2009
Location: PA
Posts: 6
Likes: 0
Received 0 Likes
on
0 Posts
I just had the switch replaced this AM. Same type problems of lights flashing off and on, loss of power steering, etc., while driving on the interstate at 60+ mph and at other places at lower speeds, etc.. I might be a little older and more challenged that most of you but took it to the Honda dealer thinking the warranty / recall would cover it. I checked all my papers but didn't find a w/o that showed it had been replaced. I had a ''99 with my paperwork that showed I had the switch replaced but have sold it. The dealer mechanic checked and told me it had been replaced so had it replaced "again" today. I am going to contact Honda about covering the repair costs and also the NHTSA. This post is just to make you aware that even though Honda might have replaced yours the replacement item may still be of "defective" design. So this is more proof that what Boostedmonkey said in prev post happens with the replacement parts - I am assuming that it was in fact replaced earlier. I would appreciate any guidance about getting the warranty monies back from Honda and dealing with the NHTSA. Kudos on orig post and subsequent ones.
See my 2nd post below ! !
See my 2nd post below ! !
Last edited by jimb98honda; 07-30-2009 at 02:19 PM. Reason: additional info
07-30-2009, 01:38 PM
#17
Join Date: Jul 2009
Location: PA
Posts: 6
Likes: 0
Received 0 Likes
on
0 Posts
"The dealer mechanic checked and told me it had been replaced so had it replaced "again" today." (July 30, 2009) from my original post earlier today.
Although I couldn't find my paperwork for an original replacement around the 2002 date I assumed it might have never been replaced under the warranty / recall. But today when the Honda service manager told me it had been replaced I didn't have any proof to verify that and had to have it replaced at my expense. I went back to the shop and got the "old" one for possible "proof" if Honda or I need it.
I just signed onto www.ahm-ownerlink.com/maintenance....... and entered my VIN and it showed that the part was replaced under warranty in 2002. This was free. Almost all others (non-Honda sites) require a fee. So now I have to go back to Honda and see if I can get my money back for the second replacement part. Thanks for your patience.
Last edited by jimb98honda; 07-30-2009 at 02:17 PM. Reason: Need to add additional info and delete some.
09-10-2009, 04:14 PM
#18
New User

Join Date: Sep 2009
Posts: 6
Likes: 0
Received 0 Likes
on
0 Posts
Hi guys I have a 1998 Accord LX 2.3 VTEC 5-speed. about 2 years ago, the car was stalling driving down the street on hot days, so we had the ignition replaced. It hasn't stalled since, but a few months ago, sometimes you have to turn the key several times before the engine cranks, and then it starts right up like nothing was wrong. The key also feels a bit "notchy" sometimes, like it may be hanging on something. You have to wiggle it a bit and then it turns fine, but even after you get the key to turn sometimes the engine won't crank. Does this sound like the ignition switch, or could this be the key cylinder? Does anyone know where I can get a switch besides the dealer?
09-10-2009, 06:16 PM
#19
Join Date: Jul 2009
Location: PA
Posts: 6
Likes: 0
Received 0 Likes
on
0 Posts
Carve, I don't know if you can buy a switch from anyone else. The dealer charged me $60.66 for the switch on July 30, 2009. Mad Medicine the originator of this thread (I think) bought one from the dealer and his thread was almost exactly a year before I had mine replaced and no change in parts price. I "assume" that he may respond to your post if he checks his emails soon. The p/n on my statement is 35130-S84-305 if you want to Google it or use whatever search engine you have. Good luck. Jim
09-11-2009, 04:24 AM
#20
New User
Join Date: Sep 2009
Posts: 6
Likes: 0
Received 0 Likes
on
0 Posts
Thanks, Jim. It seems like everyone else is stalling while driving (which was also my symptom before the recall). Now I'm having a problem with starting, and the key feels "notchy". Does anyone know if this is just a different failure mode of the same part?
Edit: OK...my wife neglected to tell me something. I just went out to start the car, and the solenoid clicked a few times with no start, and then it started right up no problem. I'm not sure if this is new, or if it was doing this all along. She said "I didn't know it was clicking". So maybe it wasn't, or maybe she just didn't notice. Ideas? Battery cable maybe?
Edit: OK...my wife neglected to tell me something. I just went out to start the car, and the solenoid clicked a few times with no start, and then it started right up no problem. I'm not sure if this is new, or if it was doing this all along. She said "I didn't know it was clicking". So maybe it wasn't, or maybe she just didn't notice. Ideas? Battery cable maybe?
Last edited by carve; 09-11-2009 at 05:38 AM.
09-11-2009, 05:19 AM
#21
Join Date: Jul 2009
Location: PA
Posts: 6
Likes: 0
Received 0 Likes
on
0 Posts
Carve, I had both situations - shutting down on the interstate was first then not wanting to start. I jiggled my key around, turned the key back to "off" a couple times and after maybe the 3rd try would start. I could also hear a click like a selonoid with a dead battery where there wasn't enough juice to crank but would engage the selonoid. I Googled the P/N and found that the Acura had the same problems and the replacement wiring/switch # was the same. Also, it seems that the replacement switch may need replacing if used a lot. I think one of the Acura guys got a switch from AutoZone but for a few dollars more I would go with the dealer part. I am not a mechanic or Guru like some of the Tech guys that respond / answer questions - Just warning you - my disclaimer
Last edited by jimb98honda; 09-11-2009 at 05:21 AM. Reason: additional comments
09-13-2009, 02:45 AM
#22
New User

Join Date: Sep 2009
Location: Las Vegas, NV
Posts: 2
Likes: 0
Received 0 Likes
on
0 Posts
I looked up my problem on Google, and this is the first posting i clicked on! This is very helpful information! By far the best!!!
I look like a girly girl, but that never stopped me from helping my dad in the garage a few years back!
I have full confidence that I can replace my ignition switch myself after reading your posting! I will do it on Monday, and let you know how it works!!!
*** NO YELLOW WIRES.........GOT IT!!!***
Thank you so much!
Wish me luck!
I will also be replacing my brake light fuse, Because sometimes I can't get my car out of 'park'... Which sometimes is turning into ALL THE TIME NOW(sometimes my brake lights work, sometimes not)!
09-14-2009, 08:17 PM
#23
New User
Join Date: Sep 2009
Posts: 6
Likes: 0
Received 0 Likes
on
0 Posts
Hi guys I have a 1998 Accord LX 2.3 VTEC 5-speed. about 2 years ago, the car was stalling driving down the street on hot days, so we had the ignition replaced. It hasn't stalled since, but a few months ago, sometimes you have to turn the key several times before the engine cranks, and then it starts right up like nothing was wrong. The key also feels a bit "notchy" sometimes, like it may be hanging on something. You have to wiggle it a bit and then it turns fine, but even after you get the key to turn sometimes the engine won't crank. Does this sound like the ignition switch, or could this be the key cylinder? Does anyone know where I can get a switch besides the dealer?
09-15-2009, 05:23 PM
#24
New User
Join Date: Sep 2009
Location: Las Vegas, NV
Posts: 2
Likes: 0
Received 0 Likes
on
0 Posts
Thank you so much for such a wonderful post! i successfully replaced my ignition switch!
If i can do it, i'm sure almost anyone could!
It took a little less than an hour if i worked nonstop!
Thanks again
If i can do it, i'm sure almost anyone could!
It took a little less than an hour if i worked nonstop!
Thanks again