
Write Up / How To - H22 H22a H-series Cam Camshaft Install (search friendly)
 01-07-2007, 09:29 PM
#1
Honda-Tech Member
Thread Starter
Disclaimer: An infant could install cams after reading this, so if you mess up, IT IS NOT MY FAULT!
Guys there was no good writeup out there for us so I decided to make one. John (The Birdman) will be doing the pictorial documenting (thanks John )
)
This will include:
Removal and installation of camshafts, valve springs, retainers.
Replacement of valve seals.
Auto to manual tensioner conversion and Timing belt install.
My parts list:
Balance shaft seal retainer (I didn't do this when I swapped it in, what a n00b I was )
)
Manual tensioner parts (2 pullies, 2 springs, hardware, etc)
New timing belt
New Cam seals (2)
New Valve Seals (8In/8Exh)
New Valve Keepers (just a couple in case, I bought 6)
New Cam Keys (yes I'm ****) (FYI: h22a4 people: prevalent rumor here, the oem cam keys are not removable, so you NEED to buy some, look them up for a 94 h22, because the part sites will not let you buy them for h22a4s)
Eibach 20402.2 Valve Springs (16) (these are the stock height ones crower sells)
Crower Cromoly Retainers (87093S-16)
Crower Stage 3 Cams
JUN H22a Cam Gears
New spark plugs
Special Tools:
Surgical Scissors like these (to hold the keepers)
2 Very small pick type tools (to handle the keepers)
Crank pulley removal tool
Feeler gauges
Snap-on style valve adjustment tool
Timing Light
Air compressor, compression tester attachment
Red Loctite (for cam gear bolts)
Overhead style valve spring compressor (if you want to do this with the head on the block)

Sorry I don't have an in-action pic for this thing, basically the 2 U-shaped brackets with the holes in them bolt onto the cam towers (with the supplied bolts ), then you take the V shaped rod, and use the push-pin to attach the little thing you see sitting right below it, then you push the rod through the two brackets (which you have to line up) and use it as leverage. I made a little paint pic to show what I'm talking about, its down below.
<u>TORQUE WRENCH</u> If you don't have one, You better get one (or i'll kill you)
Floor Jack/2 Jackstands
A long magnet tool is a nice aid.
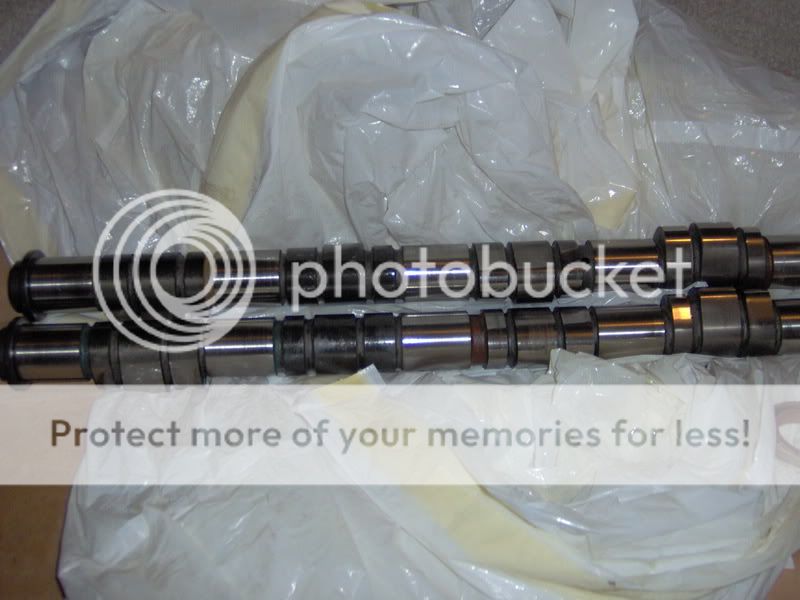
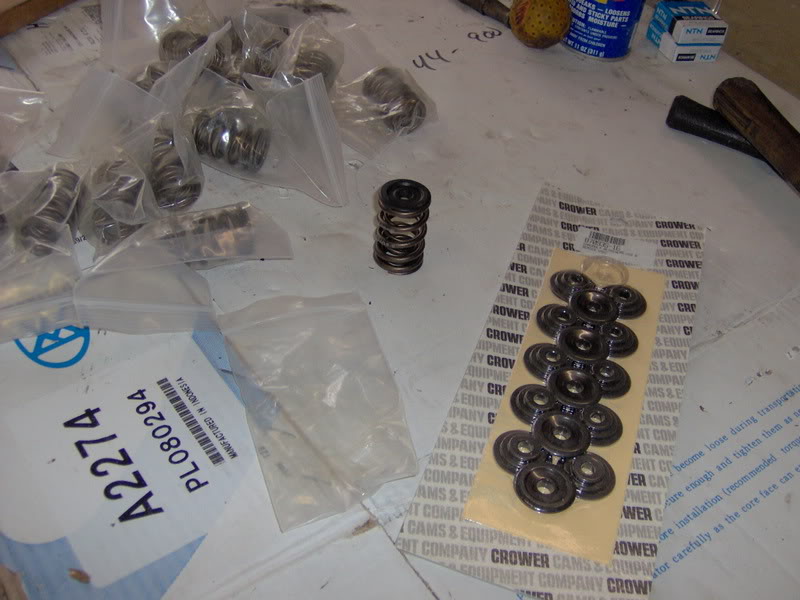
A few pics of the stuff:
Cams:
Springs/Retainers:
<u>Thou shall have a clean, large bench or table, preferably covered with a CLEAN towel, where you shall put all the parts you remove from the engine and have to re-use.</u>
Ok, first things first. Set the engine to TDC. There is a mark on the flywheel at 15 degress, so lining this mark up with the indicators in the transmission will set the engine to TDC. Set this now, it will save time later. Just pull the rubber timing plug, get your flashlight out, and have your army of slaves put the car in 5th gear and push it until you can line that mark up with the timing indicators.
Now, Disconnect the battery. Why? Why not.....the ecu would probably like a fresh reset when I crank it up with new cams in there anyway.
Now, loosen the nut on the cable to the alternator, and unclip the other connector, then move the alternator harness behind the engine and out of the way.
Loosen the adjustments and take both (or whatever you have left) of the accessory belts off.
Pop off all the spark plug wires and put them out of the way also, take the old plugs out and keep them for use in the trash can. Then mark the distributor flange as it is aligned so your ignition timing will be close to ok when you put it back together. Loosen the 3 12mm nuts on the distributor, take it off, and be ready to sop up some oil if it leaks.
Loosen all the 10mm valve cover nuts, and pop off the oil seals/washers that they sit on. Take the valve cover off, but be careful with the gasket, if it comes off all in once piece and in fairly good condition, you can re-use it, but if it breaks apart at all, get another one.
Set the valve cover down somewhere and cover it so dust and particles don't get in it.
valve cover off with everything out of the way
Lay a big rag over the open head, but first, just to check your work, make sure the cam gears are lined up so you know you set it at TDC correctly. Now we'll move down to the timing belt area. Jack the car up and put the jackstands in their spot behind the front wheels. After you're sure that the car is securely jacked up, get a little board of wood and put the jack under the oil pan, jack it up just a bit, if it starts to move the car you've gone too far.
Loosen the driver side engine mount from the car, then from the engine. Once that is out of the way, take all the little bolts out of the upper and lower timing covers, and get those bitches out of the way, and the dipstick as well.
*This part will be hard to take pictures of due to the fact that I'm working with almost zero space*
Follow 2point6's writeup on this for better pics of this part....
Now, Slide the balance belt off carefully if you want to reuse it, and I prefer to be dramatic about this and slice the timing belt in Midevil fashion, but you could just slide it off. (yes you always replace the timing belt if you're down there....ALWAYS!
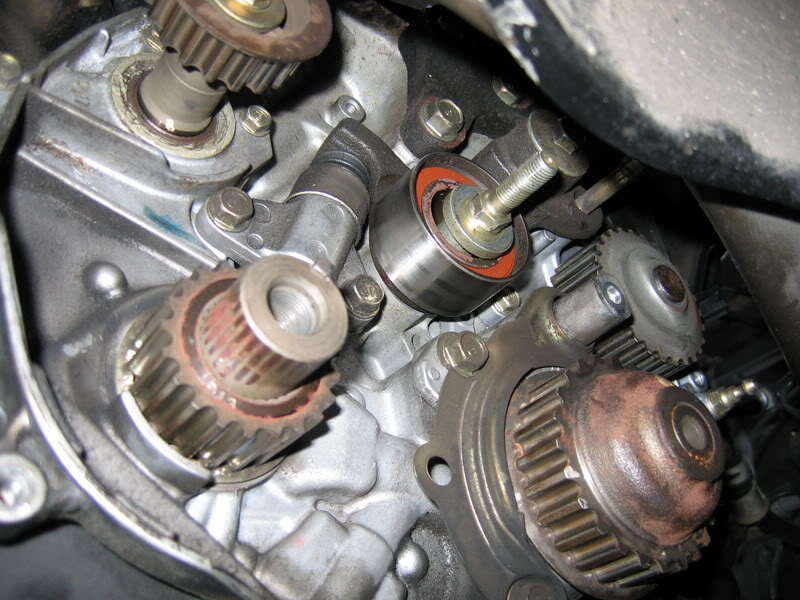
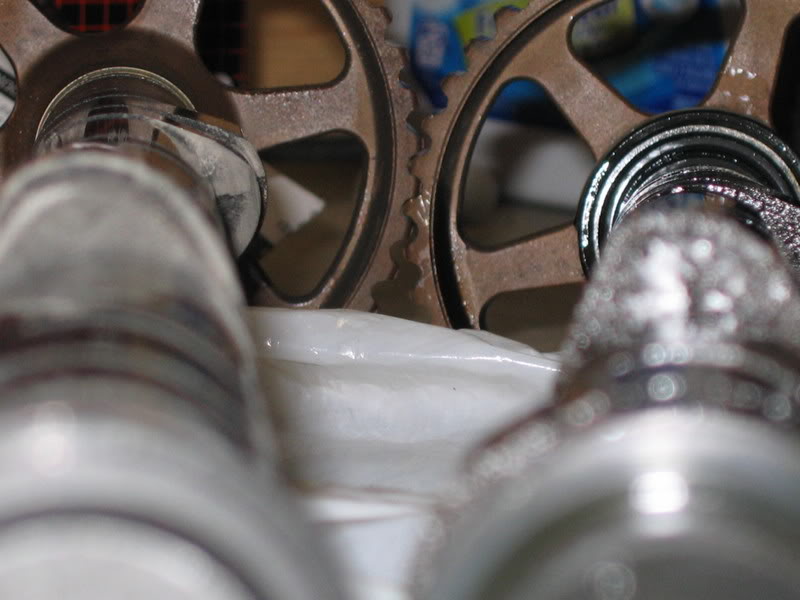
Once the timing belt is off, first remove the 10mm bolt and spring from the gold balance tensioner arm and set it out of the way. Loosen the nut on the end of the tensioner bolt, and take the balance tensioner pulley off, and be careful with it if you're reusing it. Now loosen the 2 12mm (red below) bolts on the auto-tensioner, get that POS out of the way (throw, kick, sledgehammer, i don't care). Then loosen the nuts that hold the timing tensioner pulley on, and remove them, they're in blue below. Then you can take the actual bolt out of the block, so get that out of the way as well.
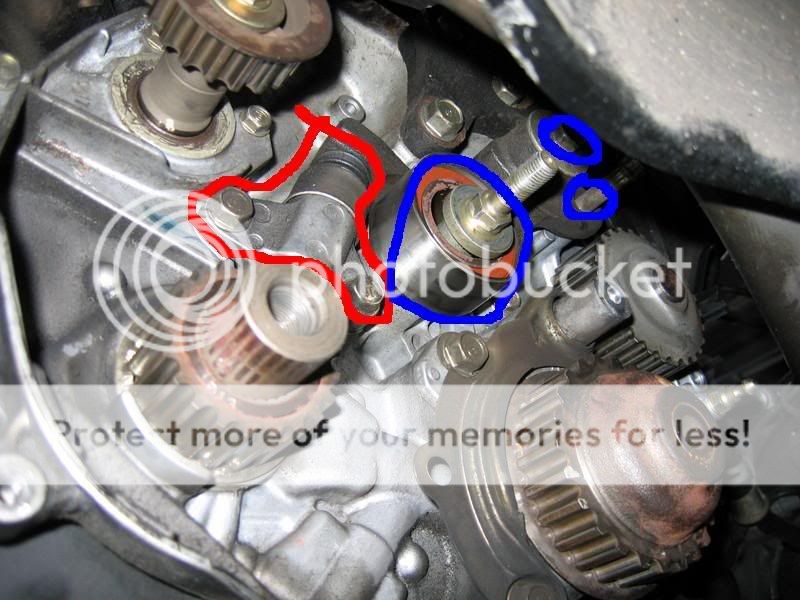
Commence bolting in all the manual tensioner stuff, the little spring perch and the tensioner pivot, as pictured below, circled in red, you will feel that you don't need to go insane tightening these, to stop and just a little more is fine. The new tensioner pulley bolt (with the huge washer) goes in the hole circled in blue, you can tighten the **** out of that bolt, and it should have some loctite on it from honda, if it doesn't, put some on it. Finally, the triangle bracket bolts in where the autotensioner used to.
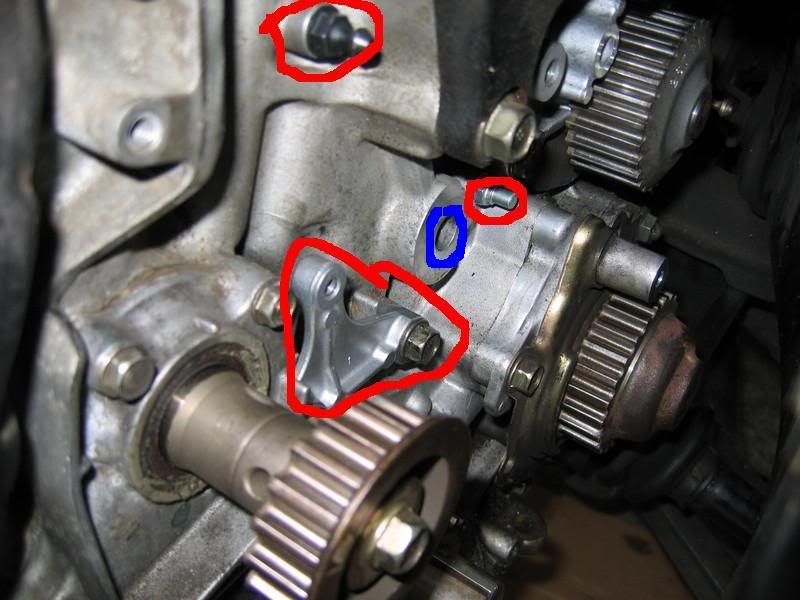
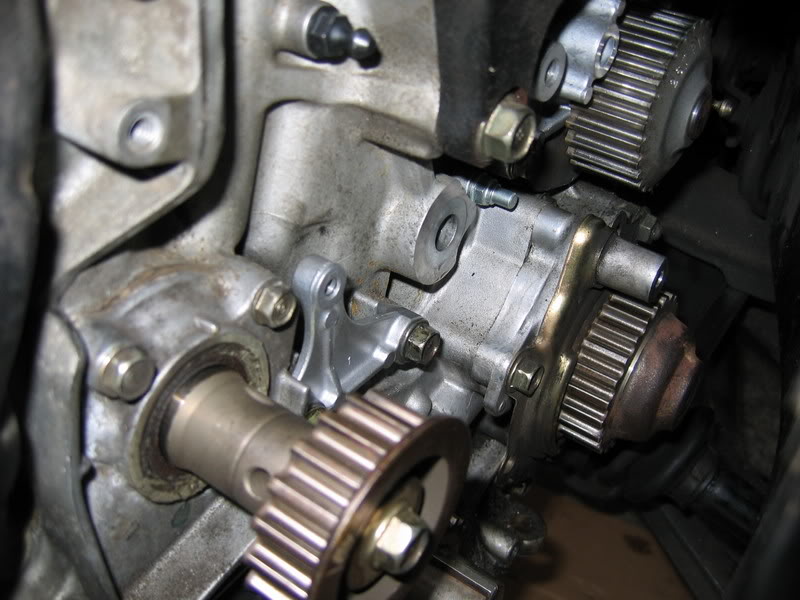
Now slide on the new timing tensioner pulley, on the right side of it there is a hole, that slides onto that little pivot you just bolted in. Once the pulley is fully down, thread in your choice of short 10mm bolt through the hole in the triangle bracket, circled in blue below. Now, take the spring and orient it as I show below, with the open tip facing out where it hooks to the tensioner, and up top on the black spring perch, the open tip facing the back side of the engine, its circled in red obviously.
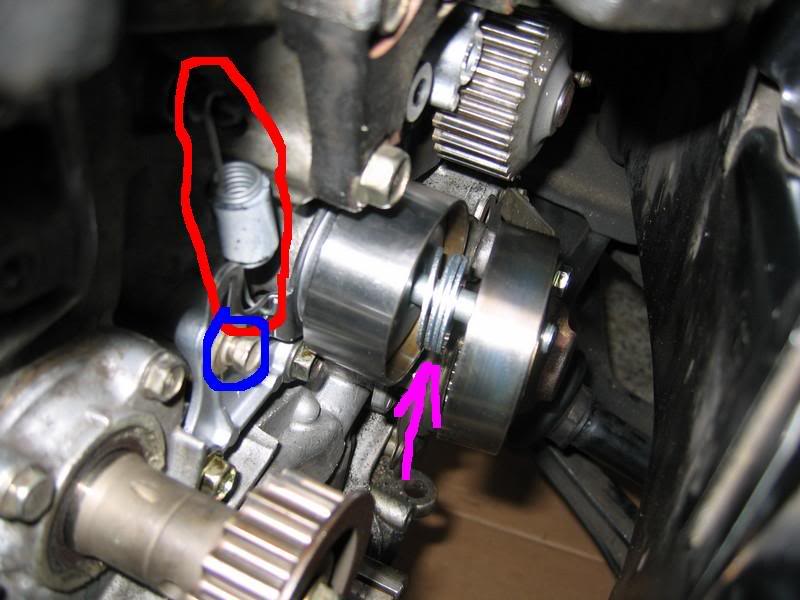
Note: I used washers instead of buying the h23 balance tensioner pulley, and they're working just fine so far (as indicated by the purple arrow ) Just bring the pulleys and the tensioner bolt with you to the hardware store, the washers just have to be big enough to fit, and just not interfere with the pulley spinning. 4 was plenty for me, I probably could have gotten away with 3, but I liked the way 4 felt.
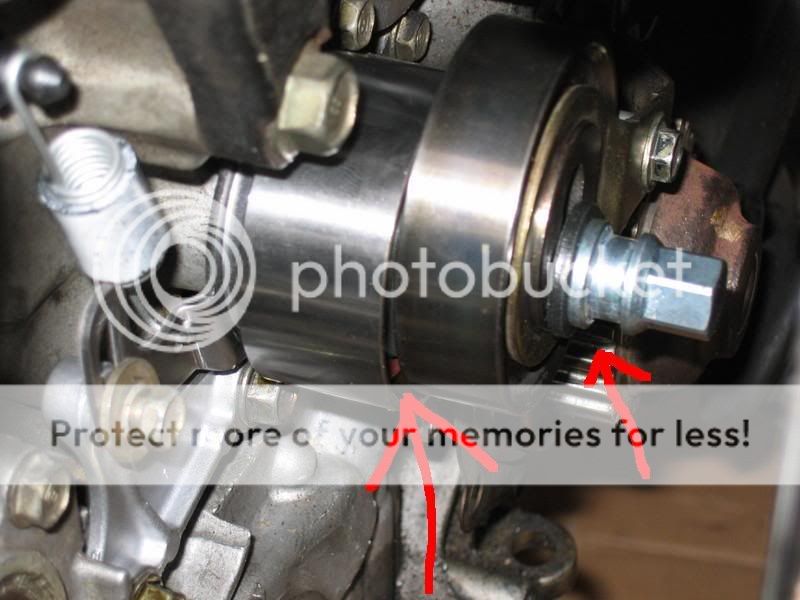
The left red arrow is just showing that there is clearance between the two pulleys once tightened down. The other one is pointing to the fact that I lined the flat side of the outer pulley back up so I could tighten the gold 'arm' back on and put its spring back on, which I replaced, but you don't have to....the 10mm bolt you see on it doesn't need to go ridiculously tight, but snug with a little loctite isn't a bad idea.
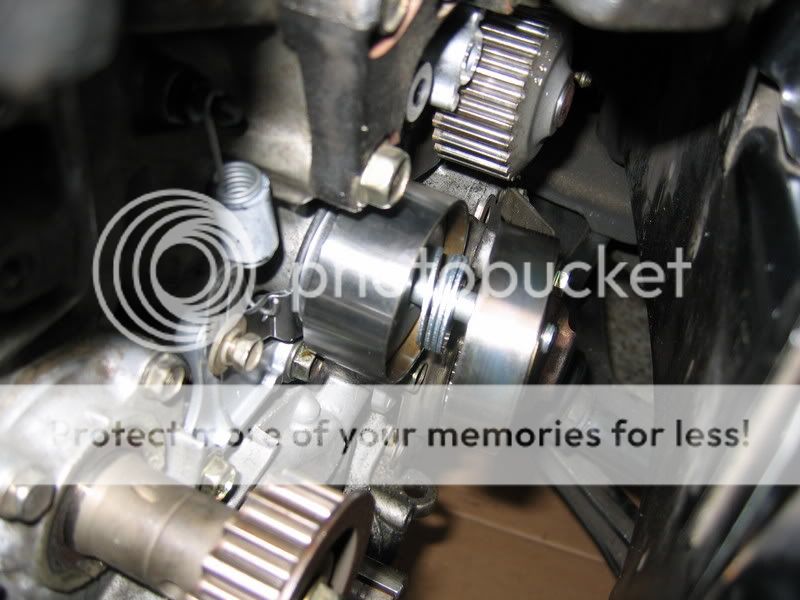
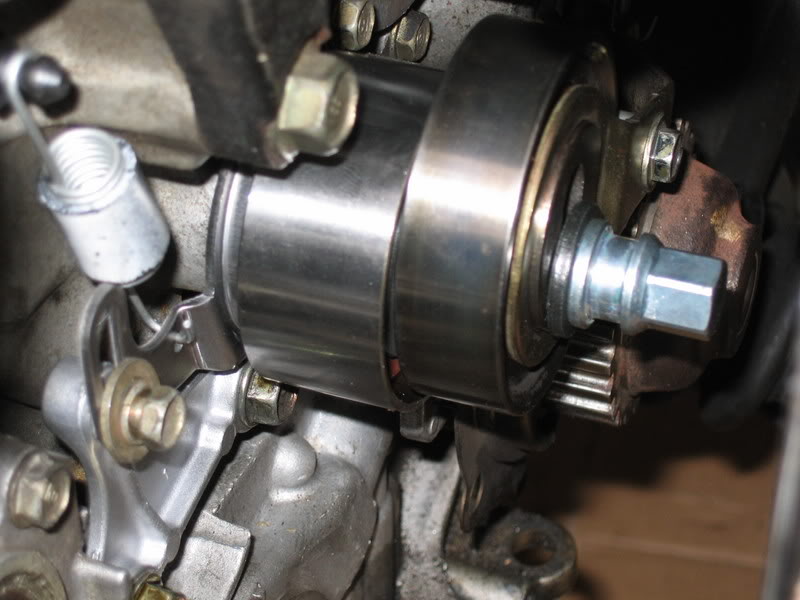
A final addition for me was the balance seal retainer, which simply bolts on and holds the seal in on the front balance shaft.
Now, we're done in this area for now, so back up top we go. Firstly, get out your 5mm dowel of choice, and stick it in the holes in the rocker plates (engine MUST be at TDC) so you can pop the bolts loose on the cam gears.
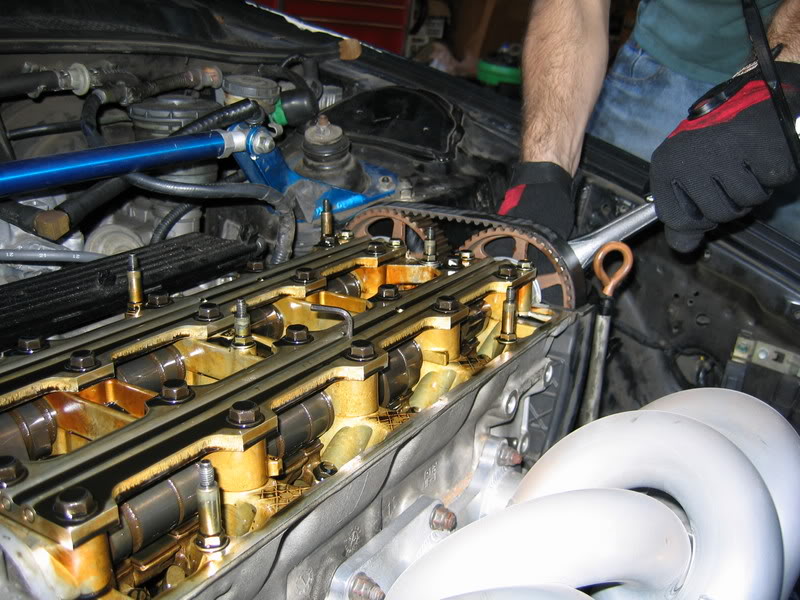
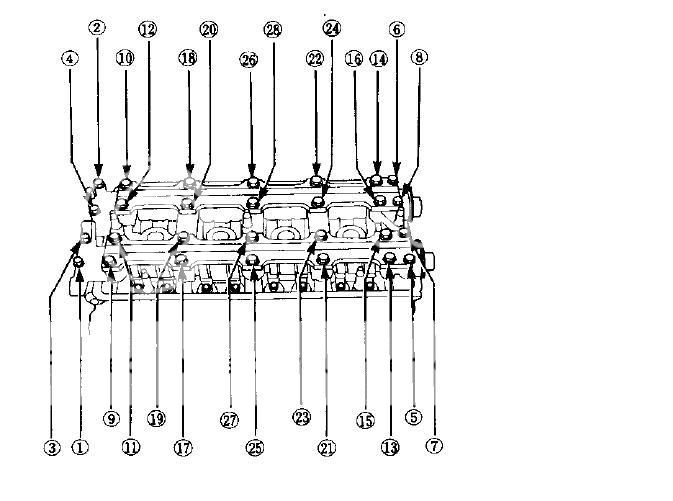
I cannot stress this hard enough, FOLLOW the ORDER for loosening the rocker plate bolts, there is a very specific order in the helms (pictured here) that MUST be followed. Or else.
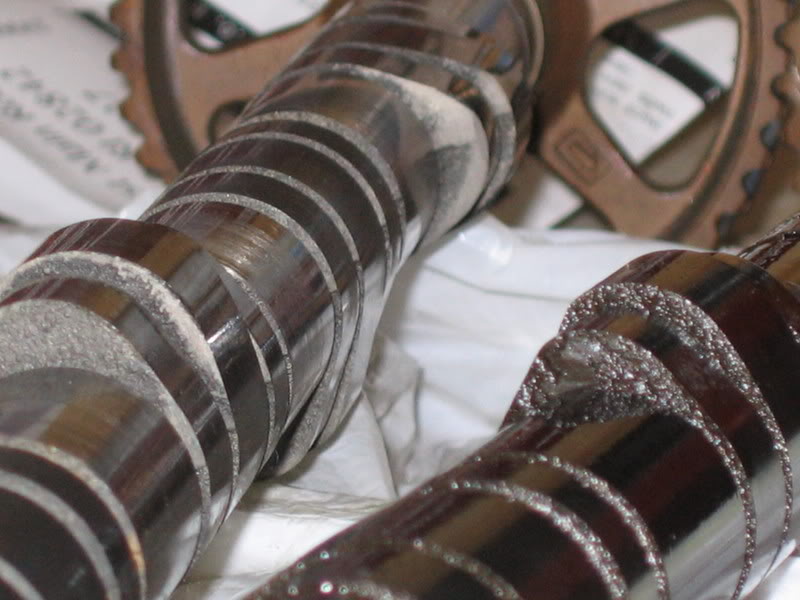
With the rocker plates out of the way, pop the timing belt side cam caps off, and commence removal of all the rest of the cam towers. Keep very good track of where each one came from. With that out of the way, lift the OEM cams/camgears out of the way, and donate them to goodwill.
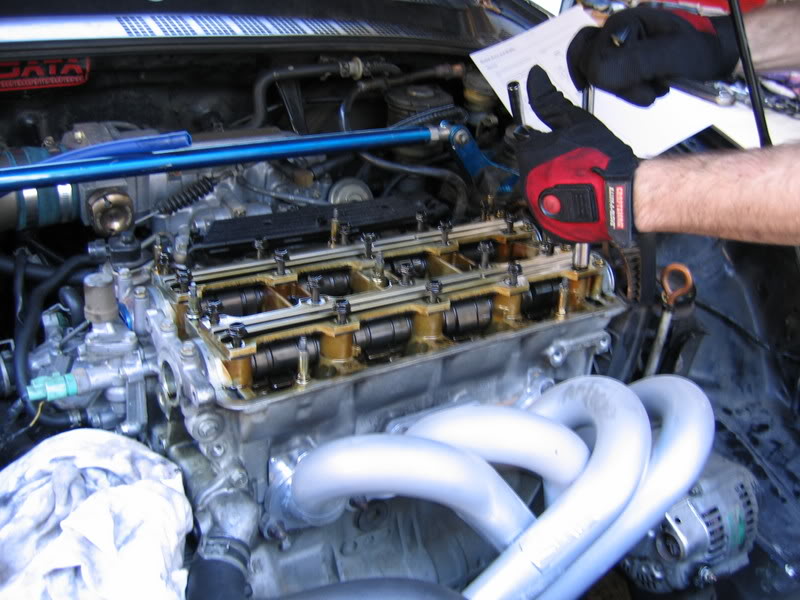
A little thumbsup for the rocker plates almost being off

Taking the cam caps off
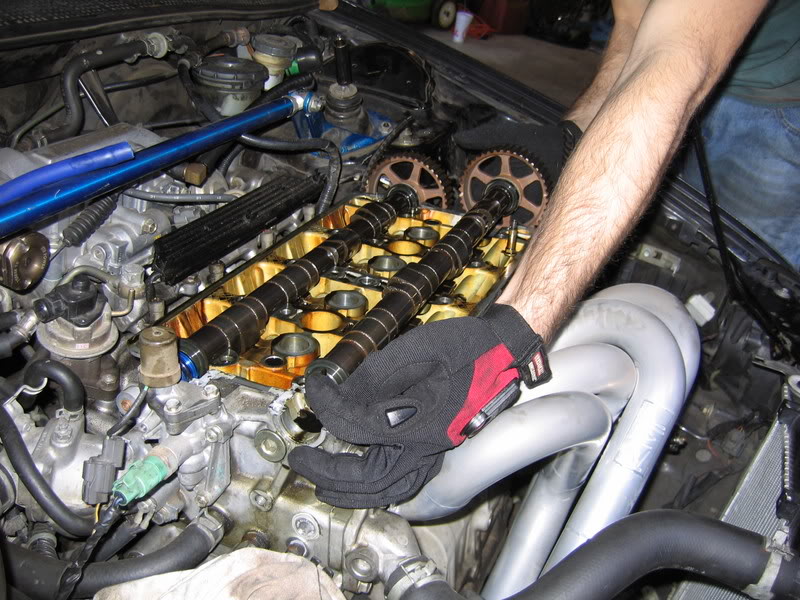
Cams coming out
If you didn't buy new cam keys (you cheap ***) then loosen the oem gears from the oem cams and take the old ones to use. Set them aside for later with the 2 bolts from the gears.
Now get out your spring compressor of choice, I choose the snap-on overhead type, because I am in love with snap-on tools, and also because I didn't want to remove the head to do this job.
Pump up your air compressor, thread the compression tester attachment into the spark plug hole, then hook the compression tester attachment to it.
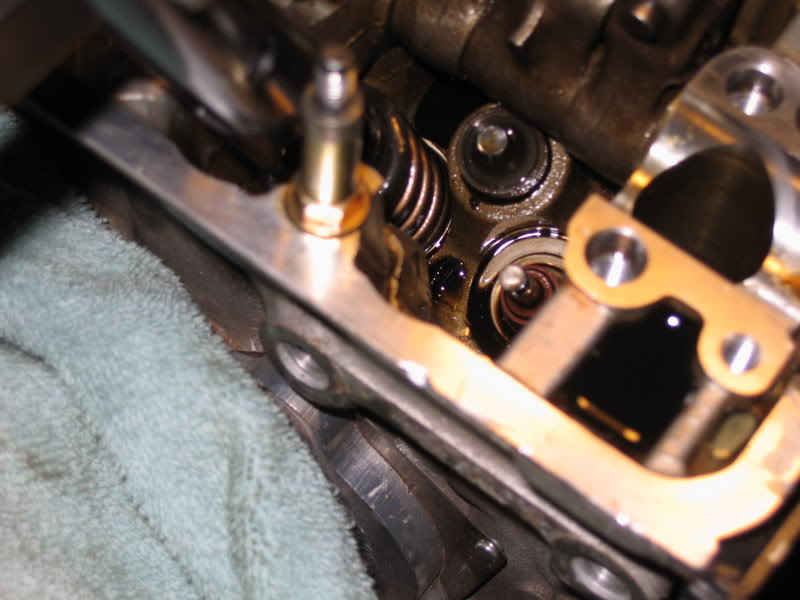
Get your magnet handy, and push the retainer down, quickly magnet the keepers up, and keep good track of these guys, you don't want to lose them at $1.56 apeice. Now remove the retainer and spring, and set them outta the way. Use some pliers and some muscle to get the valve seals off, grip them around the outside, without hitting the valve stem any, and start jiggling, turning, pulling, etc....to get them off....these are a BITCH.
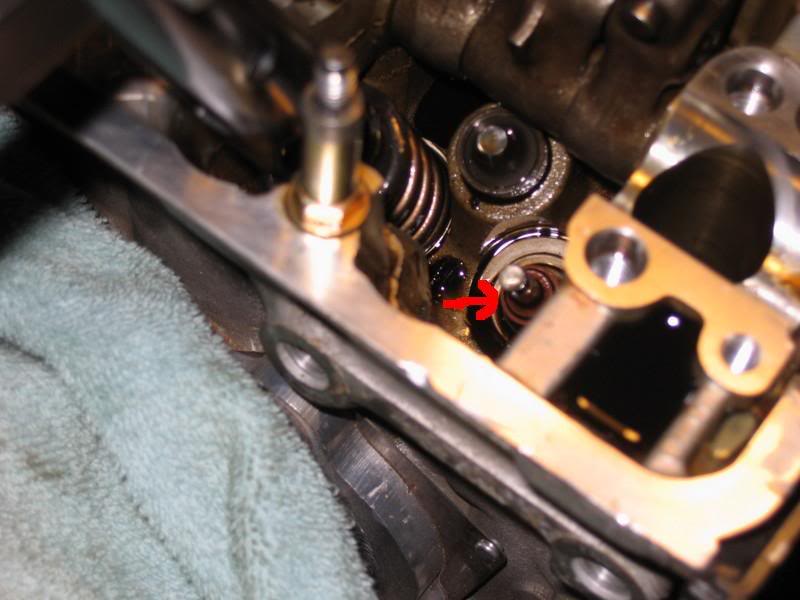
That is the best pic we took, john's camera died at this point so you guys are semi-in the dark here. Sorry. That thing being pointed to is the valve seal.
Pushing the new seal on is simple enough, just be sure that the spring on the seal matches color with the one that you removed. Black = exhaust. Silver = intake. Lube up the new valve seal with some oil, and push it down on the valve stem. Once it is down almost all the way to the valve guide, get out a deep 12mm socket, and slide that over the valve stem, push down on it until you feel the seal "click" into its seat on the valve guide. You don't have to push incredibly hard to do this, I use a hammer and give a light tap to seat them on there.
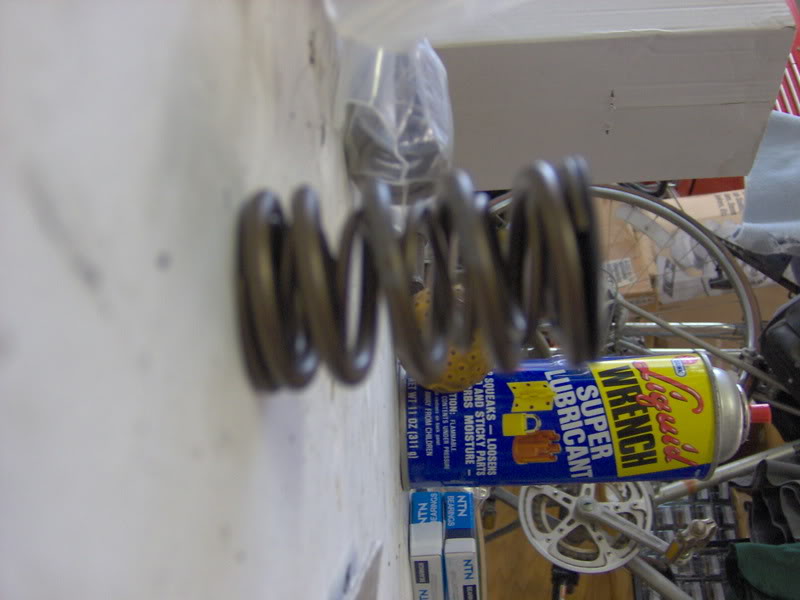
Now get your valve springs, if you can noticeably see that one side is tighter-coiled, that is considered the bottom side, so put that side down. Lube the spring(or springs if they're a dual setup) up with some oil, then put them into place. Place the retainer on top, some snap into place on the valvespring, if it does, go ahead and see if you can snap it in, this probably isn't necessary, but I'm **** about it, so DO IT!
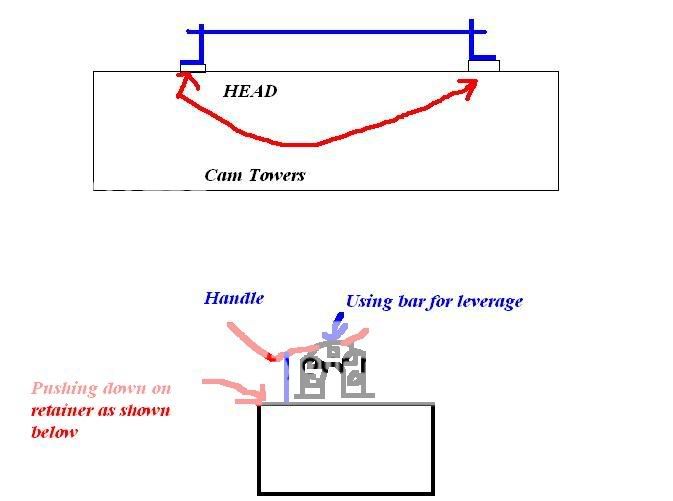
Ok guys, I know thats a rough one, lol, but here goes. As pictured, you would be doing an exhaust side spring, there are two divots in the lever, one so you can pull down toward the head (exhaust side, far divot), you figure out which of the 5 holes gives you an angle most parallel to the valve. Then there is one so you can push up away from the head (intake side, nearer divot), you use the only hole on the very end for that one, and just adjust the U brackets or the bar's position to get a good angle, angle is everything here BTW....get it right the first time, it will save you a lot of time later
Flyrod, I'm stealing your pic...lol...this is a great one to explain with though.
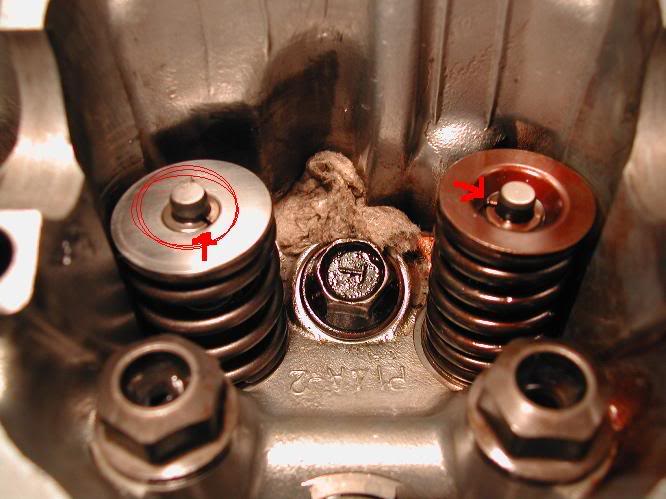
Guys, on the left valvespring I circled where the spring compressor should be, just center it well, especially when you're putting the stuff back on. I drew little arrows to show what keepers look like when seated correctly, note that they have that little bit on space in between them on one side or the other, when you're putting them in, just make sure they're moved to where one won't hit the other as you decompress the spring. If they aren't going to seat right, the person lifting the spring compressor off the spring is going to know first, it will want to stop way before the top of the valve stem, be careful, because the keeper can go flying if you let it do that.
Now, have a friend use the spring compressor to compress the spring so the retainer is a good 1/4 inch below the notch that the keepers sit in, you want to keep the valve stem completely centered in the hole through the retainer to make installing the keepers easiest. Put a keeper in your surgical scissors, and lower it into place, us the little pick type tools to get it down in there, then lower the other keeper in and push it down in there too. This part is very tedious, but go slow, and be SURE that you don't drop a keeper, if they fall down the oil returns you will have to pull the oil pan to get them out.
As you have your friend let the valve back up (his arms are toast by now, using a pipe to help hold the spring compressor helps) make sure they're seated well, then slowly release the valvespring. If they seated correctly, the retainer will be flat and the keepers will be evenly seated. If it came out crooked at all or the keepers aren't sitting even, redo it. If any of the keepers you take out look worn at all, use one of the replacements. After you're done with each one, give a quick tap on top of the valve to make sure they're seated well.
Repeat this process for all 16 valves.
Use this time as an opportunity to clean the random BS that might have fallen into the head out, wipe everything down well.
Now, lube up the cam journals, and lay the new cams into the head, firstly making sure they are adequately lubed with oil or assembly lube, also being sure we put the correct cam in the correct spot, the exhaust cam has a notch in the distributor side. Place them so the keyways face directly upward, this is TDC.
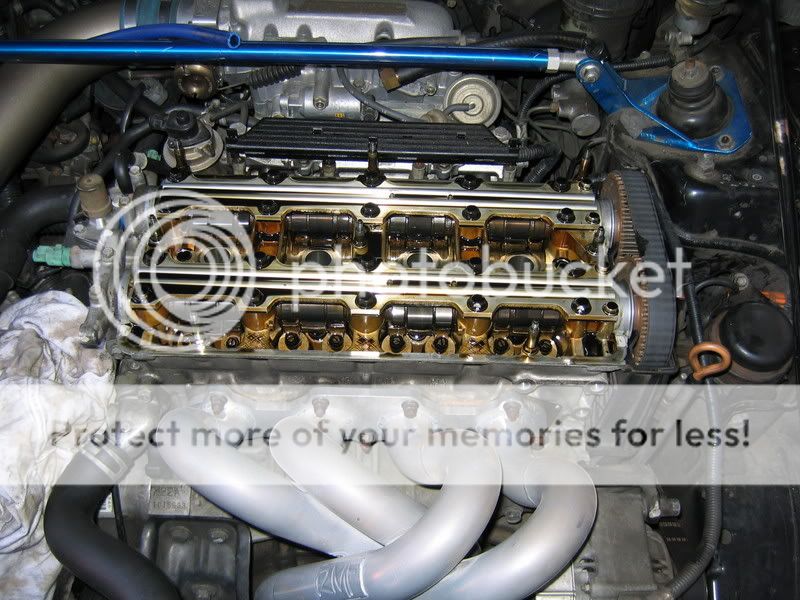
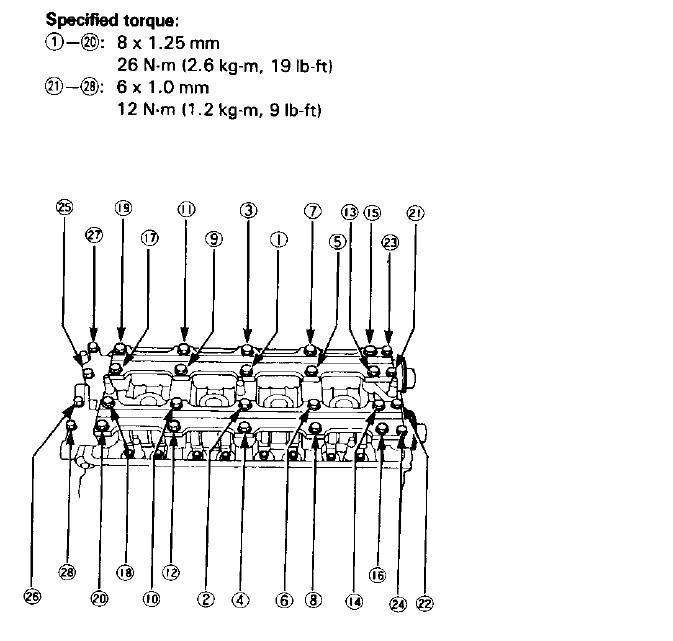
Now, pack a little grease into the back of the cam seals, and push them into place all the way against the metal, reinstall the cam caps in the correct order, and torque the rocker covers back on, in order, to spec for each bolt (see picture). Make sure to use a little honda-bond on the corners where the cam caps meet the flat surface, just a little is enough.
Loctite all the bolts on the adjustable cam gears, and tighten these bolts well, don't go ridiculously tight, they are small bolts, but do NOT *****-foot with these bolts, too many engines have been ruined by slipping cam gears. Place the cam keys in the keyways, and put the new gears on. Thread the cam gear bolts in a bit, just down as tight as they will go for now without turning the cams.
Back to the timing belt we go. Make sure your cam gears are still aligned, and check the marks on the timing gears that they're all still aligned at TDC.
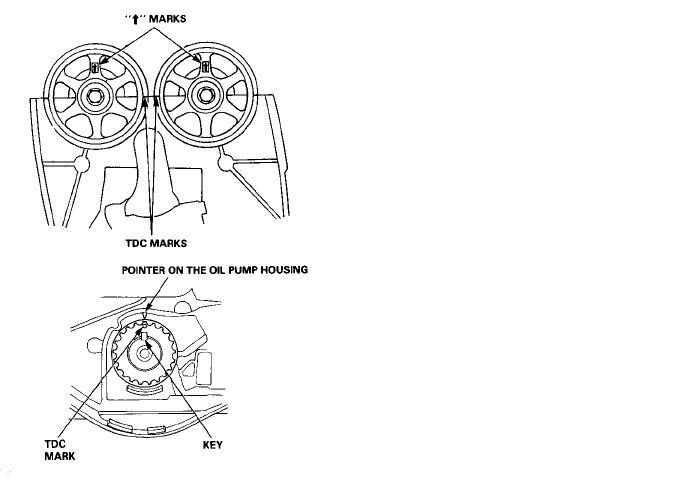
Remove the 12mm maintenance bolt from the back of the block, insert your 74mm dowel, and line up the rear balance shaft.
Loosen the nut on the end of the tensioner bolt, and then commence wrestling with the timing belt to get it on, once you have it on, do another check to make sure all the timing is still lined up correctly.
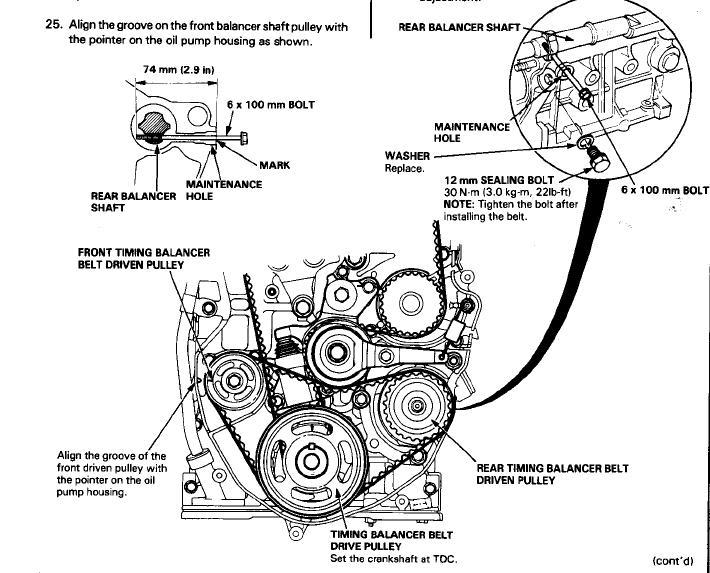
Now, line up the front balance shaft, slide on the balance belt, and put the balance pulley onto the crank. Check again that everything is lined up. If so, remove the long bolt from the back of the block, and reinstall the maintenance bolt.
Now, loosen the tensioner nut again (one turn), then retighten it, turn the engine 3 cam gear teeth counter clockwise, then loosen the tensioner nut again, then retighten to 33 ft-lbs.
Turn the engine around a few times (counter clockwise as always) and then line it up to TDC again, check to make sure that all the timing is still lined up, and also make sure the belts are riding the pulleys (esp the tensioner pulleys) well, that they aren't hitting each other or anything else.
If you're **** like me, you'll redo the tensioning procedure now, but this isn't absolutely necessary.
Now that the belt is on, you can put a final torque on the cam gears, set them to 37 ft-lbs.
Reinstall the lower timing cover and dipstick, put the sealing rubber washer on the tensioner nut that sticks out.
Jack the engine back up, and reinstall the engine mount. Put the crank pulley on, and torque the bolt to 180 ft-lbs. Let the engine down.
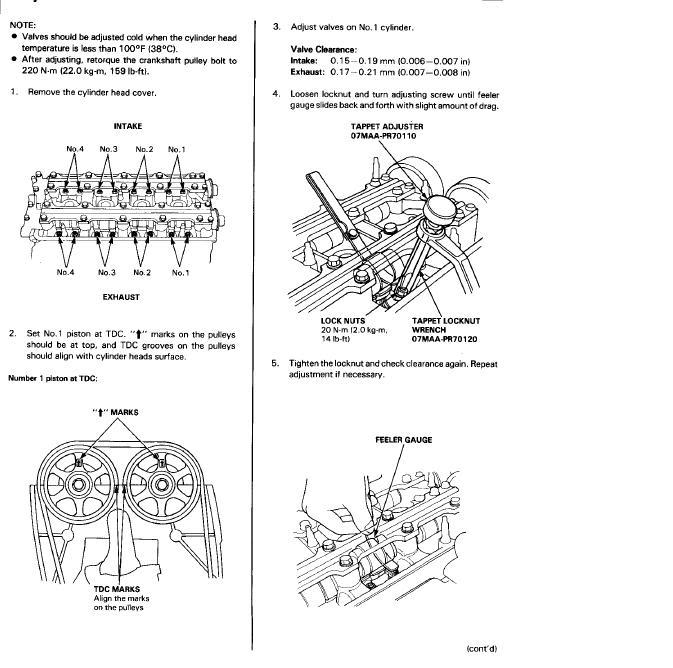
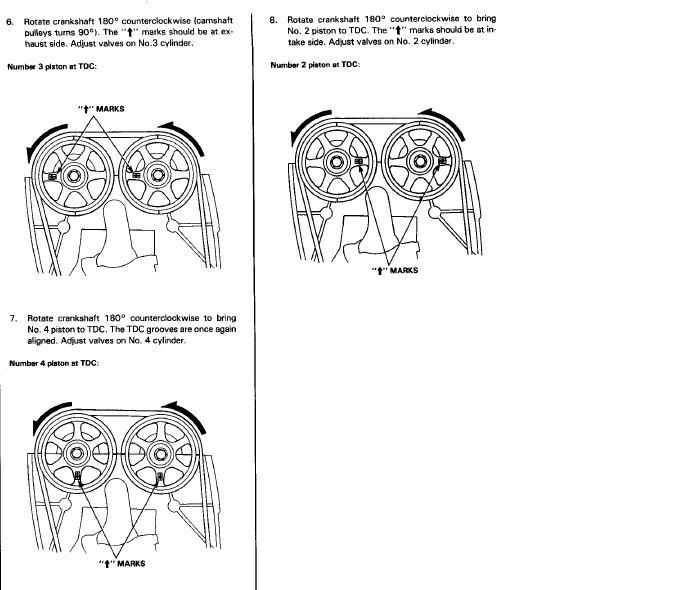
Do a valve adjustment.
Now, some people like to be flashy and cut holes in their valve cover and timing covers, yes this is functional for tuning, but no, you should not drive a car around like that daily. Any small rock that could potentially bounce up off the road and get sucked in there could (in the words of pirate) "Grenade your engine".
My suggestion:
Get another valve cover, slice off the whole timing cover side, and use that for tuning, then put your stock one back on.
Believe me, there is no need to cut your valve cover to "show off" adjustable cam gears, especially on a street car.
So now the valve cover can go back on, again, be careful with the gasket, and the spark plug hole o-rings, and seat them back on, then tighten all the valve cover 10mm bolts back on, they don't require much torque at all. I turn them until they stop, then 1/4 turn more is enough.
Put in the new spark plugs, bolt the distributor in, line up the mark you made, then leave it semi-loose. Put the spark plug wires back on.
Put the accessory belts back on, tension them.
Reconnect the alternator harness.
Get out your timing light, and go start the engine, jump the service connector. Check the timing, and adjust the dizzy if necessary, to line up the mark with the indicators.
Tighten down the dizzy, replace the rubber plug in the timing hole. Listen for abnormal noises, shut the engine off if you hear any (duh )
)
Go take her for a little ride, making sure everything feels ok. (If you changed the cams, make that little ride right up to the tuner and get your dyno on)
Thats it boys! Let me know if I messed anything up, I typed this all pretty quick
-Matt
Modified by bb4ever at 11:44 AM 1/11/2007
Modified by bb4ever at 11:44 AM 1/11/2007
Guys there was no good writeup out there for us so I decided to make one. John (The Birdman) will be doing the pictorial documenting (thanks John
)This will include:
Removal and installation of camshafts, valve springs, retainers.
Replacement of valve seals.
Auto to manual tensioner conversion and Timing belt install.
My parts list:
Balance shaft seal retainer (I didn't do this when I swapped it in, what a n00b I was
)Manual tensioner parts (2 pullies, 2 springs, hardware, etc)
New timing belt
New Cam seals (2)
New Valve Seals (8In/8Exh)
New Valve Keepers (just a couple in case, I bought 6)
New Cam Keys (yes I'm ****) (FYI: h22a4 people: prevalent rumor here, the oem cam keys are not removable, so you NEED to buy some, look them up for a 94 h22, because the part sites will not let you buy them for h22a4s)
Eibach 20402.2 Valve Springs (16) (these are the stock height ones crower sells)
Crower Cromoly Retainers (87093S-16)
Crower Stage 3 Cams
JUN H22a Cam Gears
New spark plugs
Special Tools:
Surgical Scissors like these (to hold the keepers)
2 Very small pick type tools (to handle the keepers)
Crank pulley removal tool
Feeler gauges
Snap-on style valve adjustment tool
Timing Light
Air compressor, compression tester attachment
Red Loctite (for cam gear bolts)
Overhead style valve spring compressor (if you want to do this with the head on the block)
Sorry I don't have an in-action pic for this thing, basically the 2 U-shaped brackets with the holes in them bolt onto the cam towers (with the supplied bolts
), then you take the V shaped rod, and use the push-pin to attach the little thing you see sitting right below it, then you push the rod through the two brackets (which you have to line up) and use it as leverage. I made a little paint pic to show what I'm talking about, its down below.<u>TORQUE WRENCH</u> If you don't have one, You better get one (or i'll kill you)
Floor Jack/2 Jackstands
A long magnet tool is a nice aid.
A few pics of the stuff:
Cams:
Springs/Retainers:
<u>Thou shall have a clean, large bench or table, preferably covered with a CLEAN towel, where you shall put all the parts you remove from the engine and have to re-use.</u>
Ok, first things first. Set the engine to TDC. There is a mark on the flywheel at 15 degress, so lining this mark up with the indicators in the transmission will set the engine to TDC. Set this now, it will save time later. Just pull the rubber timing plug, get your flashlight out, and have your army of slaves put the car in 5th gear and push it until you can line that mark up with the timing indicators.
Now, Disconnect the battery. Why? Why not.....the ecu would probably like a fresh reset when I crank it up with new cams in there anyway.
Now, loosen the nut on the cable to the alternator, and unclip the other connector, then move the alternator harness behind the engine and out of the way.
Loosen the adjustments and take both (or whatever you have left
) of the accessory belts off.Pop off all the spark plug wires and put them out of the way also, take the old plugs out and keep them for use in the trash can
. Then mark the distributor flange as it is aligned so your ignition timing will be close to ok when you put it back together. Loosen the 3 12mm nuts on the distributor, take it off, and be ready to sop up some oil if it leaks.Loosen all the 10mm valve cover nuts, and pop off the oil seals/washers that they sit on. Take the valve cover off, but be careful with the gasket, if it comes off all in once piece and in fairly good condition, you can re-use it, but if it breaks apart at all, get another one.
Set the valve cover down somewhere and cover it so dust and particles don't get in it.
valve cover off with everything out of the way
Lay a big rag over the open head, but first, just to check your work, make sure the cam gears are lined up so you know you set it at TDC correctly. Now we'll move down to the timing belt area. Jack the car up and put the jackstands in their spot behind the front wheels. After you're sure that the car is securely jacked up, get a little board of wood and put the jack under the oil pan, jack it up just a bit, if it starts to move the car you've gone too far.
Loosen the driver side engine mount from the car, then from the engine. Once that is out of the way, take all the little bolts out of the upper and lower timing covers, and get those bitches out of the way, and the dipstick as well.
*This part will be hard to take pictures of due to the fact that I'm working with almost zero space*
Follow 2point6's writeup on this for better pics of this part....
Now, Slide the balance belt off carefully if you want to reuse it, and I prefer to be dramatic about this and slice the timing belt in Midevil fashion, but you could just slide it off.
(yes you always replace the timing belt if you're down there....ALWAYS!Once the timing belt is off, first remove the 10mm bolt and spring from the gold balance tensioner arm and set it out of the way. Loosen the nut on the end of the tensioner bolt, and take the balance tensioner pulley off, and be careful with it if you're reusing it. Now loosen the 2 12mm (red below) bolts on the auto-tensioner, get that POS out of the way (throw, kick, sledgehammer, i don't care). Then loosen the nuts that hold the timing tensioner pulley on, and remove them, they're in blue below. Then you can take the actual bolt out of the block, so get that out of the way as well.
Commence bolting in all the manual tensioner stuff, the little spring perch and the tensioner pivot, as pictured below, circled in red, you will feel that you don't need to go insane tightening these, to stop and just a little more is fine. The new tensioner pulley bolt (with the huge washer) goes in the hole circled in blue, you can tighten the **** out of that bolt, and it should have some loctite on it from honda, if it doesn't, put some on it. Finally, the triangle bracket bolts in where the autotensioner used to.
Now slide on the new timing tensioner pulley, on the right side of it there is a hole, that slides onto that little pivot you just bolted in. Once the pulley is fully down, thread in your choice of short 10mm bolt through the hole in the triangle bracket, circled in blue below. Now, take the spring and orient it as I show below, with the open tip facing out where it hooks to the tensioner, and up top on the black spring perch, the open tip facing the back side of the engine, its circled in red obviously.
Note: I used washers instead of buying the h23 balance tensioner pulley, and they're working just fine so far
(as indicated by the purple arrow ) Just bring the pulleys and the tensioner bolt with you to the hardware store, the washers just have to be big enough to fit, and just not interfere with the pulley spinning. 4 was plenty for me, I probably could have gotten away with 3, but I liked the way 4 felt.The left red arrow is just showing that there is clearance between the two pulleys once tightened down. The other one is pointing to the fact that I lined the flat side of the outer pulley back up so I could tighten the gold 'arm' back on and put its spring back on, which I replaced, but you don't have to....the 10mm bolt you see on it doesn't need to go ridiculously tight, but snug with a little loctite isn't a bad idea.
A final addition for me was the balance seal retainer, which simply bolts on and holds the seal in on the front balance shaft.
Now, we're done in this area for now, so back up top we go. Firstly, get out your 5mm dowel of choice, and stick it in the holes in the rocker plates (engine MUST be at TDC) so you can pop the bolts loose on the cam gears.
I cannot stress this hard enough, FOLLOW the ORDER for loosening the rocker plate bolts, there is a very specific order in the helms (pictured here) that MUST be followed. Or else.
With the rocker plates out of the way, pop the timing belt side cam caps off, and commence removal of all the rest of the cam towers. Keep very good track of where each one came from. With that out of the way, lift the OEM cams/camgears out of the way, and donate them to goodwill.
A little thumbsup for the rocker plates almost being off
Taking the cam caps off
Cams coming out
If you didn't buy new cam keys (you cheap ***) then loosen the oem gears from the oem cams and take the old ones to use. Set them aside for later with the 2 bolts from the gears.
Now get out your spring compressor of choice, I choose the snap-on overhead type, because I am in love with snap-on tools, and also because I didn't want to remove the head to do this job.
Pump up your air compressor, thread the compression tester attachment into the spark plug hole, then hook the compression tester attachment to it.
Get your magnet handy, and push the retainer down, quickly magnet the keepers up, and keep good track of these guys, you don't want to lose them at $1.56 apeice. Now remove the retainer and spring, and set them outta the way. Use some pliers and some muscle to get the valve seals off, grip them around the outside, without hitting the valve stem any, and start jiggling, turning, pulling, etc....to get them off....these are a BITCH.
That is the best pic we took, john's camera died at this point so you guys are semi-in the dark here. Sorry. That thing being pointed to is the valve seal.
Pushing the new seal on is simple enough, just be sure that the spring on the seal matches color with the one that you removed. Black = exhaust. Silver = intake. Lube up the new valve seal with some oil, and push it down on the valve stem. Once it is down almost all the way to the valve guide, get out a deep 12mm socket, and slide that over the valve stem, push down on it until you feel the seal "click" into its seat on the valve guide. You don't have to push incredibly hard to do this, I use a hammer and give a light tap to seat them on there.
Now get your valve springs, if you can noticeably see that one side is tighter-coiled, that is considered the bottom side, so put that side down. Lube the spring(or springs if they're a dual setup) up with some oil, then put them into place. Place the retainer on top, some snap into place on the valvespring, if it does, go ahead and see if you can snap it in, this probably isn't necessary, but I'm **** about it, so DO IT!
Ok guys, I know thats a rough one, lol, but here goes. As pictured, you would be doing an exhaust side spring, there are two divots in the lever, one so you can pull down toward the head (exhaust side, far divot), you figure out which of the 5 holes gives you an angle most parallel to the valve. Then there is one so you can push up away from the head (intake side, nearer divot), you use the only hole on the very end for that one, and just adjust the U brackets or the bar's position to get a good angle, angle is everything here BTW....get it right the first time, it will save you a lot of time later
Flyrod, I'm stealing your pic...lol...this is a great one to explain with though.
Guys, on the left valvespring I circled where the spring compressor should be, just center it well, especially when you're putting the stuff back on. I drew little arrows to show what keepers look like when seated correctly, note that they have that little bit on space in between them on one side or the other, when you're putting them in, just make sure they're moved to where one won't hit the other as you decompress the spring. If they aren't going to seat right, the person lifting the spring compressor off the spring is going to know first, it will want to stop way before the top of the valve stem, be careful, because the keeper can go flying if you let it do that.
Now, have a friend use the spring compressor to compress the spring so the retainer is a good 1/4 inch below the notch that the keepers sit in, you want to keep the valve stem completely centered in the hole through the retainer to make installing the keepers easiest. Put a keeper in your surgical scissors, and lower it into place, us the little pick type tools to get it down in there, then lower the other keeper in and push it down in there too. This part is very tedious, but go slow, and be SURE that you don't drop a keeper, if they fall down the oil returns you will have to pull the oil pan to get them out.
As you have your friend let the valve back up (his arms are toast by now, using a pipe to help hold the spring compressor helps) make sure they're seated well, then slowly release the valvespring. If they seated correctly, the retainer will be flat and the keepers will be evenly seated. If it came out crooked at all or the keepers aren't sitting even, redo it. If any of the keepers you take out look worn at all, use one of the replacements. After you're done with each one, give a quick tap on top of the valve to make sure they're seated well.
Repeat this process for all 16 valves.
Use this time as an opportunity to clean the random BS that might have fallen into the head out, wipe everything down well.
Now, lube up the cam journals, and lay the new cams into the head, firstly making sure they are adequately lubed with oil or assembly lube, also being sure we put the correct cam in the correct spot, the exhaust cam has a notch in the distributor side. Place them so the keyways face directly upward, this is TDC.
Now, pack a little grease into the back of the cam seals, and push them into place all the way against the metal, reinstall the cam caps in the correct order, and torque the rocker covers back on, in order, to spec for each bolt (see picture). Make sure to use a little honda-bond on the corners where the cam caps meet the flat surface, just a little is enough.
Loctite all the bolts on the adjustable cam gears, and tighten these bolts well, don't go ridiculously tight, they are small bolts, but do NOT *****-foot with these bolts, too many engines have been ruined by slipping cam gears. Place the cam keys in the keyways, and put the new gears on. Thread the cam gear bolts in a bit, just down as tight as they will go for now without turning the cams.
Back to the timing belt we go. Make sure your cam gears are still aligned, and check the marks on the timing gears that they're all still aligned at TDC.
Remove the 12mm maintenance bolt from the back of the block, insert your 74mm dowel, and line up the rear balance shaft.
Loosen the nut on the end of the tensioner bolt, and then commence wrestling with the timing belt to get it on, once you have it on, do another check to make sure all the timing is still lined up correctly.
Now, line up the front balance shaft, slide on the balance belt, and put the balance pulley onto the crank. Check again that everything is lined up. If so, remove the long bolt from the back of the block, and reinstall the maintenance bolt.
Now, loosen the tensioner nut again (one turn), then retighten it, turn the engine 3 cam gear teeth counter clockwise, then loosen the tensioner nut again, then retighten to 33 ft-lbs.
Turn the engine around a few times (counter clockwise as always) and then line it up to TDC again, check to make sure that all the timing is still lined up, and also make sure the belts are riding the pulleys (esp the tensioner pulleys) well, that they aren't hitting each other or anything else.
If you're **** like me, you'll redo the tensioning procedure now, but this isn't absolutely necessary.
Now that the belt is on, you can put a final torque on the cam gears, set them to 37 ft-lbs.
Reinstall the lower timing cover and dipstick, put the sealing rubber washer on the tensioner nut that sticks out.
Jack the engine back up, and reinstall the engine mount. Put the crank pulley on, and torque the bolt to 180 ft-lbs. Let the engine down.
Do a valve adjustment.
Now, some people like to be flashy and cut holes in their valve cover and timing covers, yes this is functional for tuning, but no, you should not drive a car around like that daily. Any small rock that could potentially bounce up off the road and get sucked in there could (in the words of pirate) "Grenade your engine".
My suggestion:
Get another valve cover, slice off the whole timing cover side, and use that for tuning, then put your stock one back on.
Believe me, there is no need to cut your valve cover to "show off" adjustable cam gears, especially on a street car.
So now the valve cover can go back on, again, be careful with the gasket, and the spark plug hole o-rings, and seat them back on, then tighten all the valve cover 10mm bolts back on, they don't require much torque at all. I turn them until they stop, then 1/4 turn more is enough.
Put in the new spark plugs, bolt the distributor in, line up the mark you made, then leave it semi-loose. Put the spark plug wires back on.
Put the accessory belts back on, tension them.
Reconnect the alternator harness.
Get out your timing light, and go start the engine, jump the service connector. Check the timing, and adjust the dizzy if necessary, to line up the mark with the indicators.
Tighten down the dizzy, replace the rubber plug in the timing hole. Listen for abnormal noises, shut the engine off if you hear any (duh
)Go take her for a little ride, making sure everything feels ok. (If you changed the cams, make that little ride right up to the tuner and get your dyno on)
Thats it boys! Let me know if I messed anything up, I typed this all pretty quick
-Matt
Modified by bb4ever at 11:44 AM 1/11/2007
Modified by bb4ever at 11:44 AM 1/11/2007
 01-07-2007, 09:39 PM
#2
Honda-Tech Member
Join Date: Jan 2004
Location: Further down the spiral, TX, usa
Posts: 10,629
Likes: 0
Received 1 Like
on
1 Post
Very nice Could you post a pic of the valve spring compressor tool you used?
So how long until a thread titled 'How do I install my cams on my H22' is made?
Could you post a pic of the valve spring compressor tool you used?So how long until a thread titled 'How do I install my cams on my H22' is made?
 01-07-2007, 09:41 PM
#4
Honda-Tech Member
Thread Starter
<TABLE WIDTH="90%" CELLSPACING=0 CELLPADDING=0 ALIGN=CENTER><TR><TD>Quote, originally posted by Hawkze_2.3 »</TD></TR><TR><TD CLASS="quote">Very nice Could you post a pic of the valve spring compressor tool you used?
So how long until a thread titled 'How do I install my cams on my H22' is made? </TD></TR></TABLE>
LOL
I'll have a pic of it actually on the head and in use, as soon as john uploads the pics.
<TABLE WIDTH="90%" CELLSPACING=0 CELLPADDING=0 ALIGN=CENTER><TR><TD>Quote, originally posted by TylerC161 »</TD></TR><TR><TD CLASS="quote">Awesome! Hopefully this'll get added to the FAQ</TD></TR></TABLE>
good idea
Could you post a pic of the valve spring compressor tool you used?So how long until a thread titled 'How do I install my cams on my H22' is made?
</TD></TR></TABLE>LOL
I'll have a pic of it actually on the head and in use, as soon as john uploads the pics.
<TABLE WIDTH="90%" CELLSPACING=0 CELLPADDING=0 ALIGN=CENTER><TR><TD>Quote, originally posted by TylerC161 »</TD></TR><TR><TD CLASS="quote">Awesome! Hopefully this'll get added to the FAQ</TD></TR></TABLE>
good idea
01-07-2007, 09:51 PM
#5
Join Date: Sep 2005
Location: San Gabriel, CA, U.S.A
Posts: 424
Likes: 0
Received 0 Likes
on
0 Posts
<TABLE WIDTH="90%" CELLSPACING=0 CELLPADDING=0 ALIGN=CENTER><TR><TD>Quote, originally posted by TylerC161 »</TD></TR><TR><TD CLASS="quote">Awesome! Hopefully this'll get added to the FAQ</TD></TR></TABLE>
x3. This is informative as heck.
to you, too, bb4ever. Awesome write-up.
x3. This is informative as heck.
to you, too, bb4ever. Awesome write-up.
01-07-2007, 09:56 PM
#7
Join Date: Oct 2004
Location: Lawrence, KS
Posts: 834
Likes: 0
Received 0 Likes
on
0 Posts
<TABLE WIDTH="90%" CELLSPACING=0 CELLPADDING=0 ALIGN=CENTER><TR><TD>Quote, originally posted by thegeorge613 »</TD></TR><TR><TD CLASS="quote">
x3. This is informative as heck.
to you, too, bb4ever. Awesome write-up.</TD></TR></TABLE>
x4. + ^^^% points
x3. This is informative as heck.
to you, too, bb4ever. Awesome write-up.</TD></TR></TABLE>x4. + ^^^% points
Trending Topics
01-07-2007, 10:01 PM
#8
Honda-Tech Member
Thread Starter
<TABLE WIDTH="90%" CELLSPACING=0 CELLPADDING=0 ALIGN=CENTER><TR><TD>Quote, originally posted by M@ »</TD></TR><TR><TD CLASS="quote">
x4. + ^^^% points</TD></TR></TABLE>
hell yea....lol...gimme those % points back
x4. + ^^^% points</TD></TR></TABLE>
hell yea....lol...gimme those % points back
01-08-2007, 02:08 AM
#10
Honda-Tech Member
Join Date: Jul 2006
Location: Brisbane, QLD, Australia
Posts: 682
Likes: 0
Received 0 Likes
on
0 Posts
to you for the effort. Very informative write-up. May just come in handy soon.
01-08-2007, 04:34 AM
#11
Honda-Tech Member
Join Date: Feb 2002
Location: land of the sheep, home of the hypocrite
Posts: 2,072
Likes: 0
Received 0 Likes
on
0 Posts
Good to see stuff like this around here again. Thanks!
Also, I like to plug the oil drain holes with paper towels when swapping springs etc. so that pieces don't fall down into the oil pan. Here is an example:

Also, I like to plug the oil drain holes with paper towels when swapping springs etc. so that pieces don't fall down into the oil pan. Here is an example:
01-08-2007, 05:41 AM
#14
Honda-Tech Member
iTrader: (1)
Join Date: Sep 2006
Location: Cincinnati, Ohio, USA
Posts: 1,757
Likes: 0
Received 0 Likes
on
0 Posts
very nice...i am hoping to be doing camshafts and cam gears this summer...
great job on the write up.
my only problem will be timing...
great job on the write up.
my only problem will be timing...
01-08-2007, 06:39 AM
#15
Honda-Tech Member
Thread Starter
<TABLE WIDTH="90%" CELLSPACING=0 CELLPADDING=0 ALIGN=CENTER><TR><TD>Quote, originally posted by flyrod »</TD></TR><TR><TD CLASS="quote">Good to see stuff like this around here again. Thanks!
Also, I like to plug the oil drain holes with paper towels when swapping springs etc. so that pieces don't fall down into the oil pan. Here is an example:
</TD></TR></TABLE>
See I was going to say that, but you can't really get the paper towel out of h22 oil returns with the spring in the way....there didn't seem to be enough room...the h22 returns are under the metal that goes across in between each cylinder....I dropped like 3 keepers down there LOL....my friend even dropped a valve seal down there after yanking it off....that was a BITCH to get out, it got stuck in the return, above the balance shaft, I had to use a hangar to get it out lol
<TABLE WIDTH="90%" CELLSPACING=0 CELLPADDING=0 ALIGN=CENTER><TR><TD>Quote, originally posted by PirateMcFred »</TD></TR><TR><TD CLASS="quote">Well thanks for the **** tease Matt. Get to the tune and dyno already. Vids of acceleration or sound clips are good too.
Pirate</TD></TR></TABLE>
Hahaha sorry....I should be on the dyno in a few hours, so numbers will be up promptly
01-08-2007, 07:32 AM
#17
Honda-Tech Member
<TABLE WIDTH="90%" CELLSPACING=0 CELLPADDING=0 ALIGN=CENTER><TR><TD>Quote, originally posted by bb4ever »</TD></TR><TR><TD CLASS="quote">Now, Disconnect the battery. Why? Why not.....the ecu would probably like a fresh reset when I crank it up with new cams in there anyway.</TD></TR></TABLE>
If you don't disconnect the battery and you touch any metal with the 10mm wrench while removing the nut on the alternator wire, you'll see very quickly why you should have disconnected the battery before beginning.
If you don't disconnect the battery and you touch any metal with the 10mm wrench while removing the nut on the alternator wire, you'll see very quickly why you should have disconnected the battery before beginning.
 01-08-2007, 10:00 AM
#21
moderator emeritus

<TABLE WIDTH="90%" CELLSPACING=0 CELLPADDING=0 ALIGN=CENTER><TR><TD>Quote, originally posted by 94Vtecluder »</TD></TR><TR><TD CLASS="quote">Too bad it's not in a 4g. Then it might actually be quick. </TD></TR></TABLE>
it IS in a 4th gen......
</TD></TR></TABLE>it IS in a 4th gen......
 01-08-2007, 10:16 AM
#23
Member
Join Date: Nov 2003
Location: USA
Posts: 1,502
Likes: 0
Received 0 Likes
on
0 Posts
<TABLE WIDTH="90%" CELLSPACING=0 CELLPADDING=0 ALIGN=CENTER><TR><TD>Quote, originally posted by bb4ever »</TD></TR><TR><TD CLASS="quote">thanks john, I'll work those in soon
Sorry guys, no dyno today
Hopefully tomorrow!</TD></TR></TABLE>
Dang, what happened? I was stalking this thread waiting on results...
Sorry guys, no dyno today
Hopefully tomorrow!</TD></TR></TABLE>
Dang, what happened? I was stalking this thread waiting on results...
01-08-2007, 12:04 PM
#25
Honda-Tech Member
Thread Starter
<TABLE WIDTH="90%" CELLSPACING=0 CELLPADDING=0 ALIGN=CENTER><TR><TD>Quote, originally posted by 94Vtecluder »</TD></TR><TR><TD CLASS="quote">Too bad it's not in a 4g. Then it might actually be quick. </TD></TR></TABLE>
ehh I have a 4g dude....lol
<TABLE WIDTH="90%" CELLSPACING=0 CELLPADDING=0 ALIGN=CENTER><TR><TD>Quote, originally posted by ap »</TD></TR><TR><TD CLASS="quote">you should practice what you preach...
lol. im assuming you DIDNT change the timing belt...
How long did the whole thing take? A good day I bet.</TD></TR></TABLE>
Your first time you'll need 2 days to do this, or a very full day (early am to late night)
and yes I did change my timing belt....you can see the old one cut in the pics above....
I was just driving it a bit, it actually runs semi-ok on the current tune, though you can feel that it needs adjustment
Dyno is tomorrow at around 1pm, results will be up shortly after
(jdogg had other engagements today)
</TD></TR></TABLE>ehh I have a 4g dude....lol
<TABLE WIDTH="90%" CELLSPACING=0 CELLPADDING=0 ALIGN=CENTER><TR><TD>Quote, originally posted by ap »</TD></TR><TR><TD CLASS="quote">you should practice what you preach...
lol. im assuming you DIDNT change the timing belt...
How long did the whole thing take? A good day I bet.</TD></TR></TABLE>
Your first time you'll need 2 days to do this, or a very full day (early am to late night)
and yes I did change my timing belt....you can see the old one cut in the pics above....
I was just driving it a bit, it actually runs semi-ok on the current tune, though you can feel that it needs adjustment
Dyno is tomorrow at around 1pm, results will be up shortly after
(jdogg had other engagements today)