
rim restoration
 07-04-2010, 03:02 PM
#1
Honda-Tech Member
Thread Starter
**if this has been posted in the wrong section please relocate**
this is a step by step on rim restoration (the way i went about it) to help any members if they choose this option. i get questions about how i restored my old bbs rs mesh from my build thread a few times a week almost so i am making this thread to help ayone who is interested and so i can just slap a link for anyone inquiring through messages.
i started with a set of 5x114.3 16x8 +32 3 piece bbs rs mesh that i ordered off rbmotoring.
they were in rough shape and needed some love.
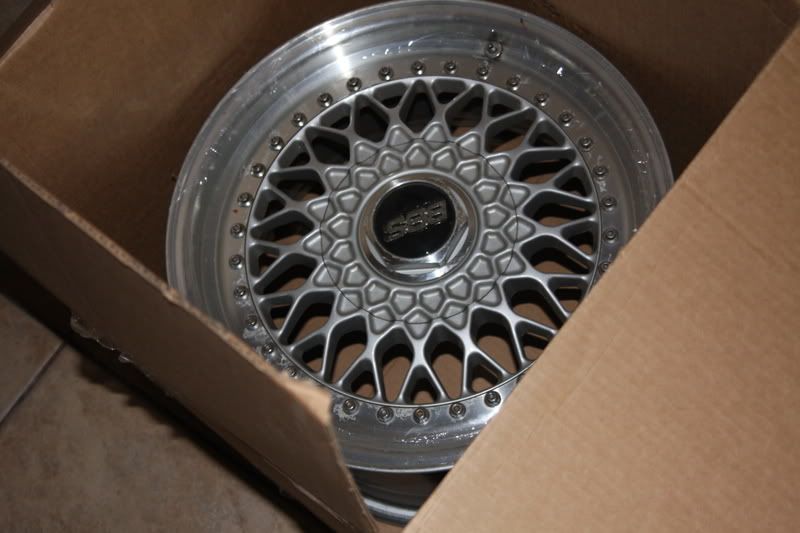
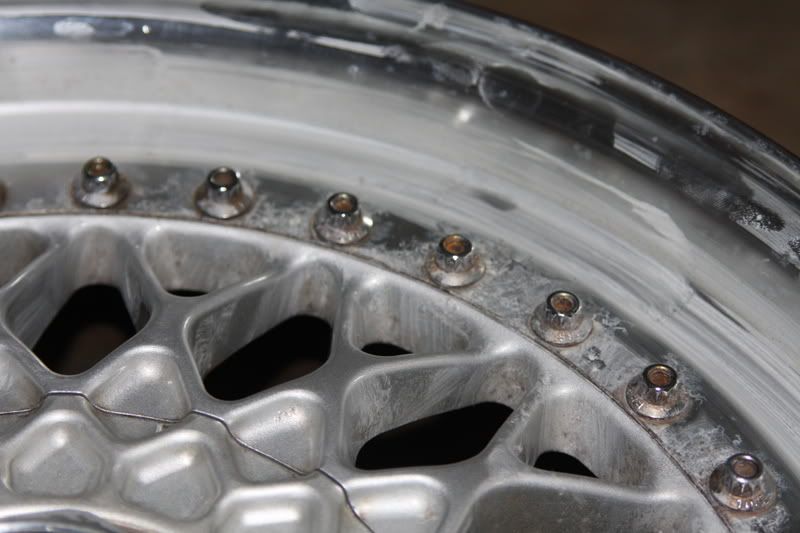
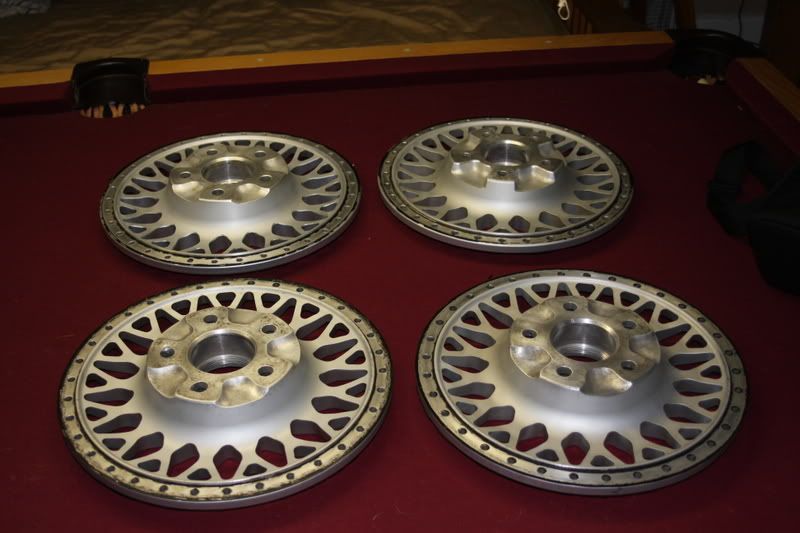
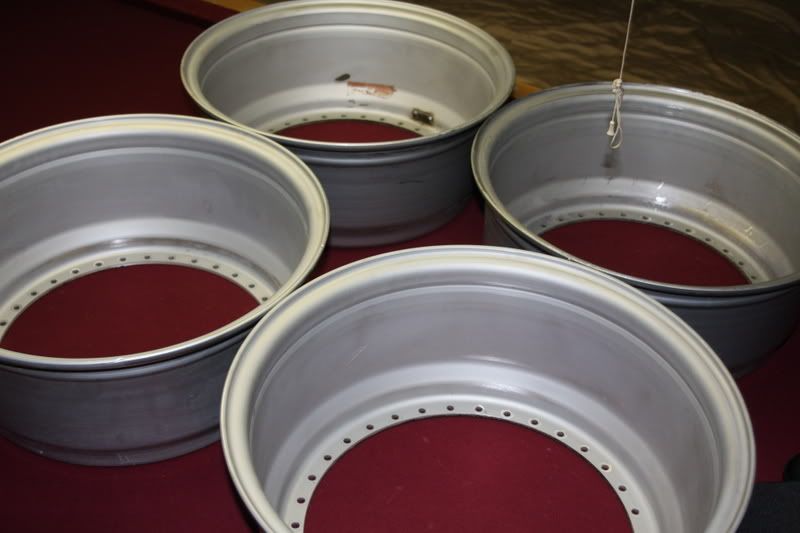
restoring wheels is much easier when they are in their individual pieces. so i took off all the hardware (136 sets of nuts and bolts). the 3 pieces are together pretty tight so seperating the pieces is done by placing each wheel in an oven individually (obviously) on bake 350 for 5 min. remove the wheel... take it outside and beat the back side of the lip with a rubber mallet around the wheel until it pops off (this may take a decent amount of force). then have someone hold a 2x4 upright against the ground. while holding the bottom lip of the barrel drop the wheel down on top of the 2x4 so that the top of the board hits the mounting point on the back of the face of the wheels. this should knock the face off.
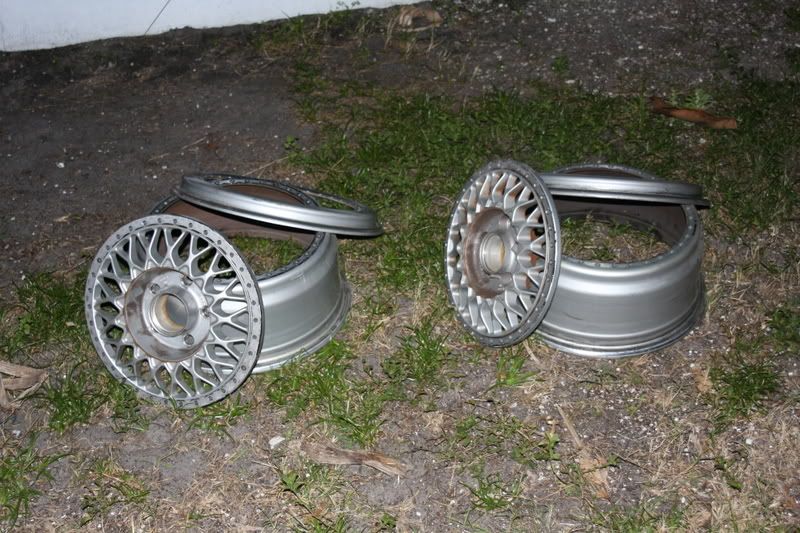
clean the pieces well (i used engine bright mostly and a scotch bright for the barrels).
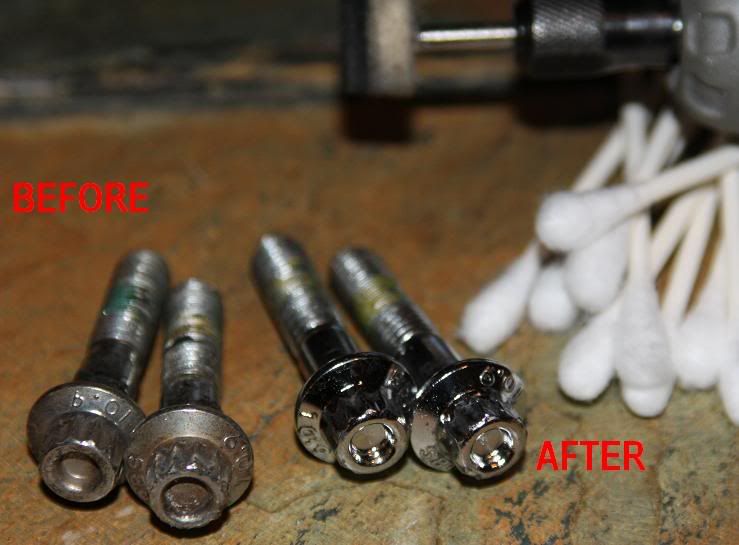
rather then replace the hardware ($200-$500 for new bolts) i decided to restore the bbs ones.
i soaked the bolts in coke for a day in hopes that it would help loosen the service grime.
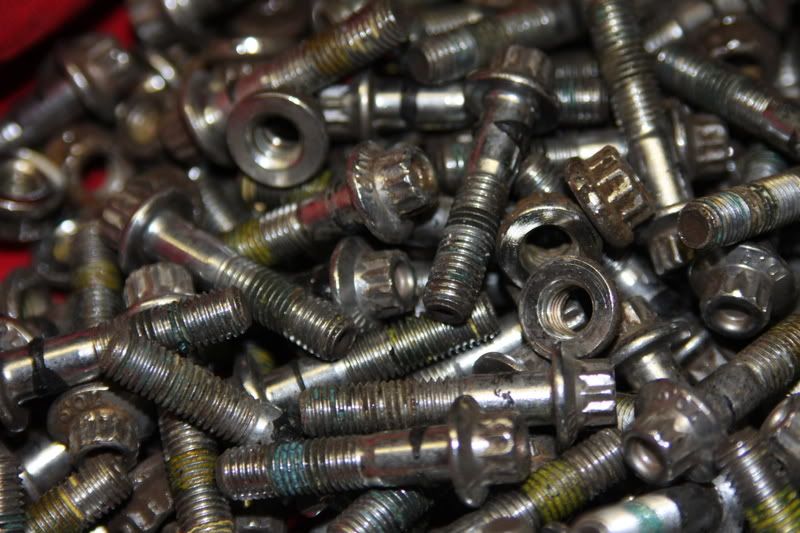
i purchased a dremel a while back so i decided to use this for restoring the bolts. i bought a polishing kit for the dremel and used the half inch soft polishing srew on bit plus mothers aluminum polish for the bolts. each bolt was done individually. the centers of the bolts have divots in them which were done with qtips and mothers polish. a microfiber cloth was used for the final touch.
the lips are a whole seperate adventure. if you dont plan on spending the noraml $200-$250 each on new lips then get ready for fun.
start by using aircraft stripper on them to remove the factory clear coat (you can find aircraft stripper at most home depots or car paint distributers). if there are any rough spots or light curb damage you can remove most of this by dry sanding with 150 grit-320 grit sand paper.
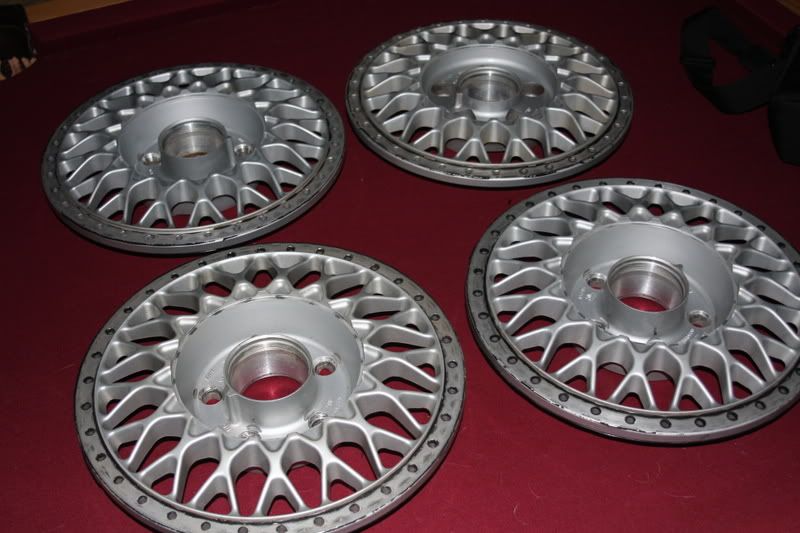
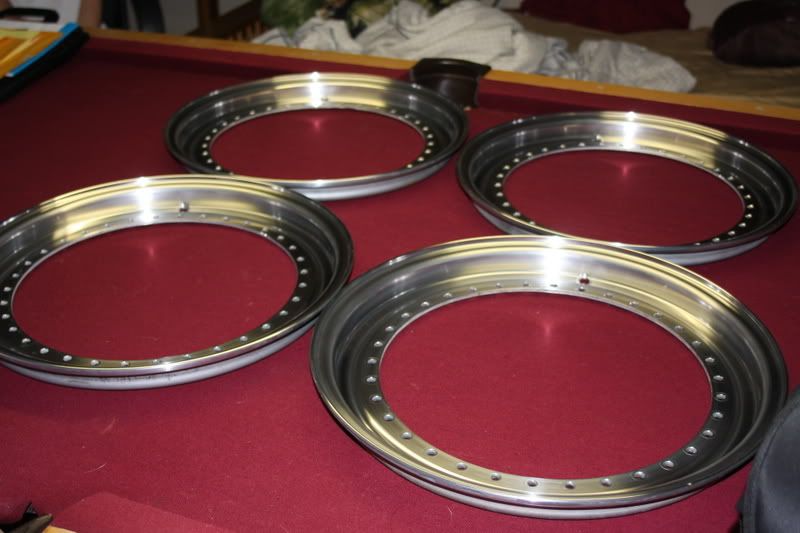
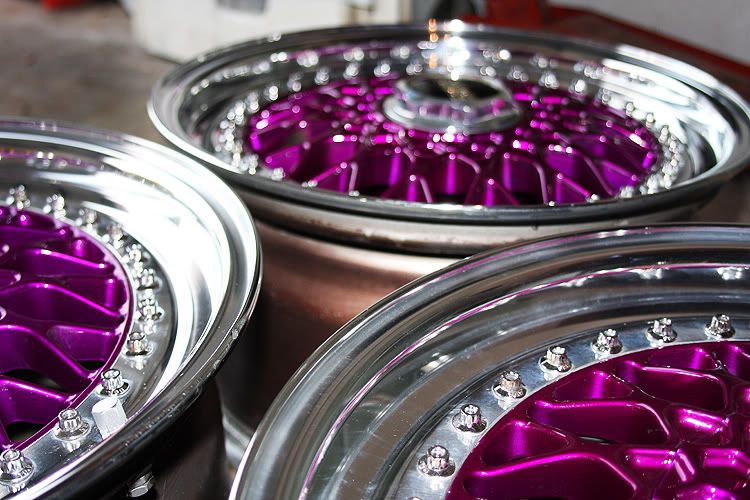
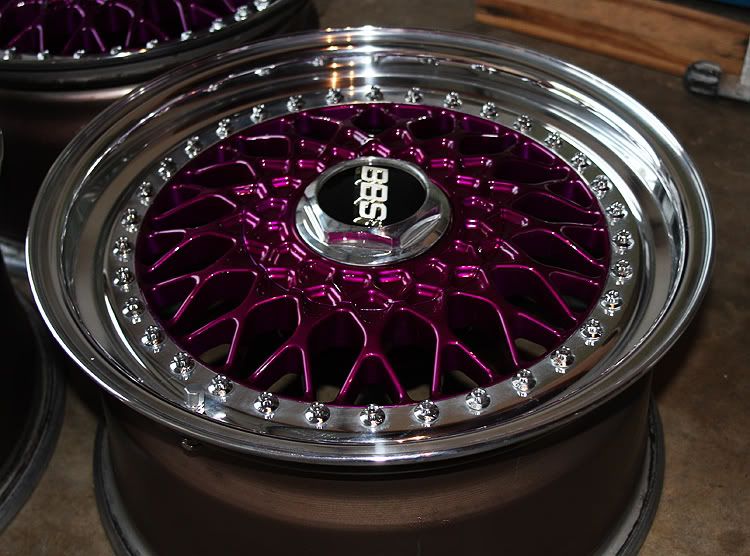
then you want to wet sand the entire face of the lip with 400grit, then 600grit, then 1000grit, then 1500grit, and finally 2000grit sand papers. the end result should look like this:

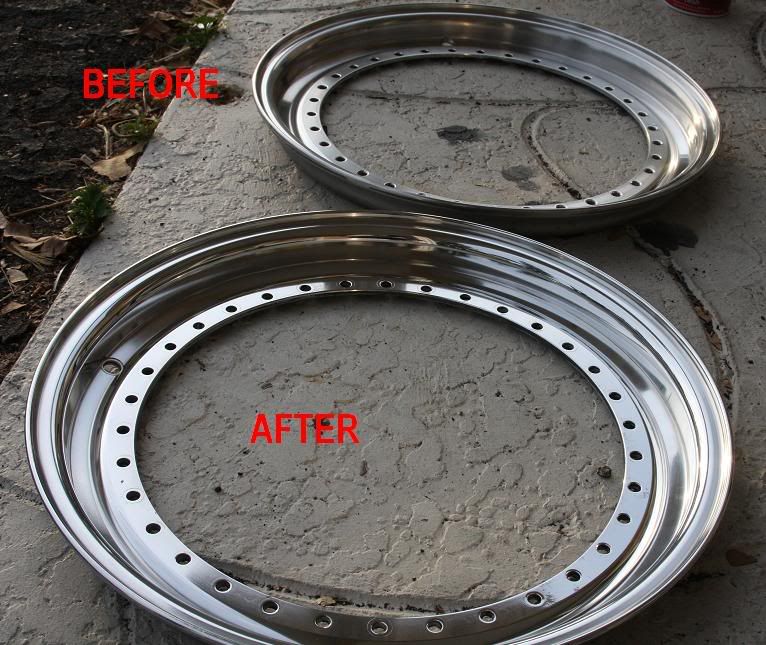
once you finish wetsanding you can use mothers aluminum polish along with a mothers polishing cone or polishing ball (can be purchased at most automotive stores) and a chordless or chord drill to high speed buff each lip. take your time! once they are buffed clean them off with a microfiber cloth. the difference should be substantial.

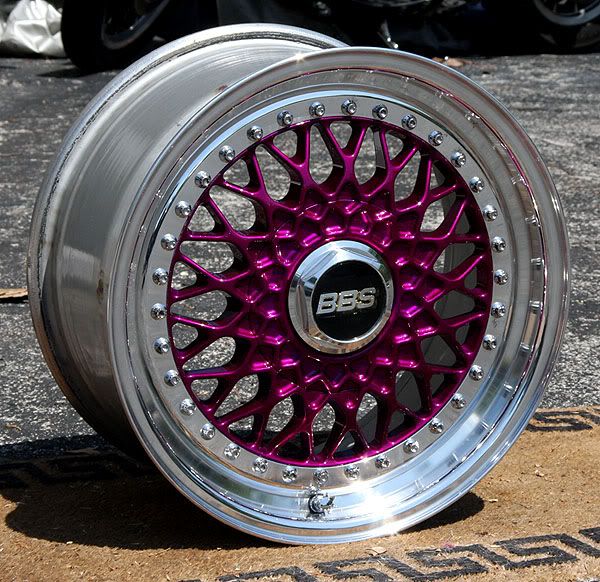
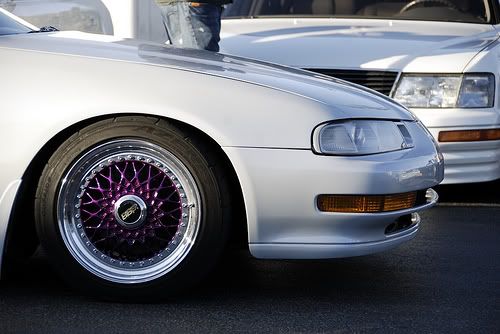
as far as the centers go it is up to you... you can have them powdercoated, chromed, painted... what have you. if you are spending all this time i suggest getting something that will last and be easy to clean (especially with mesh wheels). i went with powdercoating and decided on candy violet. tranceologist did my powder coating. make sure to have the powder coater or whoever tape off the mounting surface of the faces (where the 3 piece will sandwich together) or you will have a very difficult time assembling.
when putting the wheels back together you want to put a small bead of 100% silicon caulking (can be found at homedepot) in between the surfaces. put all the bolts in and hand tighten the nuts onto them. when tightening find the torque specs online for your particular wheel if you want or just tighten them until they are good and tight lol (at owners own risk). you want to tighten the bolts in a crossing pattern just like when putting lug nuts on.
the center caps have hex screw caps. restore these by following the same steps of stripping, wetsanding, and polishing/buffing as stated above for the lips. they can be seperated from the center cap and bbs logo by removing the circular wire locks from the backside.
once everything is back together you want to properly seal each wheel. use the 100% silicon caulking and run a bead along the sandwich portioned part of the wheel (this is located underneath where the tire will sit so this will all be hidden by the tire so it doesnt have to be super pretty). once a full bead is ran along the wheel take your finger and smooth the silicon over the 2 gaps between the 3 pieces (as applies to different wheels or 2 piece wheels). wait 24 hours to dry. i suggest doing a 2nd application of silicon to help gaurantee no leakage once the tires are mounted.
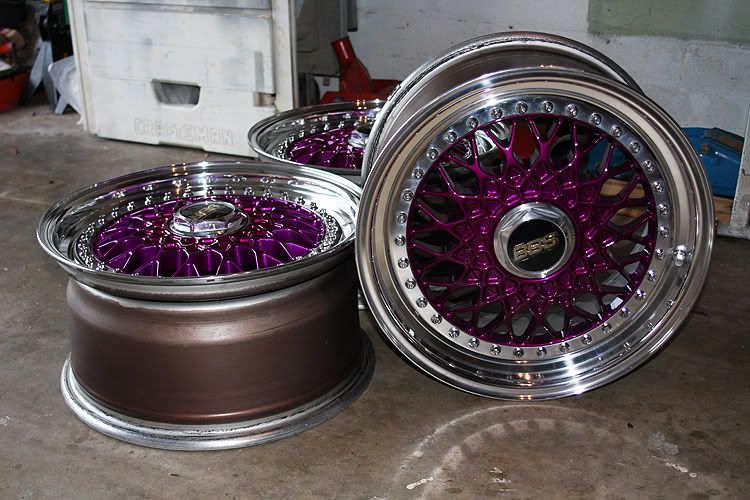
final outcome:
mine leaked the first time do to a poor job sealing so this is after a year and a half of use when i resealed them right before i sold them:
i hope this helps.
thanks for looking.
_zac
this is a step by step on rim restoration (the way i went about it) to help any members if they choose this option. i get questions about how i restored my old bbs rs mesh from my build thread a few times a week almost so i am making this thread to help ayone who is interested and so i can just slap a link for anyone inquiring through messages.
i started with a set of 5x114.3 16x8 +32 3 piece bbs rs mesh that i ordered off rbmotoring.
they were in rough shape and needed some love.
restoring wheels is much easier when they are in their individual pieces. so i took off all the hardware (136 sets of nuts and bolts). the 3 pieces are together pretty tight so seperating the pieces is done by placing each wheel in an oven individually (obviously) on bake 350 for 5 min. remove the wheel... take it outside and beat the back side of the lip with a rubber mallet around the wheel until it pops off (this may take a decent amount of force). then have someone hold a 2x4 upright against the ground. while holding the bottom lip of the barrel drop the wheel down on top of the 2x4 so that the top of the board hits the mounting point on the back of the face of the wheels. this should knock the face off.
clean the pieces well (i used engine bright mostly and a scotch bright for the barrels).
rather then replace the hardware ($200-$500 for new bolts) i decided to restore the bbs ones.
i soaked the bolts in coke for a day in hopes that it would help loosen the service grime.
i purchased a dremel a while back so i decided to use this for restoring the bolts. i bought a polishing kit for the dremel and used the half inch soft polishing srew on bit plus mothers aluminum polish for the bolts. each bolt was done individually. the centers of the bolts have divots in them which were done with qtips and mothers polish. a microfiber cloth was used for the final touch.
the lips are a whole seperate adventure. if you dont plan on spending the noraml $200-$250 each on new lips then get ready for fun.
start by using aircraft stripper on them to remove the factory clear coat (you can find aircraft stripper at most home depots or car paint distributers). if there are any rough spots or light curb damage you can remove most of this by dry sanding with 150 grit-320 grit sand paper.
then you want to wet sand the entire face of the lip with 400grit, then 600grit, then 1000grit, then 1500grit, and finally 2000grit sand papers. the end result should look like this:
once you finish wetsanding you can use mothers aluminum polish along with a mothers polishing cone or polishing ball (can be purchased at most automotive stores) and a chordless or chord drill to high speed buff each lip. take your time! once they are buffed clean them off with a microfiber cloth. the difference should be substantial.
as far as the centers go it is up to you... you can have them powdercoated, chromed, painted... what have you. if you are spending all this time i suggest getting something that will last and be easy to clean (especially with mesh wheels). i went with powdercoating and decided on candy violet. tranceologist did my powder coating. make sure to have the powder coater or whoever tape off the mounting surface of the faces (where the 3 piece will sandwich together) or you will have a very difficult time assembling.
when putting the wheels back together you want to put a small bead of 100% silicon caulking (can be found at homedepot) in between the surfaces. put all the bolts in and hand tighten the nuts onto them. when tightening find the torque specs online for your particular wheel if you want or just tighten them until they are good and tight lol (at owners own risk). you want to tighten the bolts in a crossing pattern just like when putting lug nuts on.
the center caps have hex screw caps. restore these by following the same steps of stripping, wetsanding, and polishing/buffing as stated above for the lips. they can be seperated from the center cap and bbs logo by removing the circular wire locks from the backside.
once everything is back together you want to properly seal each wheel. use the 100% silicon caulking and run a bead along the sandwich portioned part of the wheel (this is located underneath where the tire will sit so this will all be hidden by the tire so it doesnt have to be super pretty). once a full bead is ran along the wheel take your finger and smooth the silicon over the 2 gaps between the 3 pieces (as applies to different wheels or 2 piece wheels). wait 24 hours to dry. i suggest doing a 2nd application of silicon to help gaurantee no leakage once the tires are mounted.
final outcome:
mine leaked the first time do to a poor job sealing so this is after a year and a half of use when i resealed them right before i sold them:
i hope this helps.
thanks for looking.
_zac
 07-04-2010, 07:46 PM
#3
Honda-Tech Member
Join Date: Aug 2007
Location: Rio de Janeiro, RJ, Brazil
Posts: 42
Likes: 0
Received 0 Likes
on
0 Posts
You said you soke the bolts on coke before trying to restore it. The thing is: I have a Huge load of rust on my stock chromed nuts, if I just drop them into coke for a day will it bet better like just needing polish or I'll still need a dremel to get the rust off ?
") 07-05-2010, 12:36 PM
07-05-2010, 12:36 PM
#6
Honda-Tech Member
Thread Starter
 still had to polish each bolt individually...
thanks everyone
_zac

Trending Topics
07-06-2010, 10:17 PM
#11
Honda-Tech Member
Join Date: May 2008
Location: USA
Posts: 819
Likes: 0
Received 0 Likes
on
0 Posts
Man, this is inspiration to work on my Starks.
If you have the time and patience to work on mesh wheels, me working on Starks should be cake in comparison (except for the inner part of the polished lip ).
).
Excellent job!!
If you have the time and patience to work on mesh wheels, me working on Starks should be cake in comparison (except for the inner part of the polished lip
).Excellent job!!
07-07-2010, 07:07 AM
#12
Honda-Tech Member
Thread Starter
yea, just got my dremel kit out and all 136 bolts. sat in front of the tv and went to town. hours and hours of work but they came out great and saved me about $300-400 so it was well worth the time imo.
thanks man!
my brother has starks on his 95 prelude and we fully polished his. they came out great. heres a pic without the center caps (the caps havent been polished yet).

glad i could be an inspiration also man.
i actually sold these wheels a little over a month ago and the new owner is extremely happy with them.
_zac
glad i could be an inspiration also man.
i actually sold these wheels a little over a month ago and the new owner is extremely happy with them.
_zac
07-07-2010, 08:12 AM
#13
Honda-Tech Member
Join Date: May 2008
Location: USA
Posts: 819
Likes: 0
Received 0 Likes
on
0 Posts
my brother has starks on his 95 prelude and we fully polished his. they came out great. heres a pic without the center caps (the caps havent been polished yet).
glad i could be an inspiration also man.
i actually sold these wheels a little over a month ago and the new owner is extremely happy with them.
_zac
glad i could be an inspiration also man.
i actually sold these wheels a little over a month ago and the new owner is extremely happy with them.
_zac
There's just something about white wheels with polished lips right now that's really catching my eye, lol.
07-07-2010, 09:39 AM
#14
Honda-Tech Member
Thread Starter
that would look great. i almost bought a set of one piece starks a few months ago but didnt like the width or offset so much so i decided against it. you can never go wrong with white with a polished lip
goodluck
_zac
goodluck
_zac
 11-02-2011, 07:13 AM
#18
Honda-Tech Member
Thread Starter
thanks fellas
as requested:

i miss them and sometimes wish i didnt sell them but it was time to move on to bigger and better things.
_zac
as requested:
i miss them and sometimes wish i didnt sell them but it was time to move on to bigger and better things.
_zac

Thread
Thread Starter
Forum
Replies
Last Post
the all out kid
Wheel and Tire
5
03-19-2009 06:20 PM