
How to: D16Z6 block with D16A6 head
 04-03-2010, 10:32 PM
#1
PHANTOM MENACE
Thread Starter
iTrader: (2)
Join Date: May 2005
Location: SYCUAN NINE, CA, USA
Posts: 6,042
Likes: 0
Received 3 Likes
on
3 Posts
DISCLAIMER: This combination may or may not be legal in your area so it is up to you to research your local laws regarding swapping engines before taking on such an endeavor. You are responsible for your own car and your own actions with it.
So the first question some of you may be asking is why would anyone do this specific combo? Well, I have no idea why YOU may want to do this but my specific reason was simply to replace a bad 1.6 block with a good 1.6 block. I had purchased a complete A6 engine to replace my blown DOHC ZC but as luck would have it, the A6 block had ovalized cylinder walls. With that money basically wasted, I realized I had a good Z6 block sitting in the garage and decided to use it with the A6 head. I had assumed that it would be a straight "one for one" swap with my old block but it turns out that there are a few differences that will hold you back if you decide to do this without doing any research first. In my search for specific answers to issues I encountered I couldn't find any definite answers on the web. I had a camera handy so I snapped pics of all the crucial differences in the hopes it may benefit someone else later on down the road. In the end, the Factory Service Manual (FSM) for both the 88-91 and 92-95 Civic is what provided the most insight and if you don't already have one for your specific car I highly recommend obtaining one.
Depending on where you are, finding an A6 motor may not be an easy thing to do and with the age of our cars only increasing I would imagine that it won't get any easier to find them in good shape. There are only really a few reasons to do this particular combo which may include:
You already converted to MPFI on your D15B1/2 but want to up the displacement to make an equivalent Si setup
You need a direct replacement block but not the head and you can only find a Z6 block
You couldn't pass up a good deal (low mileage/low cost)
You want to drop your compression but don't want to do a rebuild
Etc.
Whatever reason you may have, you will encounter a few issues and I posted this so that anyone looking to do this will have a straight forward guide and not get stumped anywhere during the process.
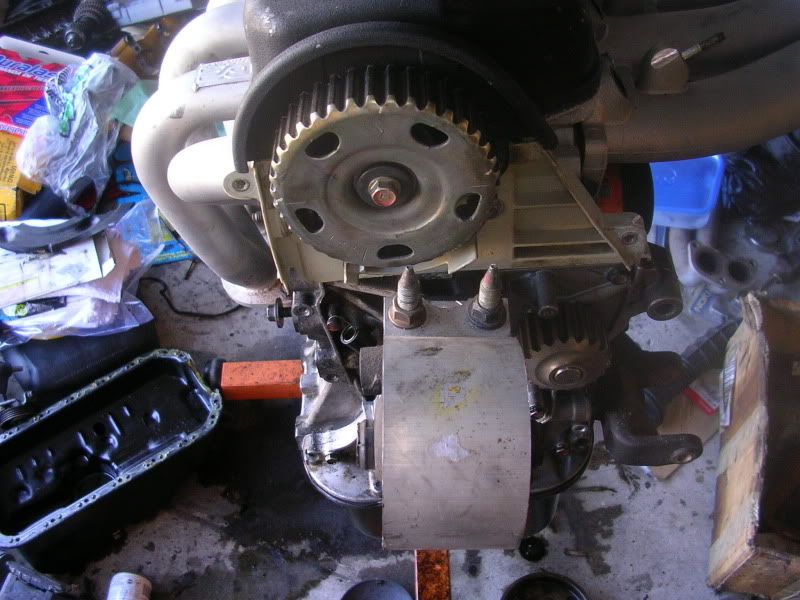
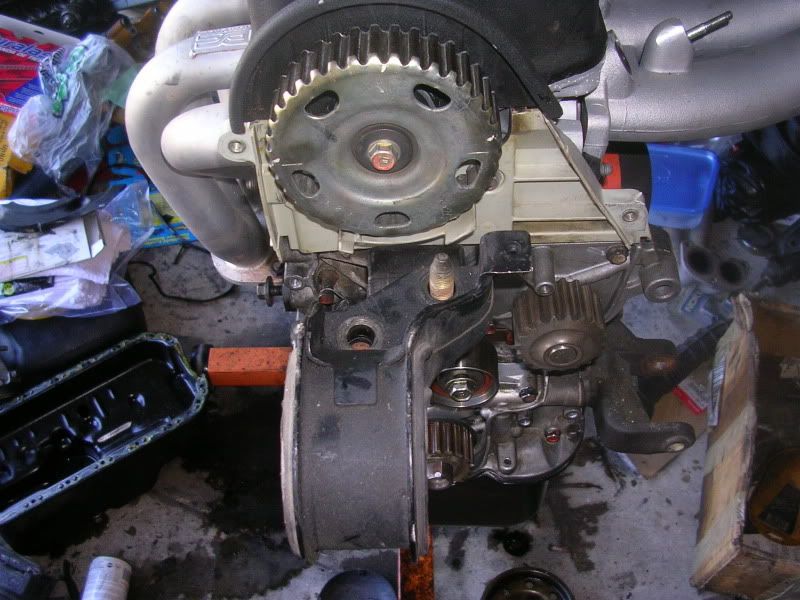
First of all, the block will fit together with the tranny but you will need to use the A6 driver's side mount and bracket to fit it in.
The first picture is with the Z6 mount and bracket in place and the second picture is with the A6 mount and bracket in place. Note that the mount is farther forward when using the A6 mount and bracket.
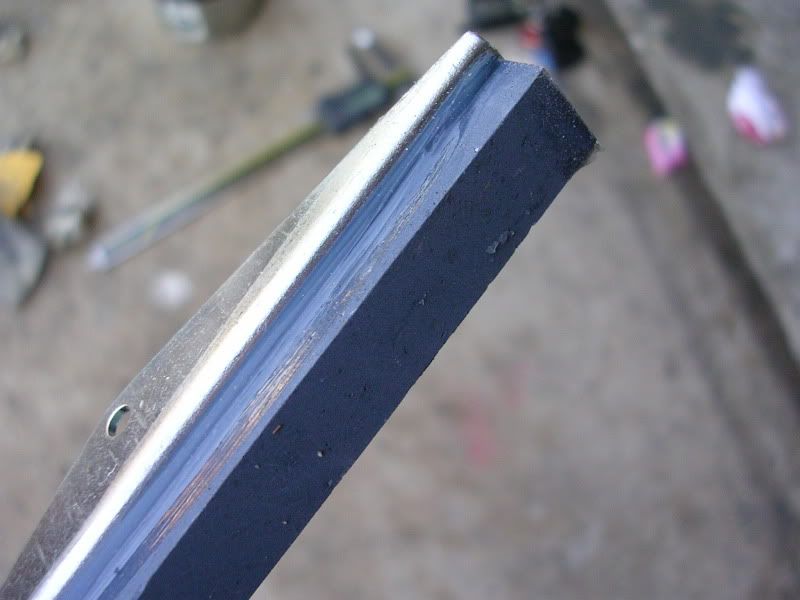
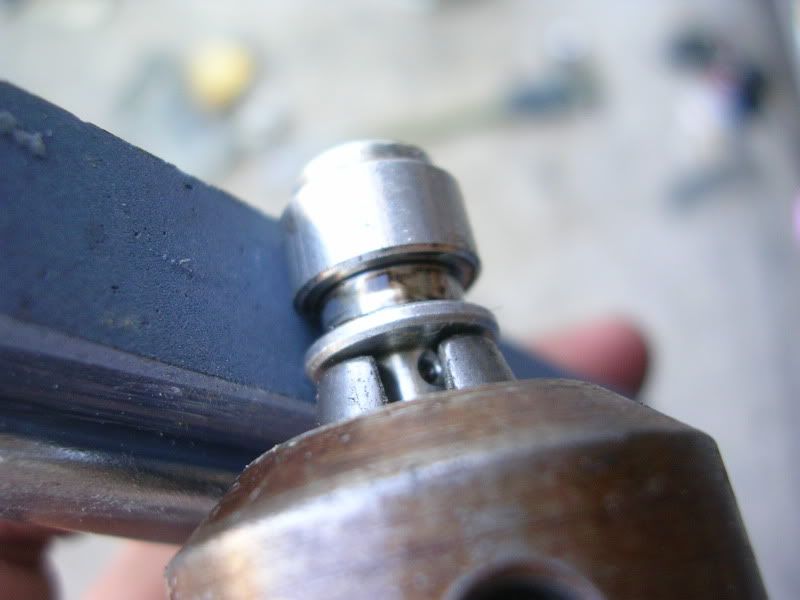
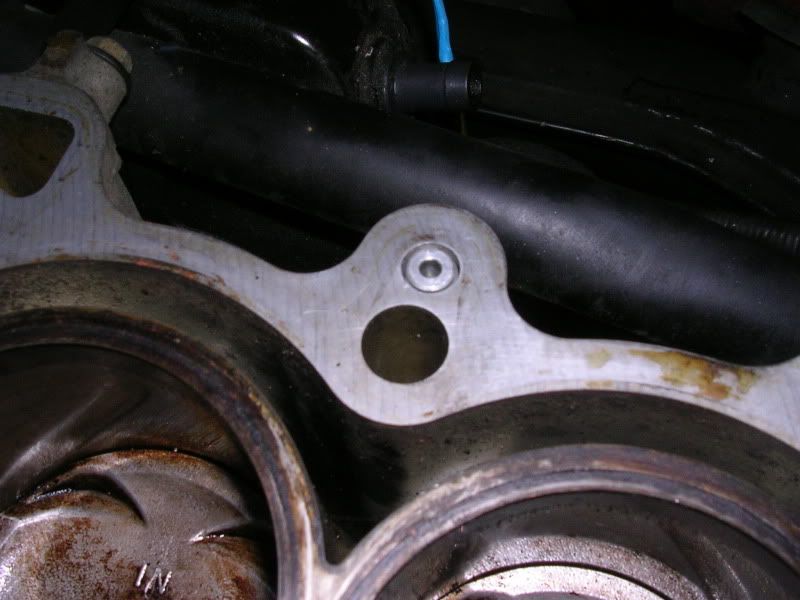
Next up, you have to deal with the oil control jet. As with most (if not all) VTEC motors the oil control jet is located in the head while with the non VTEC motors it is located in the block (this holds true for D, B, and H series motors). For this specific combo you'll realize that both the block and head do not have an oil control jet. This means that you will have to obtain one seperately. Easy enough but here's the problem:
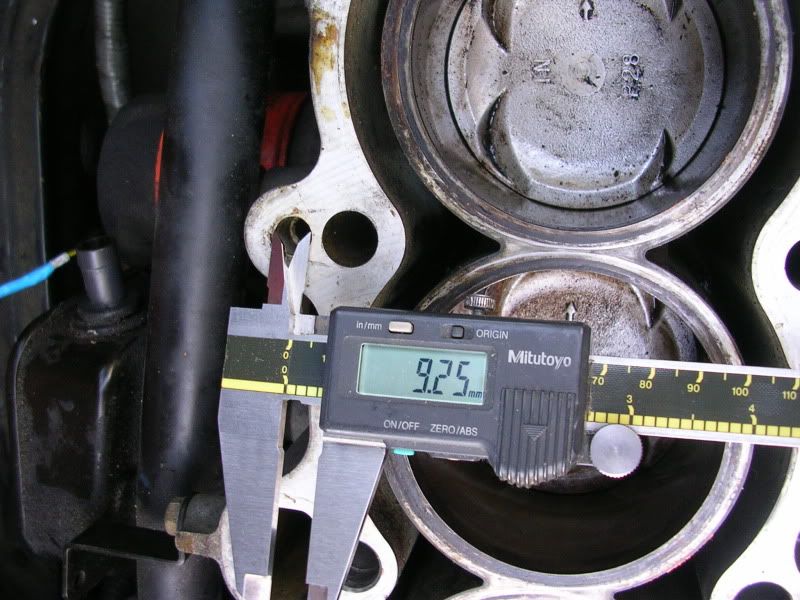

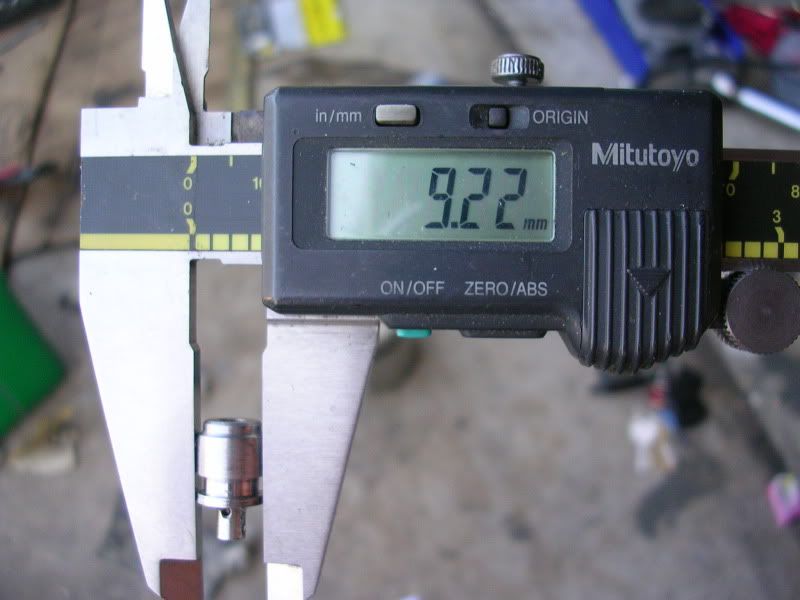
As you can see from the measurements taken, it will not fit in the block. You have two options to make it work:
A.) Take an appropriately sized drill bit and open up that hole with a depth deep enough to accomodate the oil control jet. I only recommend doing this if you have the block out of the car and have the oil pan off. The last thing anyone needs is metal shavings being circulated in engine oil.
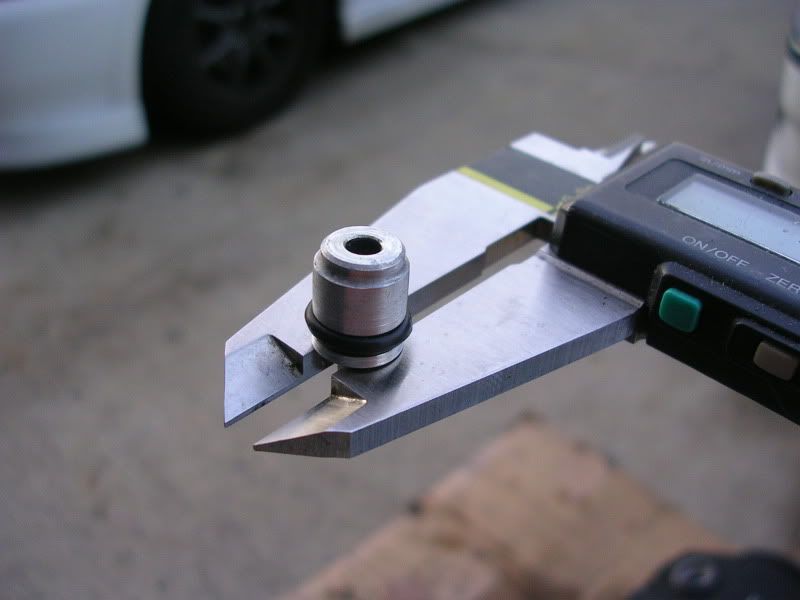
B.) Shave the oil jet down to fit the existing opening in the Z6 block. If you want to be precise have it done at a machine shop. Afterwards you will need to source an appropriately sized o-ring for the oil control jet.
For my setup, I chose to go with option B for two reasons. The first and primary reason was because I had already put my block in my car and sealed the oil pan. The second reason was because I didn't want to permanently alter the Z6 block. Since I was on a budget I opted to do shave down the oil control jet myself by inserting it into a drill and using some sand paper and a sanding stone as shown:
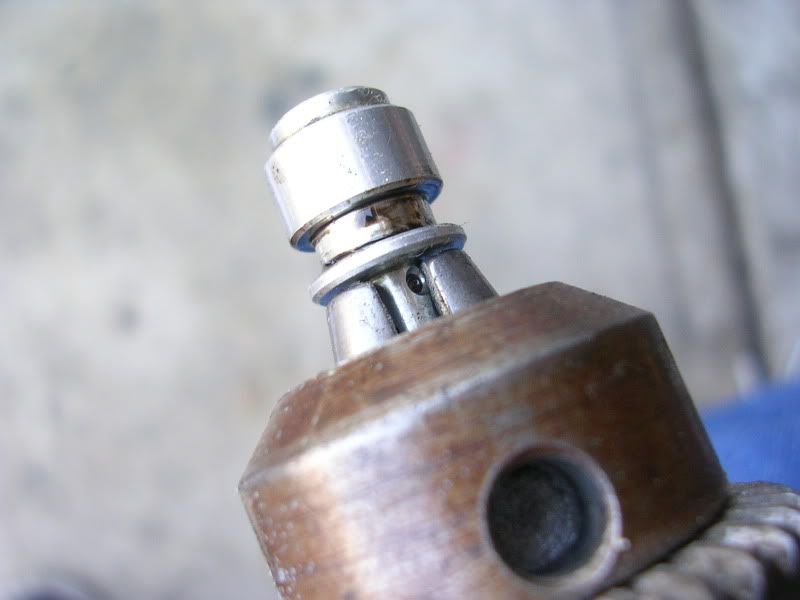
Hold the sandpaper (and sanding stone or whatever you are using) to the oil control jet and let loose with the drill.
After about 15 minutes or so, I was able to get it down to a workable diameter. If you do this yourself take your time and make sure you use a micrometer. Go slowly, once you shave off material there is no going back!
For the o-ring, I measured the diameter of the o-ring seat on the oil control jet and took a trip to the local parts store and bought a generic pack of metric o-rings. I matched an o-ring that had the same inside diameter measurement as the seat on the oil control jet. The problem here is that the thickness of the new o-ring would not allow it to fit into the block. My solution, repeat the drill process and narrow that o-ring down a bit. You want to leave enough material on the o-ring so that it will fit snugly into the block.


Now that the oil control jet is addressed, you'll want to decide what you want to do about the compression. If you don't already know, the P28 piston found in the Z6 block has a bigger dish than the PM6 piston found in the A6 block. If you are shooting for a straight A6 compression like I was you have two options to achieve the 9.1 compression ratio:
A.) Use A6 pistons.
B.) Shave the head down.
For my situation, swapping pistons wasn't an option due to budget constraints. Instead I opted to shave the head down to achieve the 9.1 compression ratio. Here's is where a compression calculator comes in handy:
http://www.zealautowerks.com/dseries.html
Using that link, I found that when using the P28 pistons in combination with a Z6 metal headgasket the head would need to be shaved .030in to obtain a comparable compression ratio to the A6. So I dropped my head off at the local machine shop and had them take off the appropriate amount of material:
For your specific setup and/or needs use link above to figure out your course of action.
By now you should be ready to bolt the head down to the block. The next challenge I encountered was finding out that the Z6 belt was too small and that the A6 belt was too loose. Solution? Use a DX timing belt.
A6 belt - too big!!

Z6 belt - too small!!
B2/B7 belt - just right!!
Something worth noting here is that the B2/B7 share the same tensioner as the A6 which unfortunately is not interchangable with the Z6 tensioner. I tried to mix and match tensioners to try to get either the A6 or Z6 belt to work and found out the hard way that they only fit their respective blocks.
Now that the belt is addressed, you are ready to put the timing belt cover on. Again, like the tensioner, the covers only work with their respective blocks. Simple, use the Z6 timing cover...not that simple. This made me ask two questions, 1) Will the Z6 lower cover work with the A6 upper covers? and 2) Will I need to use the Z6 pulley since the timing marks are meant for it? Well, since I had both an A6 and Z6 block at my disposal I compared the relevant aspects and this is what I found:
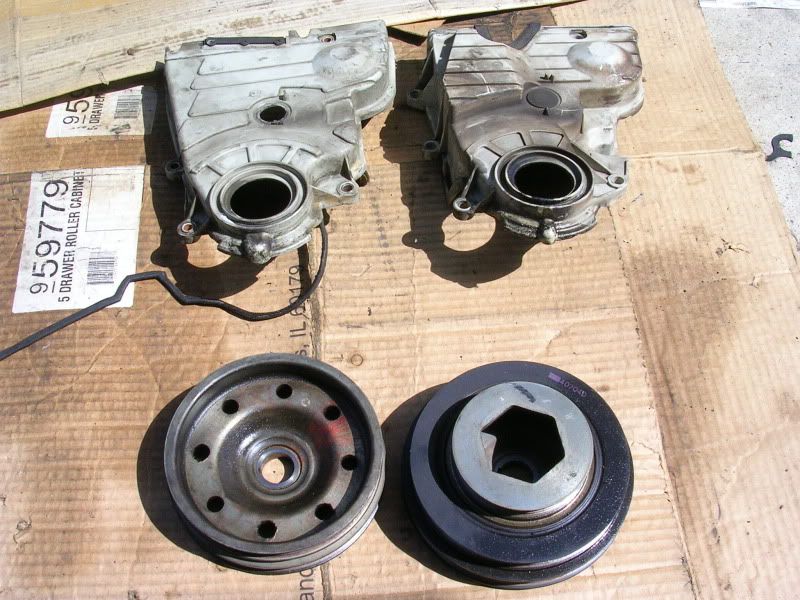
For question 1) I simply mocked them up and found that they hit each other.
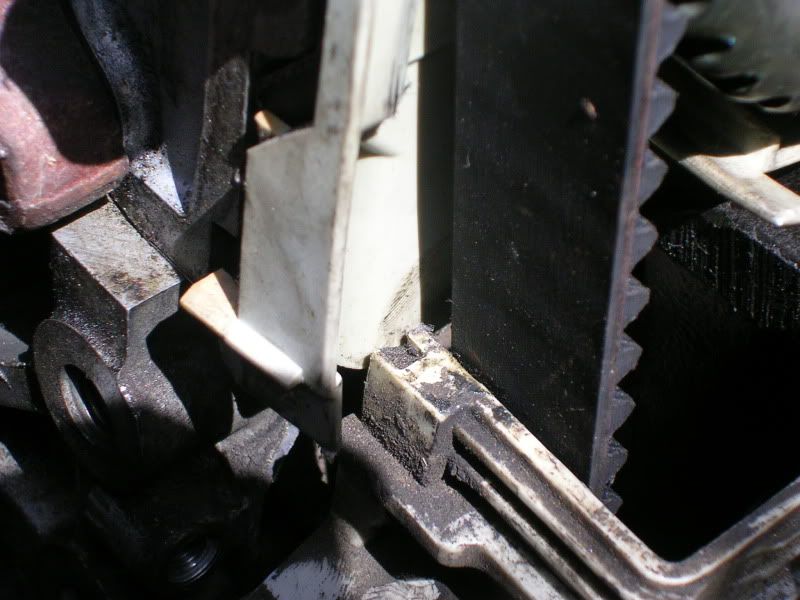
Solution? Cut the top portion of the Z6 lower timing belt cover. You could trim the A6 upper covers but I figured I'd rather cut on piece rather than two pieces. I trimmed along a ledge that was already molded into the cover. Turns out that it is almost just the right amount to cut off to make it work with the A6 upper covers.
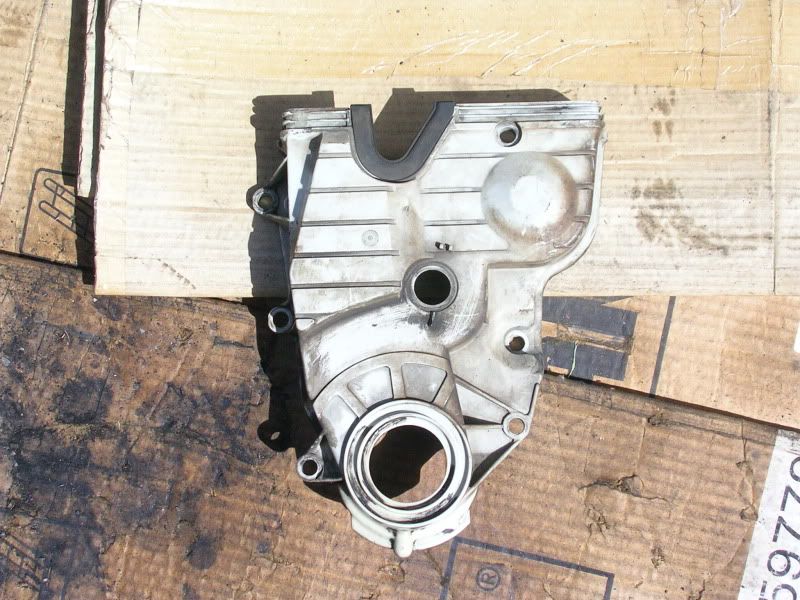

And now for the test fit:
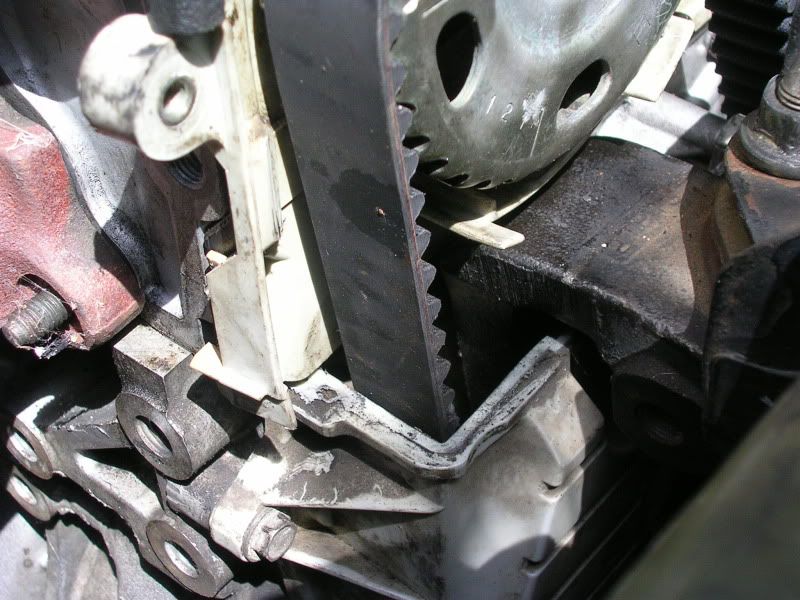
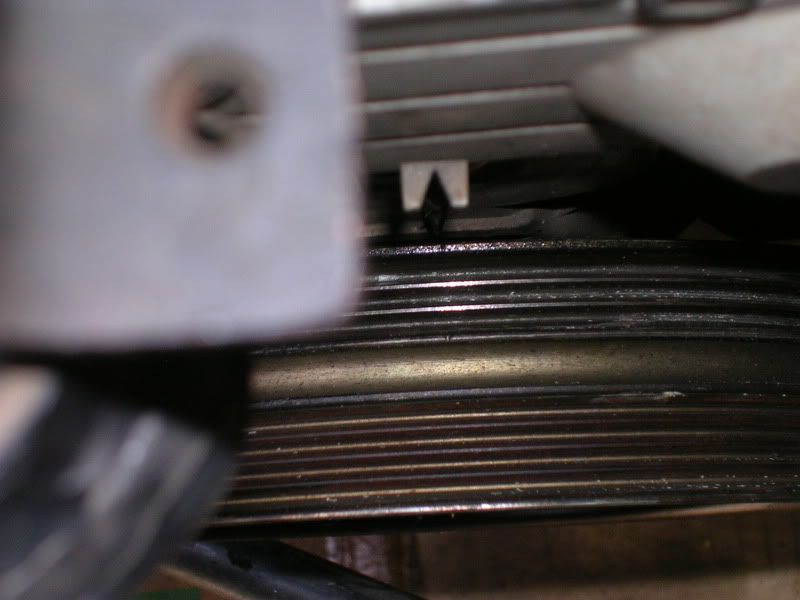
Seems to fit just fine now so now on to question 2). Again since I had both parts, this was as simple as setting the block to Top Dead Center (TDC) with the original Z6 pulley and then swapping it out for the A6 pulley.
With the Z6 pulley:
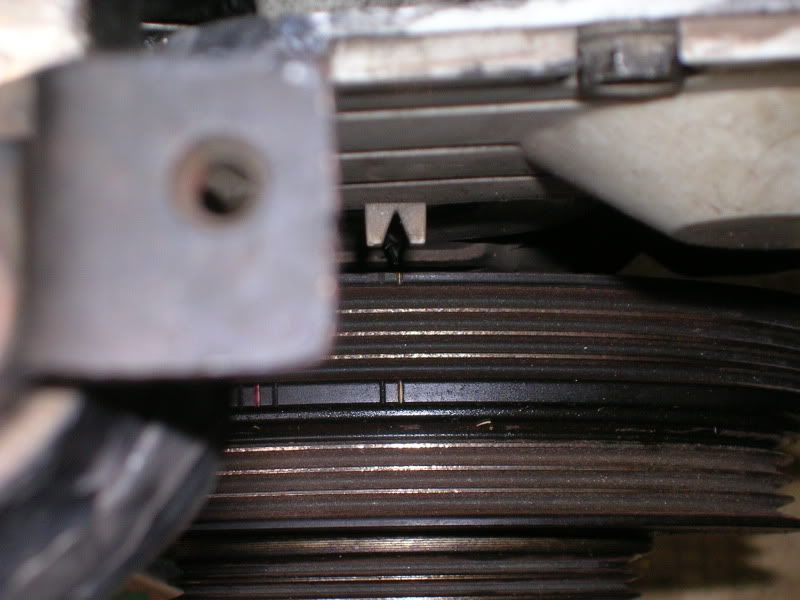
With the A6 pulley:
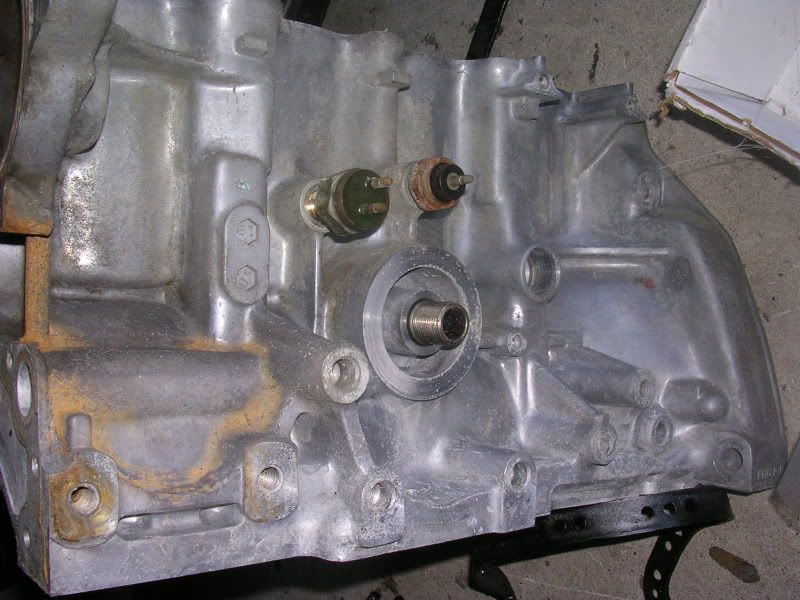
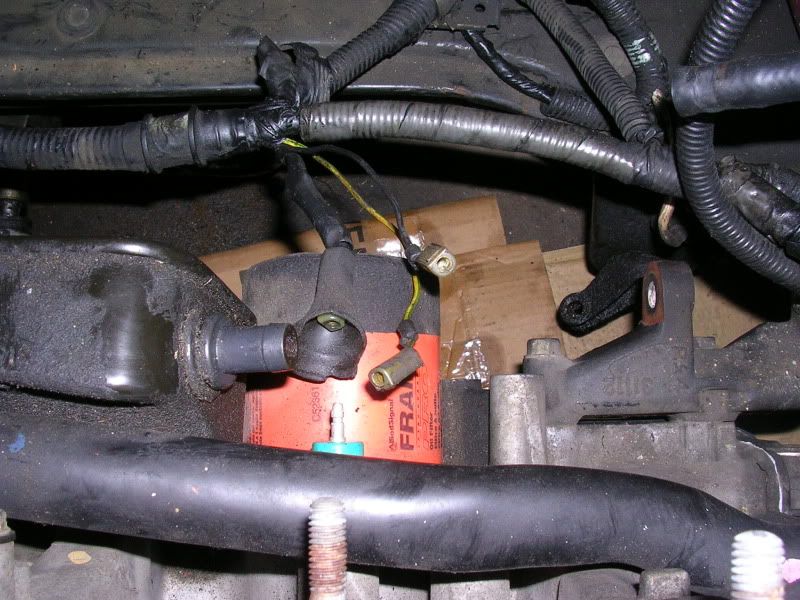
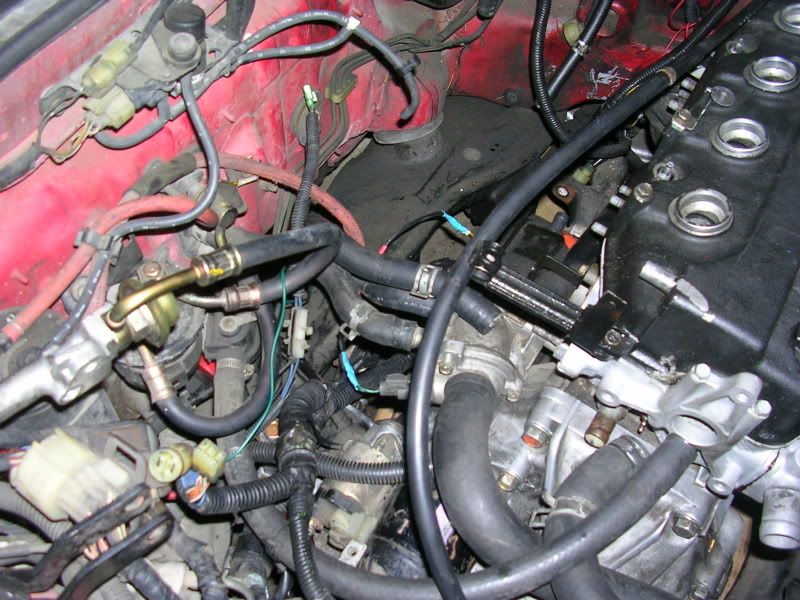
Seems to be the same so timing it will not be an issue. Assembly from here on out is straight forward but there is one more major difference that will need to be addressed. The thermoswitch for the radiator fan is located on the back of the 88-91 blocks while on the 92-95 engines it is actually located on the thermostat housing. Unfortunately they do not use the same switch or the same connector.
Back of the A6 block, the thermoswitch is the two pronged green sensor:
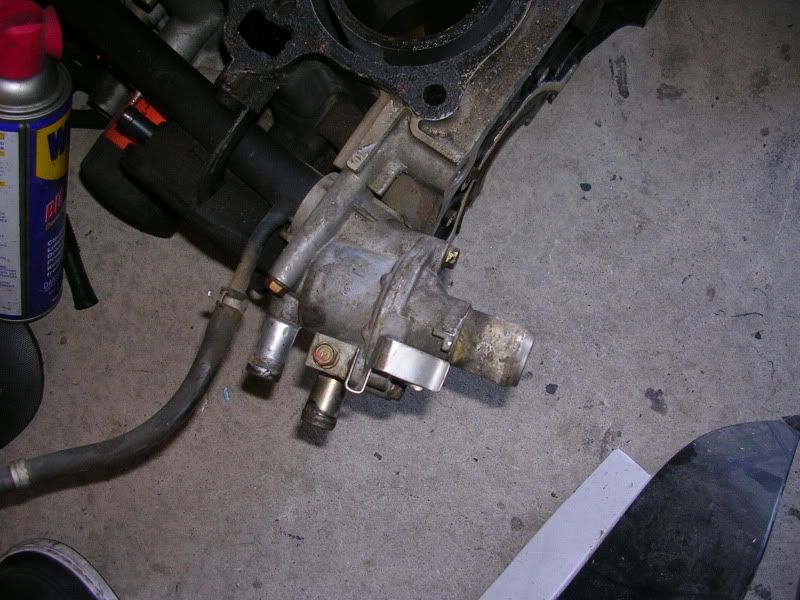
A6 thermostat housing, no sensors:
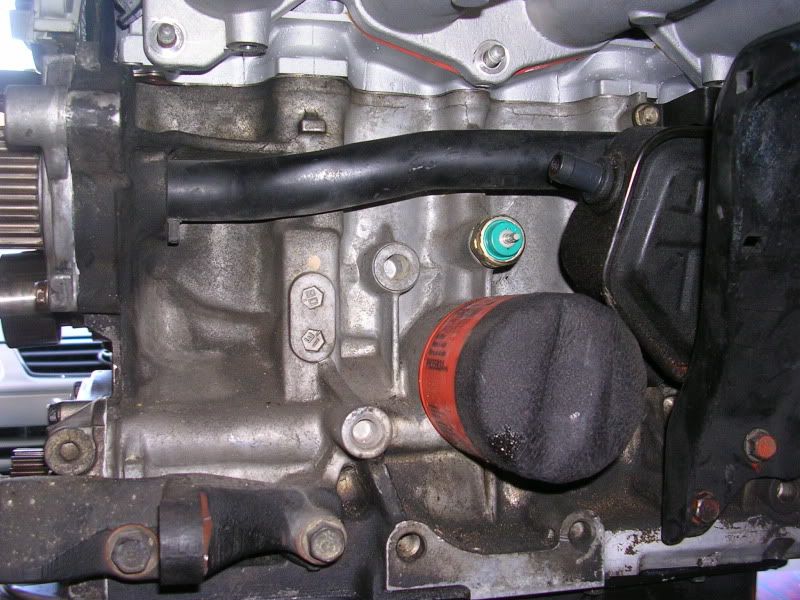
Back of the Z6 block, no thermoswitch but you can see the place for it is still physically there on the block but it is not drilled thru and it is not tapped for threads:
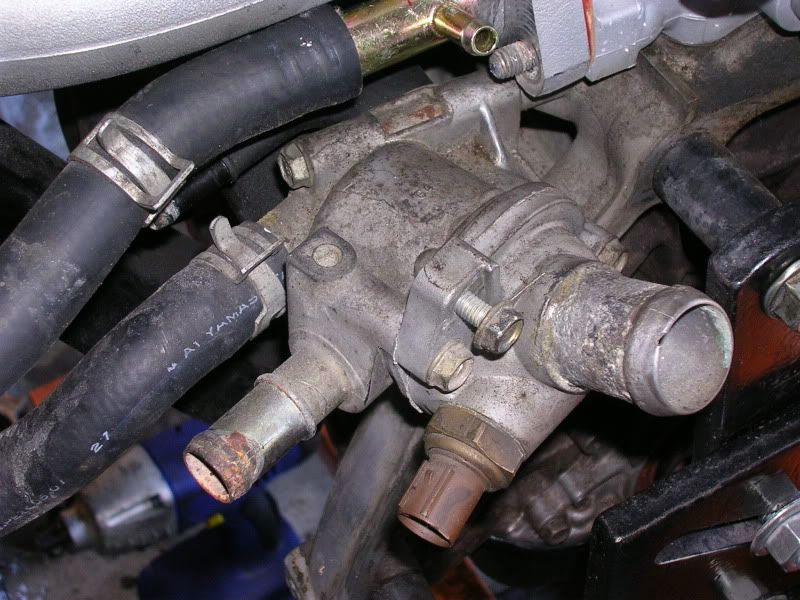
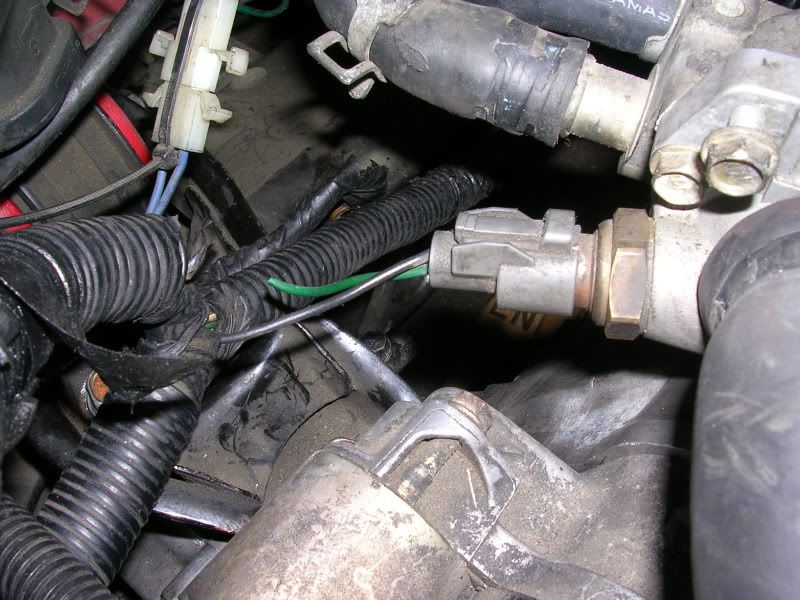
Z6 thermostat housing, the thermoswitch is the only sensor on it:
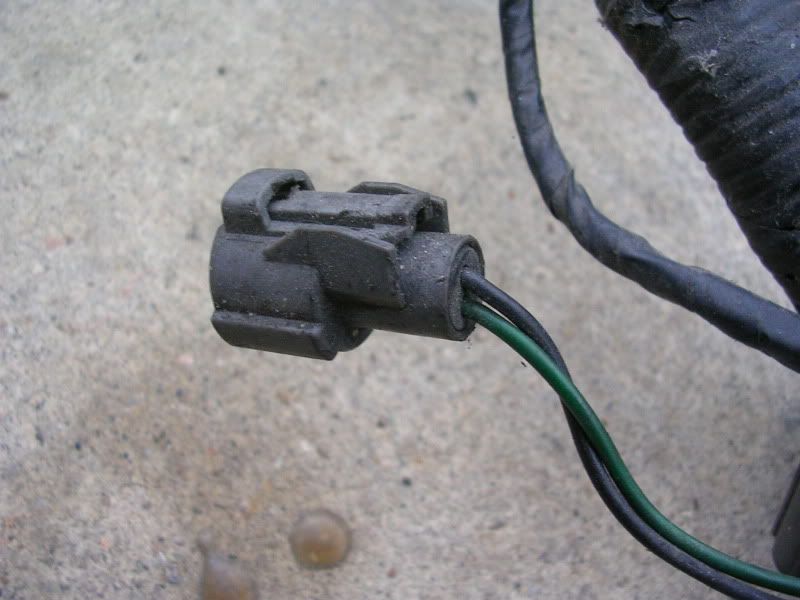
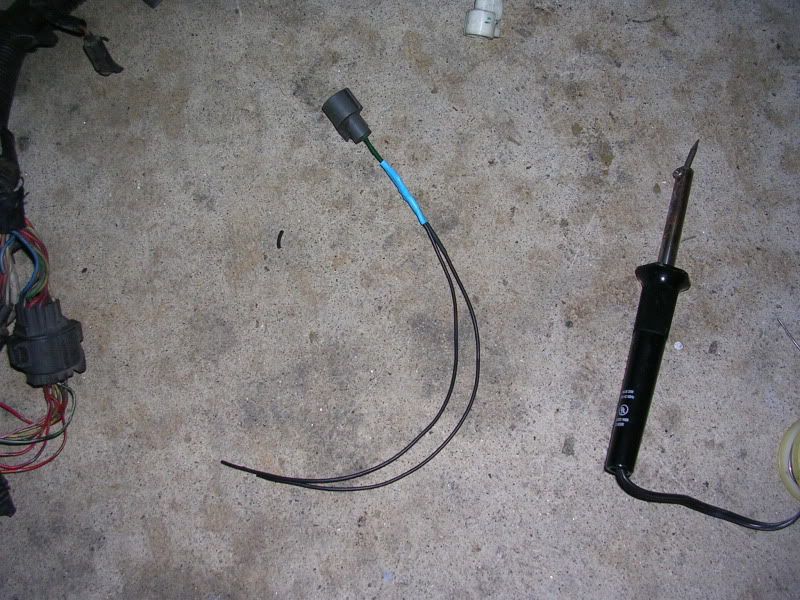
I looked up the radiator fan wiring diagrams for both the 88-91 Civic and 92-95 Civic and found that the diagrams were basically the same thing so I went ahead and cut the old connector off of the harness and replaced it with the corresponding connector (I also added an appropriate amount of extra wire to extend the plug so it would reach the thermostat housing).
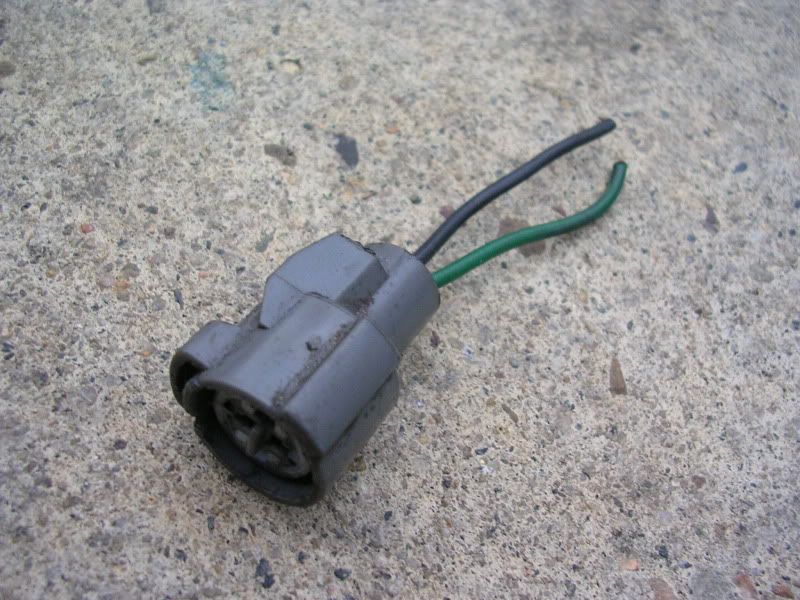
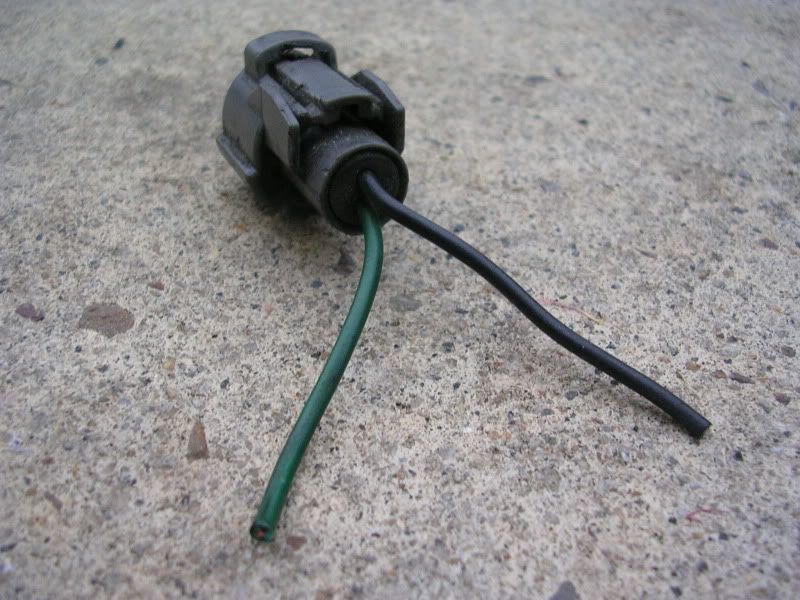
I referenced my 94 Civic to confirm I was cutting the correct plug off of a spare harness I have and double checked it against the wire colors found in the FSM. The plug for the A6 harness had one yellow/green wire and one black wire while the plug for the newer harness had one green wire and one black wire. Simply cut and solder the new plug.
Picture from my 94 Civic to confirm the correct plug will be cut:
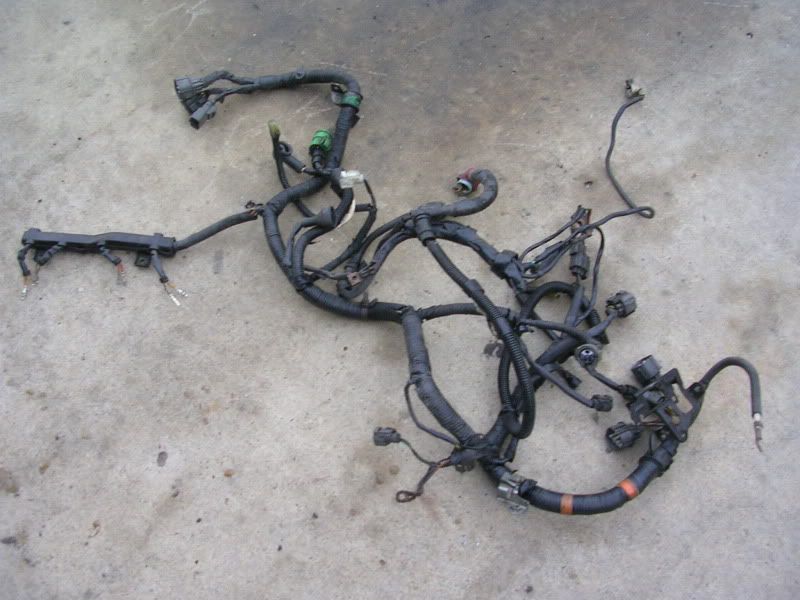
My spare harness:
The plug needed:
The plug cut from the harness:
Test fit:
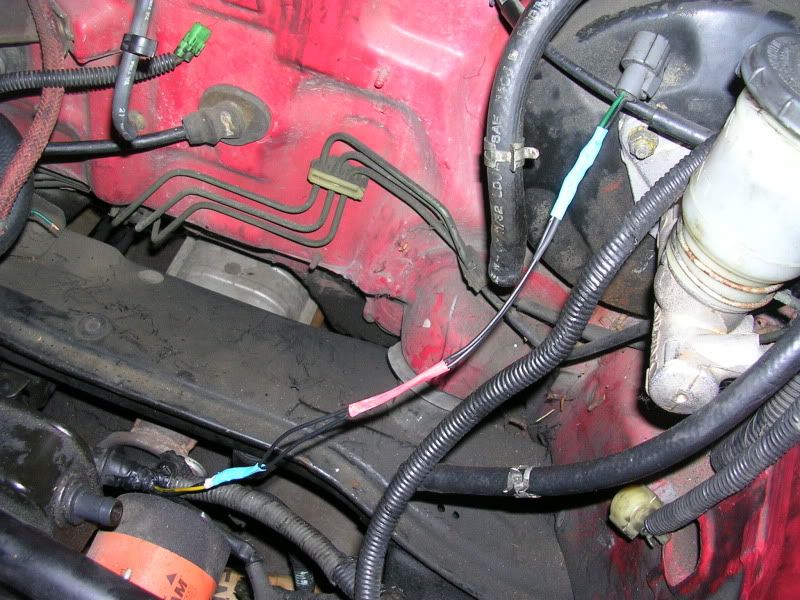
Extended wiring:
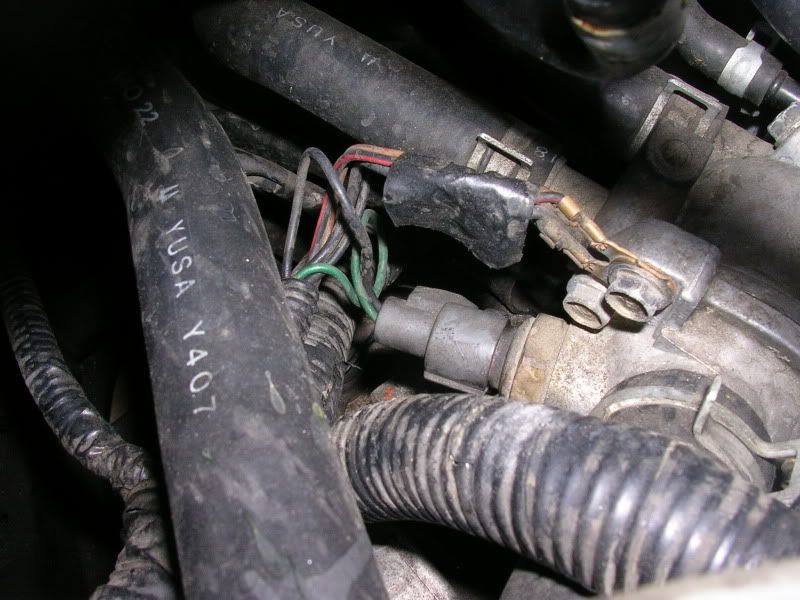
The connector to cut from the harness in the car (plug should have a cover/shroud but mine didn't):
New plug soldered into place on the harness:
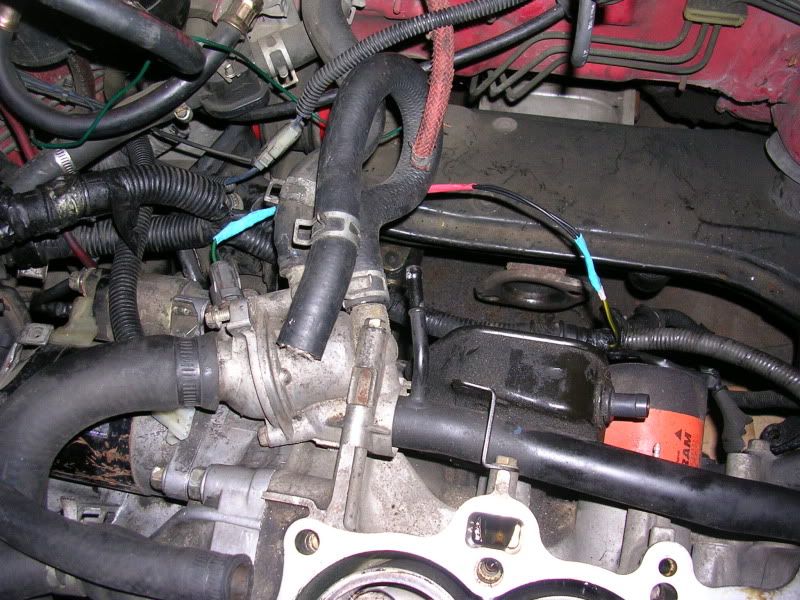
Connected:

After EVERYTHING was addressed, I assembled my motor using new seals/gaskets as needed and filled the engine with new fluid after letting it sit for a day (I wanted to ensure enough time had elapsed in order for the hondabond to fully cure. I turned the key and it fired up on the first try.
Any questions feel free to post. Hope this helps someone out in the future.
NOTE: This took alot longer to type up and I'm tired so I may edit this tomorrow to fix any grammatical and/or spelling errors and to add any relevant info I may have missed.
So the first question some of you may be asking is why would anyone do this specific combo? Well, I have no idea why YOU may want to do this but my specific reason was simply to replace a bad 1.6 block with a good 1.6 block. I had purchased a complete A6 engine to replace my blown DOHC ZC but as luck would have it, the A6 block had ovalized cylinder walls. With that money basically wasted, I realized I had a good Z6 block sitting in the garage and decided to use it with the A6 head. I had assumed that it would be a straight "one for one" swap with my old block but it turns out that there are a few differences that will hold you back if you decide to do this without doing any research first. In my search for specific answers to issues I encountered I couldn't find any definite answers on the web. I had a camera handy so I snapped pics of all the crucial differences in the hopes it may benefit someone else later on down the road. In the end, the Factory Service Manual (FSM) for both the 88-91 and 92-95 Civic is what provided the most insight and if you don't already have one for your specific car I highly recommend obtaining one.
Depending on where you are, finding an A6 motor may not be an easy thing to do and with the age of our cars only increasing I would imagine that it won't get any easier to find them in good shape. There are only really a few reasons to do this particular combo which may include:
You already converted to MPFI on your D15B1/2 but want to up the displacement to make an equivalent Si setup
You need a direct replacement block but not the head and you can only find a Z6 block
You couldn't pass up a good deal (low mileage/low cost)
You want to drop your compression but don't want to do a rebuild
Etc.
Whatever reason you may have, you will encounter a few issues and I posted this so that anyone looking to do this will have a straight forward guide and not get stumped anywhere during the process.
First of all, the block will fit together with the tranny but you will need to use the A6 driver's side mount and bracket to fit it in.
The first picture is with the Z6 mount and bracket in place and the second picture is with the A6 mount and bracket in place. Note that the mount is farther forward when using the A6 mount and bracket.
Next up, you have to deal with the oil control jet. As with most (if not all) VTEC motors the oil control jet is located in the head while with the non VTEC motors it is located in the block (this holds true for D, B, and H series motors). For this specific combo you'll realize that both the block and head do not have an oil control jet. This means that you will have to obtain one seperately. Easy enough but here's the problem:
As you can see from the measurements taken, it will not fit in the block. You have two options to make it work:
A.) Take an appropriately sized drill bit and open up that hole with a depth deep enough to accomodate the oil control jet. I only recommend doing this if you have the block out of the car and have the oil pan off. The last thing anyone needs is metal shavings being circulated in engine oil.
B.) Shave the oil jet down to fit the existing opening in the Z6 block. If you want to be precise have it done at a machine shop. Afterwards you will need to source an appropriately sized o-ring for the oil control jet.
For my setup, I chose to go with option B for two reasons. The first and primary reason was because I had already put my block in my car and sealed the oil pan. The second reason was because I didn't want to permanently alter the Z6 block. Since I was on a budget I opted to do shave down the oil control jet myself by inserting it into a drill and using some sand paper and a sanding stone as shown:
Hold the sandpaper (and sanding stone or whatever you are using) to the oil control jet and let loose with the drill.
After about 15 minutes or so, I was able to get it down to a workable diameter. If you do this yourself take your time and make sure you use a micrometer. Go slowly, once you shave off material there is no going back!
For the o-ring, I measured the diameter of the o-ring seat on the oil control jet and took a trip to the local parts store and bought a generic pack of metric o-rings. I matched an o-ring that had the same inside diameter measurement as the seat on the oil control jet. The problem here is that the thickness of the new o-ring would not allow it to fit into the block. My solution, repeat the drill process and narrow that o-ring down a bit. You want to leave enough material on the o-ring so that it will fit snugly into the block.
Now that the oil control jet is addressed, you'll want to decide what you want to do about the compression. If you don't already know, the P28 piston found in the Z6 block has a bigger dish than the PM6 piston found in the A6 block. If you are shooting for a straight A6 compression like I was you have two options to achieve the 9.1 compression ratio:
A.) Use A6 pistons.
B.) Shave the head down.
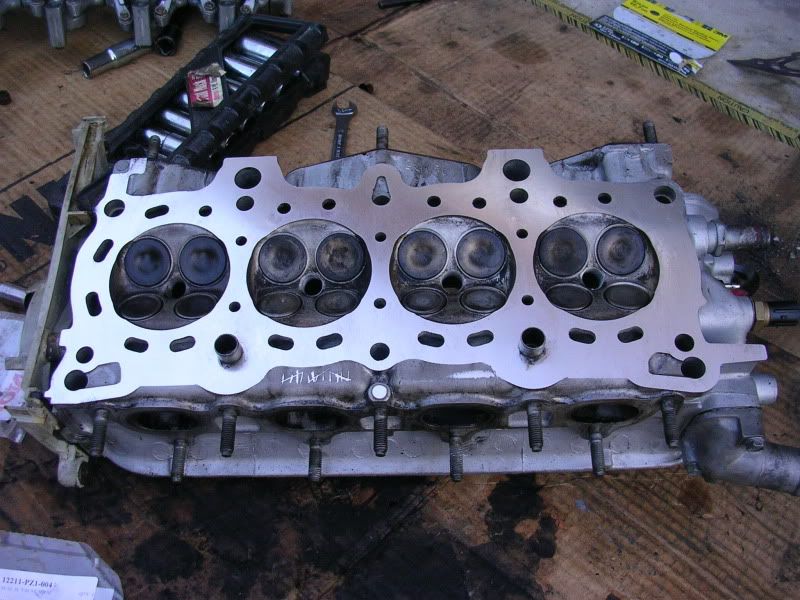
For my situation, swapping pistons wasn't an option due to budget constraints. Instead I opted to shave the head down to achieve the 9.1 compression ratio. Here's is where a compression calculator comes in handy:
http://www.zealautowerks.com/dseries.html
Using that link, I found that when using the P28 pistons in combination with a Z6 metal headgasket the head would need to be shaved .030in to obtain a comparable compression ratio to the A6. So I dropped my head off at the local machine shop and had them take off the appropriate amount of material:
For your specific setup and/or needs use link above to figure out your course of action.
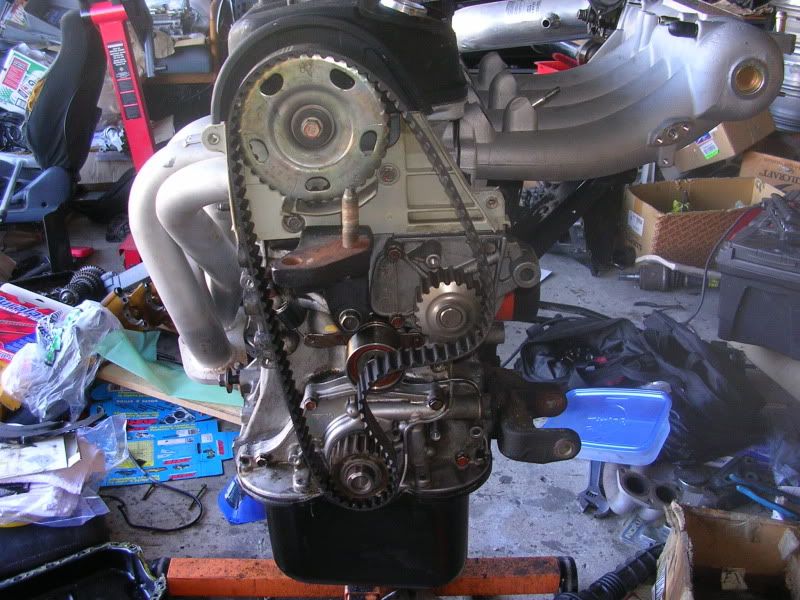
By now you should be ready to bolt the head down to the block. The next challenge I encountered was finding out that the Z6 belt was too small and that the A6 belt was too loose. Solution? Use a DX timing belt.
A6 belt - too big!!
Z6 belt - too small!!
B2/B7 belt - just right!!
Something worth noting here is that the B2/B7 share the same tensioner as the A6 which unfortunately is not interchangable with the Z6 tensioner. I tried to mix and match tensioners to try to get either the A6 or Z6 belt to work and found out the hard way that they only fit their respective blocks.
Now that the belt is addressed, you are ready to put the timing belt cover on. Again, like the tensioner, the covers only work with their respective blocks. Simple, use the Z6 timing cover...not that simple. This made me ask two questions, 1) Will the Z6 lower cover work with the A6 upper covers? and 2) Will I need to use the Z6 pulley since the timing marks are meant for it? Well, since I had both an A6 and Z6 block at my disposal I compared the relevant aspects and this is what I found:
For question 1) I simply mocked them up and found that they hit each other.
Solution? Cut the top portion of the Z6 lower timing belt cover. You could trim the A6 upper covers but I figured I'd rather cut on piece rather than two pieces. I trimmed along a ledge that was already molded into the cover. Turns out that it is almost just the right amount to cut off to make it work with the A6 upper covers.
And now for the test fit:
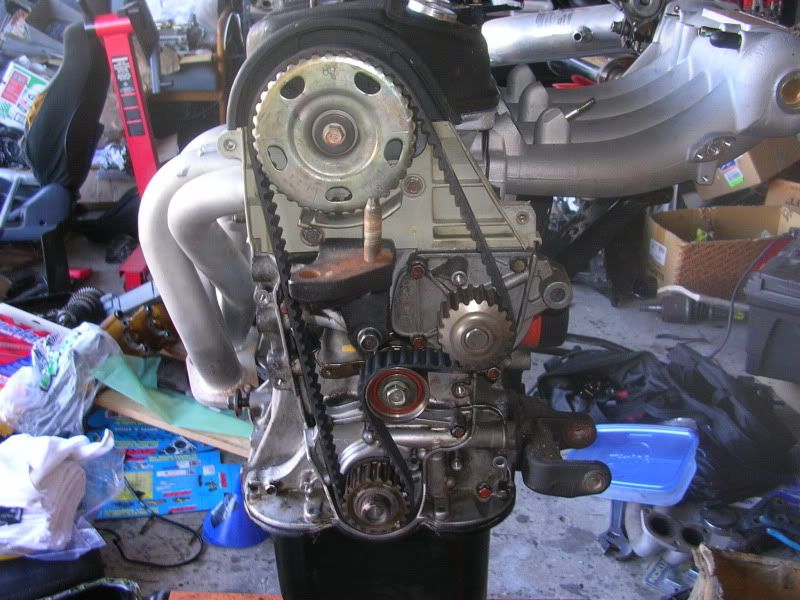
Seems to fit just fine now so now on to question 2). Again since I had both parts, this was as simple as setting the block to Top Dead Center (TDC) with the original Z6 pulley and then swapping it out for the A6 pulley.
With the Z6 pulley:
With the A6 pulley:
Seems to be the same so timing it will not be an issue. Assembly from here on out is straight forward but there is one more major difference that will need to be addressed. The thermoswitch for the radiator fan is located on the back of the 88-91 blocks while on the 92-95 engines it is actually located on the thermostat housing. Unfortunately they do not use the same switch or the same connector.
Back of the A6 block, the thermoswitch is the two pronged green sensor:
A6 thermostat housing, no sensors:
Back of the Z6 block, no thermoswitch but you can see the place for it is still physically there on the block but it is not drilled thru and it is not tapped for threads:
Z6 thermostat housing, the thermoswitch is the only sensor on it:
I looked up the radiator fan wiring diagrams for both the 88-91 Civic and 92-95 Civic and found that the diagrams were basically the same thing so I went ahead and cut the old connector off of the harness and replaced it with the corresponding connector (I also added an appropriate amount of extra wire to extend the plug so it would reach the thermostat housing).
I referenced my 94 Civic to confirm I was cutting the correct plug off of a spare harness I have and double checked it against the wire colors found in the FSM. The plug for the A6 harness had one yellow/green wire and one black wire while the plug for the newer harness had one green wire and one black wire. Simply cut and solder the new plug.
Picture from my 94 Civic to confirm the correct plug will be cut:
My spare harness:
The plug needed:
The plug cut from the harness:
Test fit:
Extended wiring:
The connector to cut from the harness in the car (plug should have a cover/shroud but mine didn't):
New plug soldered into place on the harness:
Connected:
After EVERYTHING was addressed, I assembled my motor using new seals/gaskets as needed and filled the engine with new fluid after letting it sit for a day (I wanted to ensure enough time had elapsed in order for the hondabond to fully cure. I turned the key and it fired up on the first try.
Any questions feel free to post. Hope this helps someone out in the future.
NOTE: This took alot longer to type up and I'm tired so I may edit this tomorrow to fix any grammatical and/or spelling errors and to add any relevant info I may have missed.
Last edited by 24TEN; 04-03-2010 at 10:58 PM.
 04-04-2010, 01:24 AM
#2
Honda-Tech Member
good work man! a6 blocks are definately hard to find... idk how i got lucky enough to snag the matching block and trans from the same si almost two years ago. usually si's around here (surprise surprise) that end up at the yard get d15's swapped in them
 04-04-2010, 03:41 PM
#5
PHANTOM MENACE
Thread Starter
iTrader: (2)
Join Date: May 2005
Location: SYCUAN NINE, CA, USA
Posts: 6,042
Likes: 0
Received 3 Likes
on
3 Posts
Thanks guys. Ironically after swapping this into my car and sorting out all the details, 2 A6 engines and an SOHC ZC engine showed up at my local junkyard. I don't need another A6 block anymore but I'm tempted to grab one anyway since they aren't necessarily common. I figure I can rebuild it later on and save it as a back up engine.
04-04-2010, 03:52 PM
#6
Honda-Tech Member

Trending Topics
09-07-2010, 10:35 PM
#8
Honda-Tech Member
Join Date: Aug 2010
Location: cali.
Posts: 155
Likes: 0
Received 0 Likes
on
0 Posts
are you obd1??? damn im doing the exact thing but cant get the distributor on...
was going to drill holes but.. not sure if thats the best idea
was going to drill holes but.. not sure if thats the best idea
09-08-2010, 02:48 PM
#9
PHANTOM MENACE
Thread Starter
iTrader: (2)
Join Date: May 2005
Location: SYCUAN NINE, CA, USA
Posts: 6,042
Likes: 0
Received 3 Likes
on
3 Posts
I stayed pre OBD. My plan was almost literally a block for block swap.
I'm assuming you are using (or attempting to use) a Z6 distributor? The flange only lines up with the Z6 head. If you are set on OBD1 then you can use a DX/LX OBD1 distributor (or DX/LX OBD2 distributor with modified plugs), it's the same bolt pattern.
NOTE: I've read that there is a slight difference between VTEC and non VTEC distributors with respect to how one of the internal sensors picks up it's signal. Having said that, if you are using a non VTEC head then you shouldn't be using a Z6 distributor anyway.
01-16-2011, 02:57 PM
#11
Honda-Tech Member
Join Date: Mar 2007
Location: RSM
Posts: 285
Likes: 0
Received 0 Likes
on
0 Posts
Don't know if this is the right place to post this but,what is the official name of the housing that the thermostat is in,broke a bolt off in mine and don't want a hassle getting the housing at autozone.
 01-16-2011, 07:15 PM
#14
Honda-Tech Member
Join Date: Dec 2004
Location: Illinois, USA
Posts: 84
Likes: 0
Received 0 Likes
on
0 Posts
I have an A6 long block w/IM, TB & OBD0 distributor in my storage unit (y, for sale).
No wiring harness, or trans - from '91 CRX Si . . . .
No wiring harness, or trans - from '91 CRX Si . . . .
") . really like the timing belt issue that was mentioned.
01-17-2011, 12:37 PM
. really like the timing belt issue that was mentioned.
01-17-2011, 12:37 PM
#17
Honda-Tech Member
Ok questions:
What tranny are you using and which flywheel? z6 Flywheel?
What motor mount and bracket fit in the EF, the one from the 1st pic or the one from the 2nd. You can see the difference in the bolts. One has 1 bolt the other has 2 horizontally.
What tranny are you using and which flywheel? z6 Flywheel?
What motor mount and bracket fit in the EF, the one from the 1st pic or the one from the 2nd. You can see the difference in the bolts. One has 1 bolt the other has 2 horizontally.
01-17-2011, 03:12 PM
#18
Honda-Tech Member
that first mount pic is the stock z6 mount and bracket. the 2nd is the ef post bracket with an ef mount attatched. the 2nd one is what you use. as far as flywheels go as long as you dont use an 88 trans the z6 flywheel will work fine
01-17-2011, 06:10 PM
#19
PHANTOM MENACE
Thread Starter
iTrader: (2)
Join Date: May 2005
Location: SYCUAN NINE, CA, USA
Posts: 6,042
Likes: 0
Received 3 Likes
on
3 Posts
"CivicxTree754" - I did state which mount/bracket to use, it's like two sentences above the first picture. As for the clutch and tranny, what "hatchet_honda" said is pretty much right on but to answer your question I reused my 91 flywheel/clutch/pressure plate setup with my 91 transmission. I figure it'd be best to match those parts to the tranny but to my understanding 89-95 parts are basically compatable (not sure of 96-00 D-series...), its the random oddball 88 parts that confuse people. If in doubt, make sure the clutch fits the input shaft of the tranny you are going to use and then make sure your clutch/flywheel/pressure plate fit together.
01-17-2011, 06:19 PM
#20
PHANTOM MENACE
Thread Starter
iTrader: (2)
Join Date: May 2005
Location: SYCUAN NINE, CA, USA
Posts: 6,042
Likes: 0
Received 3 Likes
on
3 Posts
Thanks, my intention was to make sure the write up was as detailed as possible so that there'd be no doubt if anyone needed to put together this combo. I will have another write up in the coming months for a random setup that I've been itching to try out.
01-18-2011, 04:41 AM
#21
Honda-Tech Member
Thanks for all the info. Great write up especially with the fan clutch wiring. I have to do the same. Please come back and tell us if the difference in displacment and new block feels better when you test drive.
 10-18-2011, 04:13 PM
#24
PHANTOM MENACE
Thread Starter
iTrader: (2)
Join Date: May 2005
Location: SYCUAN NINE, CA, USA
Posts: 6,042
Likes: 0
Received 3 Likes
on
3 Posts
Still runs like a champ! Nothing really comes to mind as far as pros/cons are concerned, I just wanted it to run like an Si would. Mechanically speaking the A6 block and Z6 block are basically the same thing (bore/stroke) but have a different piston volume. I compensated for the difference by milling the head before installing it so that the compression ratio would match a normal Si. As far as I know, that's how my car runs (like a normal Si...whatever that is like LOL).
10-22-2011, 08:02 PM
#25
Quick question...
So you stayed with the z6 pistons which put your compression lower than a6 spec, which you compensated for by decking the head 0.030". You also had to run a d15b timing belt, was this only because the head was decked or do you need to run that timing belt decked head or not?
Reason I ask is because I need to re-ring or replace my a6 block, and a clean z6 block went up for sale locally so I figured I'd just go that route. If I do I plan to use my a6 pistons, that'll put me up a little higher than a6 compression if I use the z6 HG according to that nifty link you had in your walkthrough. If I do this I won't need to deck the head obviously, and I want to know what this means in regards to the timing belt...will my a6 belt work, or will I need a z6 belt, or will I have to go with the b2/b7 belt regardless?
Also, that oil control jet you filed down...did you pull that from your a6 block? That's the only oil control jet I'll have at my disposal, so I'll assume that's the one I'll need to sand down for the z6 block.