
DIY BiXenon Projector Retrofit Kits, LIFETIME WARRANTY
 06-05-2010, 10:27 PM
#151
Honda-Tech Member
Join Date: Sep 2005
Location: CA
Posts: 2,758
Likes: 0
Received 0 Likes
on
0 Posts
 06-10-2010, 07:31 AM
#152
Honda-Tech Member
Join Date: Sep 2005
Location: Memphis, TN, 38135
Posts: 27
Likes: 0
Received 0 Likes
on
0 Posts
I have a 92-95 (EG) hatchback and am interested in getting this kit. I'm supposed to get the H4 right?...and which projector size am I supposed to use? Large or small?
06-10-2010, 07:55 AM
#153

Join Date: Jan 2010
Posts: 204
Likes: 0
Received 0 Likes
on
0 Posts
http://www.retrosolutionsllc.com/ser...BIXENON/Detail
 06-12-2010, 10:43 AM
#156
Join Date: Jan 2010
Posts: 204
Likes: 0
Received 0 Likes
on
0 Posts
Thanks, already shipped!
The price includes ALL parts. It is a DIY installation kit, however services to install into your lamps is available as well. Shoot us an email to: sales@retro-solutions.com
The price includes ALL parts. It is a DIY installation kit, however services to install into your lamps is available as well. Shoot us an email to: sales@retro-solutions.com
06-16-2010, 10:09 AM
#157
Honda-Tech Member
Join Date: Sep 2005
Location: Memphis, TN, 38135
Posts: 27
Likes: 0
Received 0 Likes
on
0 Posts
I just installed the DIY BiXenon Projector Retrofit Kit last night. Here's a mini review on the kit for those that may be interested.
I had been watching the progress of this kit being developed since about 2 years ago when this company (or its possible that it may have been another company, but I digress) was trying to develop a true plug and play projector retrofit that did not require cutting the OEM housing. I finally decided to bite the bullet and invest in this kit.
The packaging is nice. Everything is in individual packages and the bulbs themselves are already preinstalled in the projector housing to protect them (although you will need to take them out to install...just put the bulbs in a ziplock back so you don't accidentally touch them). All of the wires are LABELED! This is good because there are many wires, and though everything can only connect one way anyway, it is good to know which wire controls what. Plenty of zip ties and brackets are included for locating the ballast and controller wherever you want. I only used the zip ties in my installation.
I did have two issues with the product though. The first one is that if you get the H4 like I did, it is the low beam only. It is NOT the bixenon HID. I'm not sure if you have to order it separately or not, but just letting anyone know so they aren't surprised when they don't see the high/low actuator on the bulb. The second issue is quality control of the threaded portion (this is how the projector locks in to your reflector lamp housing. It uses a threaded locking mechanism). The threads are very rough and I had to use a metal file to file some of the threads so that the ring can be tightened all the way down. Also, there needs to be better tolerance checking on the metal tabs that the bulb retainer spring is attached to, because I had to bend them around some so that the threaded ring could go on and off. Otherwise it will grind against the ring threads (sorry if this doesn't make sense to the readers that don't have the kit, but RetroSolutions should know what I'm referring to).
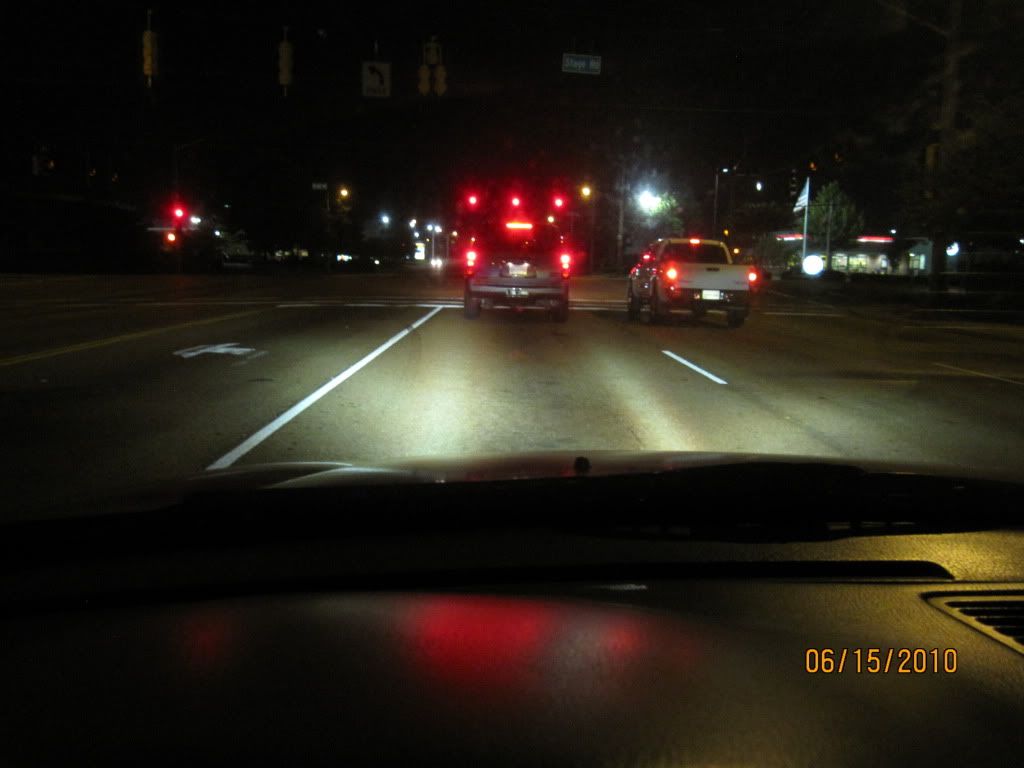
And now on to the pics. As you can see, the output is significantly greater than stock. Stock H4's are the weakest bulb on the market as far as output goes. You can also see that there are hot spots. Keep in mind that this is a budget projector retrofit. It will not perform as uniformly as say, a TL projector or Porsche projector. So if you are looking for that quality, I suggest getting OEM projectors. But if you are on a budget, this kit is worth every penny.
Inside the driver's seat:
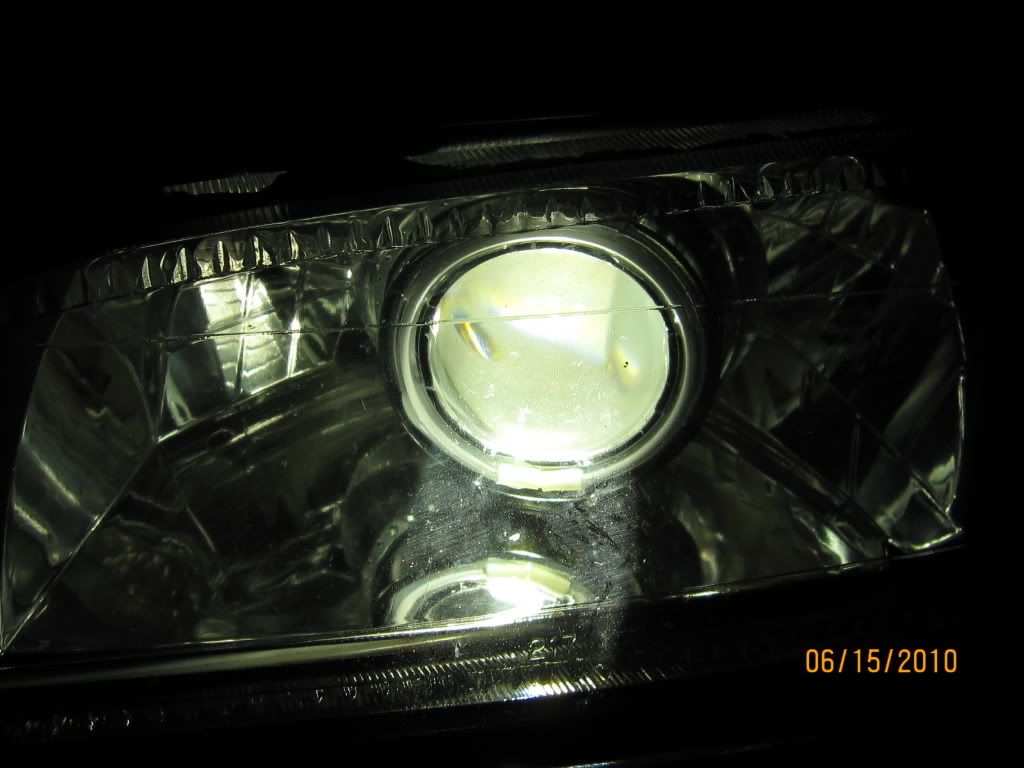
Projector installed (I did not hook up the angel eyes):
Cutoff against a wall, taken outside the car:

I had been watching the progress of this kit being developed since about 2 years ago when this company (or its possible that it may have been another company, but I digress) was trying to develop a true plug and play projector retrofit that did not require cutting the OEM housing. I finally decided to bite the bullet and invest in this kit.
The packaging is nice. Everything is in individual packages and the bulbs themselves are already preinstalled in the projector housing to protect them (although you will need to take them out to install...just put the bulbs in a ziplock back so you don't accidentally touch them). All of the wires are LABELED! This is good because there are many wires, and though everything can only connect one way anyway, it is good to know which wire controls what. Plenty of zip ties and brackets are included for locating the ballast and controller wherever you want. I only used the zip ties in my installation.
I did have two issues with the product though. The first one is that if you get the H4 like I did, it is the low beam only. It is NOT the bixenon HID. I'm not sure if you have to order it separately or not, but just letting anyone know so they aren't surprised when they don't see the high/low actuator on the bulb. The second issue is quality control of the threaded portion (this is how the projector locks in to your reflector lamp housing. It uses a threaded locking mechanism). The threads are very rough and I had to use a metal file to file some of the threads so that the ring can be tightened all the way down. Also, there needs to be better tolerance checking on the metal tabs that the bulb retainer spring is attached to, because I had to bend them around some so that the threaded ring could go on and off. Otherwise it will grind against the ring threads (sorry if this doesn't make sense to the readers that don't have the kit, but RetroSolutions should know what I'm referring to).
And now on to the pics. As you can see, the output is significantly greater than stock. Stock H4's are the weakest bulb on the market as far as output goes. You can also see that there are hot spots. Keep in mind that this is a budget projector retrofit. It will not perform as uniformly as say, a TL projector or Porsche projector. So if you are looking for that quality, I suggest getting OEM projectors. But if you are on a budget, this kit is worth every penny.
Inside the driver's seat:
Projector installed (I did not hook up the angel eyes):
Cutoff against a wall, taken outside the car:
06-16-2010, 08:26 PM
#158
Honda-Tech Member

Join Date: Aug 2009
Location: Auckland, New Zealand
Posts: 11
Likes: 0
Received 0 Likes
on
0 Posts
Hi there, will you shipped internationally? Also has anyone fitted these on 4th prelude headlight?
06-16-2010, 09:35 PM
#159
Honda-Tech Member
Join Date: Dec 2004
Posts: 184
Likes: 0
Received 0 Likes
on
0 Posts
I just installed the DIY BiXenon Projector Retrofit Kit last night. Here's a mini review on the kit for those that may be interested.
I had been watching the progress of this kit being developed since about 2 years ago when this company (or its possible that it may have been another company, but I digress) was trying to develop a true plug and play projector retrofit that did not require cutting the OEM housing. I finally decided to bite the bullet and invest in this kit.
The packaging is nice. Everything is in individual packages and the bulbs themselves are already preinstalled in the projector housing to protect them (although you will need to take them out to install...just put the bulbs in a ziplock back so you don't accidentally touch them). All of the wires are LABELED! This is good because there are many wires, and though everything can only connect one way anyway, it is good to know which wire controls what. Plenty of zip ties and brackets are included for locating the ballast and controller wherever you want. I only used the zip ties in my installation.
I did have two issues with the product though. The first one is that if you get the H4 like I did, it is the low beam only. It is NOT the bixenon HID. I'm not sure if you have to order it separately or not, but just letting anyone know so they aren't surprised when they don't see the high/low actuator on the bulb. The second issue is quality control of the threaded portion (this is how the projector locks in to your reflector lamp housing. It uses a threaded locking mechanism). The threads are very rough and I had to use a metal file to file some of the threads so that the ring can be tightened all the way down. Also, there needs to be better tolerance checking on the metal tabs that the bulb retainer spring is attached to, because I had to bend them around some so that the threaded ring could go on and off. Otherwise it will grind against the ring threads (sorry if this doesn't make sense to the readers that don't have the kit, but RetroSolutions should know what I'm referring to).
And now on to the pics. As you can see, the output is significantly greater than stock. Stock H4's are the weakest bulb on the market as far as output goes. You can also see that there are hot spots. Keep in mind that this is a budget projector retrofit. It will not perform as uniformly as say, a TL projector or Porsche projector. So if you are looking for that quality, I suggest getting OEM projectors. But if you are on a budget, this kit is worth every penny.
Inside the driver's seat:
Projector installed (I did not hook up the angel eyes):
Cutoff against a wall, taken outside the car:
06-17-2010, 04:31 AM
#160
Honda-Tech Member
Join Date: Sep 2005
Location: Memphis, TN, 38135
Posts: 27
Likes: 0
Received 0 Likes
on
0 Posts
Yes I installed it correctly. The reason I posted the review was to give everyone a real working example of how everything looks. Hot spots are primarily caused by 2 things. Imperfect projector lenses or imperfect headlamp housing lenses. In my car I have the Depo headlamp housings (came with the car, so I don't know how these look in the OEM fluted glass headlamp housings) and of course the Retro Solutions projector retrofit.
I completely recommend the product but even in the original prototypes from 2 years ago there were hot spots on the ground, although the cutoff on the wall was a bit cleaner. Keep in mind that the light is traveling through 2 separate pieces of glass, variances in either could cause light to be transmitted differently.
Also, even people that do OEM retrofits tend to swap out projector lenses for sharper cutoffs, hotspot reduction, changes in color, etc. Lenses are the big thing here, but this is not a $500 Bosch projector retrofit lol. SO one can't expect it to behave like one. There's no wrong way to install these. They only go in one way, at least on the H4's (there is an alignment ring clearly marked with the side that says TOP and nothing goes in any other way but the right way)
Last edited by PolePosition08; 06-17-2010 at 04:46 AM.
06-17-2010, 06:33 AM
#161
Join Date: Jan 2010
Posts: 204
Likes: 0
Received 0 Likes
on
0 Posts
PolePosition08 -
They are bixenon units, the solenoid to control the High/Low function is inside the projectors, and actuates the cutoff shield, not the bulb. They function in the same way all bixenon projectors work, by moving the cutoff shield. They are indeed bixenon whether be H4 or any other bulb type we carry, all of them are bixenon functional.
Also, I have to agree that the cutoff does not look as it should, and I think the bulb placement make be to blame there. The beam also looks more narrow than it should be and the cutoff is not very sharp, which all would indicate the bulbs are sitting to far back. With the bulbs placed correctly, your output should look just as shown in the photo here, also taken by the client who installed it:
06-18-2010, 12:53 PM
#164
Honda-Tech Member
Join Date: Sep 2005
Location: Memphis, TN, 38135
Posts: 27
Likes: 0
Received 0 Likes
on
0 Posts
The pics I posted are from my EG. Scroll up a couple of posts.
Edit - Will be posting additional pics after doing some slight adjustments
Edit - Will be posting additional pics after doing some slight adjustments
Last edited by PolePosition08; 06-18-2010 at 10:17 PM.
06-18-2010, 12:59 PM
#165
Honda-Tech Member

Join Date: Feb 2009
Posts: 99
Likes: 0
Received 0 Likes
on
0 Posts
How do you like them? From the pics, they dont look like they do a good job spreading, looks more like just a straight line from each projector.
06-18-2010, 02:59 PM
#166
Honda-Tech Member
Join Date: Dec 2004
Posts: 184
Likes: 0
Received 0 Likes
on
0 Posts
06-19-2010, 07:38 AM
#167
Honda-Tech Member
Join Date: Jul 2004
Location: somewhere in, tx, usa
Posts: 532
Likes: 0
Received 0 Likes
on
0 Posts
i have the exact same headlights and the bixenon projectors and mines look nothing like yours. mines are straight like the pics of the accord..not talking down about your headlights but somthings wrong here
06-19-2010, 07:56 AM
#168
Join Date: Jan 2010
Posts: 204
Likes: 0
Received 0 Likes
on
0 Posts
PolePosition08 - if you need any assistance don't hesitate to shoot us an email, IM us, or give us a call. Like dewoine says they should look like the photo from the Accord above.
06-19-2010, 09:35 AM
#169
Honda-Tech Member
Join Date: Sep 2005
Location: Memphis, TN, 38135
Posts: 27
Likes: 0
Received 0 Likes
on
0 Posts
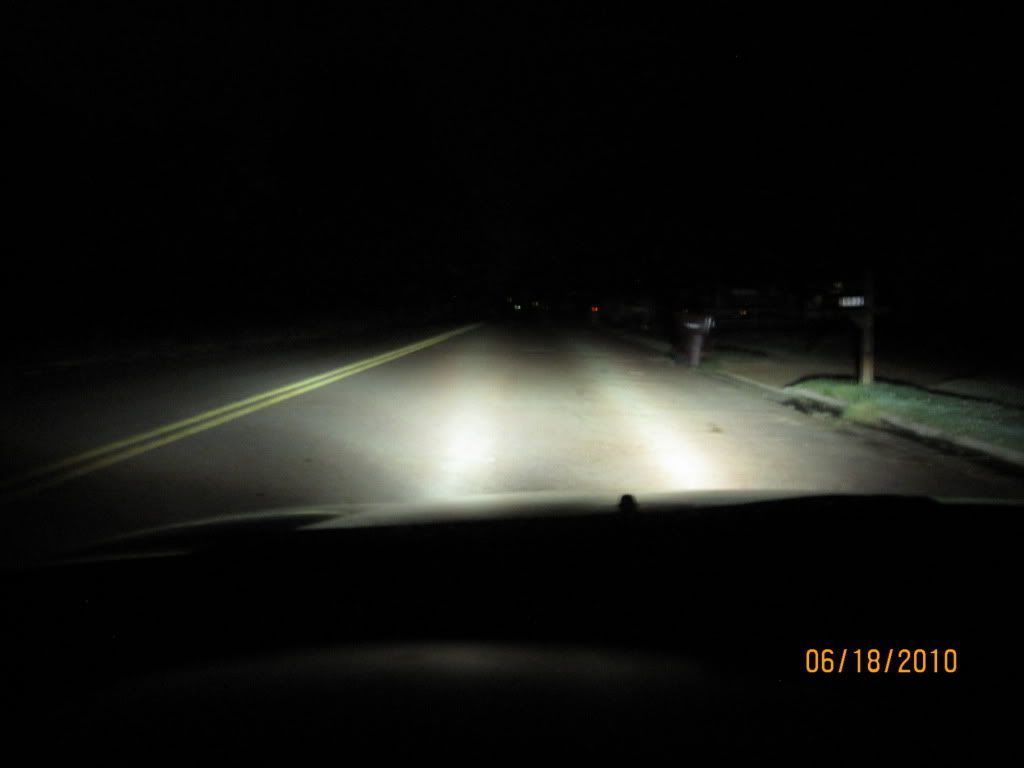
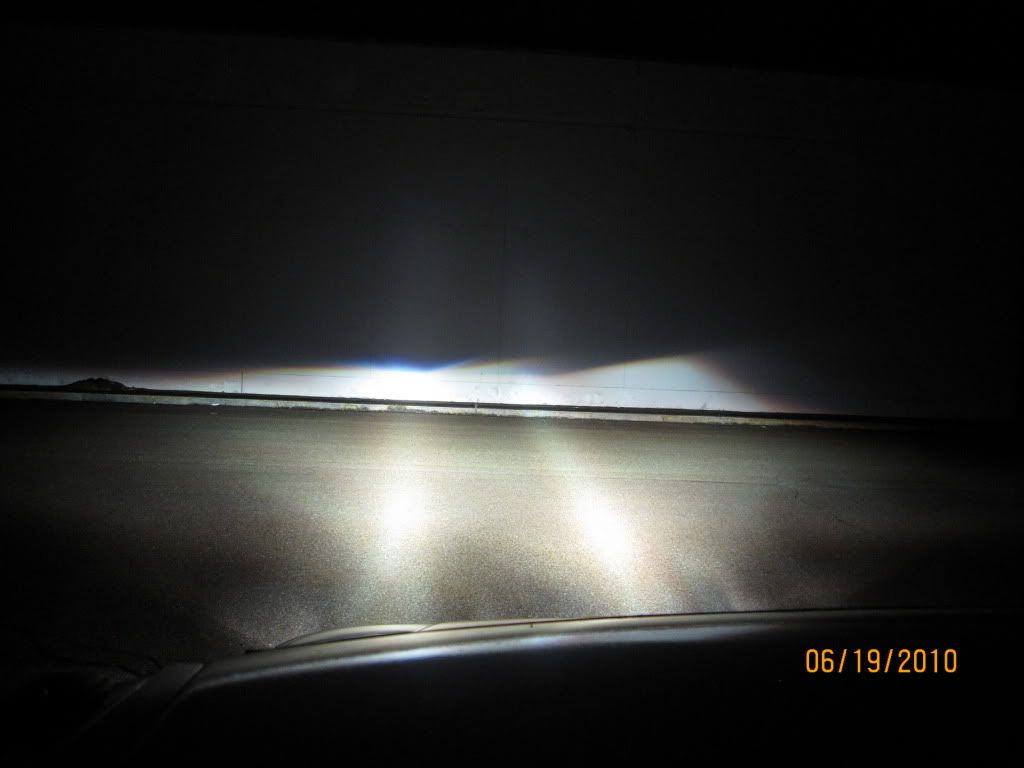
After some finagling aka jiggling the bulb around, I was able to improve the spread of the beam. Although there are still hotspots (again, I have not seen a non-OEM projector that didn't, its just the nature of it. Think high school microscopes vs hospital microscopes. Same magnification but the optical clarity of the lens is different) and I have no issue with that. The cutoff on the wall is better...also notice that I am quite a distance from the wall. The Accord pic that looks so perfect is less than 10 feet from the wall lol. Or it is just zoomed in to the middle. I have my height adjusted so that it is enough to let me see far down the road but lower than oncoming traffic's eye level so that it doesn't blind them....my distance from the wall is about 35-40 feet.
On the road on an unlighted street from inside the car:
Against the wall taken outside the car:
Anyways, I do fully and completely recommend the product. I wasn't posting pics to discourage anyone in any way, shape, or form. I just wanted to show what it looks like in real life, from a person who has nothing to gain. The light output is 3x the stock reflector/halogen setup. It is about 2x the output of just putting an HID kit in the stock reflector housing. Is it like my S2000? Nope. But I am pleased with the product (again nobody has addressed the only complaint I did have, which was not light related, but related to me having to file off metal because threads were catching due to jagged edges and the retainer tabs being too far out). Cheers!
06-19-2010, 11:19 AM
#170
Honda-Tech Member
After some finagling aka jiggling the bulb around, I was able to improve the spread of the beam. Although there are still hotspots (again, I have not seen a non-OEM projector that didn't, its just the nature of it. Think high school microscopes vs hospital microscopes. Same magnification but the optical clarity of the lens is different) and I have no issue with that. The cutoff on the wall is better...also notice that I am quite a distance from the wall. The Accord pic that looks so perfect is less than 10 feet from the wall lol. Or it is just zoomed in to the middle. I have my height adjusted so that it is enough to let me see far down the road but lower than oncoming traffic's eye level so that it doesn't blind them....my distance from the wall is about 35-40 feet.
On the road on an unlighted street from inside the car:
Against the wall taken outside the car:
Anyways, I do fully and completely recommend the product. I wasn't posting pics to discourage anyone in any way, shape, or form. I just wanted to show what it looks like in real life, from a person who has nothing to gain. The light output is 3x the stock reflector/halogen setup. It is about 2x the output of just putting an HID kit in the stock reflector housing. Is it like my S2000? Nope. But I am pleased with the product (again nobody has addressed the only complaint I did have, which was not light related, but related to me having to file off metal because threads were catching due to jagged edges and the retainer tabs being too far out). Cheers!
On the road on an unlighted street from inside the car:
Against the wall taken outside the car:
Anyways, I do fully and completely recommend the product. I wasn't posting pics to discourage anyone in any way, shape, or form. I just wanted to show what it looks like in real life, from a person who has nothing to gain. The light output is 3x the stock reflector/halogen setup. It is about 2x the output of just putting an HID kit in the stock reflector housing. Is it like my S2000? Nope. But I am pleased with the product (again nobody has addressed the only complaint I did have, which was not light related, but related to me having to file off metal because threads were catching due to jagged edges and the retainer tabs being too far out). Cheers!
 06-20-2010, 08:29 AM
#171
Join Date: Jan 2010
Posts: 204
Likes: 0
Received 0 Likes
on
0 Posts
After some finagling aka jiggling the bulb around, I was able to improve the spread of the beam. Although there are still hotspots (again, I have not seen a non-OEM projector that didn't, its just the nature of it. Think high school microscopes vs hospital microscopes. Same magnification but the optical clarity of the lens is different) and I have no issue with that. The cutoff on the wall is better...also notice that I am quite a distance from the wall. The Accord pic that looks so perfect is less than 10 feet from the wall lol. Or it is just zoomed in to the middle. I have my height adjusted so that it is enough to let me see far down the road but lower than oncoming traffic's eye level so that it doesn't blind them....my distance from the wall is about 35-40 feet.
On the road on an unlighted street from inside the car:
Against the wall taken outside the car:
Anyways, I do fully and completely recommend the product. I wasn't posting pics to discourage anyone in any way, shape, or form. I just wanted to show what it looks like in real life, from a person who has nothing to gain. The light output is 3x the stock reflector/halogen setup. It is about 2x the output of just putting an HID kit in the stock reflector housing. Is it like my S2000? Nope. But I am pleased with the product (again nobody has addressed the only complaint I did have, which was not light related, but related to me having to file off metal because threads were catching due to jagged edges and the retainer tabs being too far out). Cheers!
On the road on an unlighted street from inside the car:
Against the wall taken outside the car:
Anyways, I do fully and completely recommend the product. I wasn't posting pics to discourage anyone in any way, shape, or form. I just wanted to show what it looks like in real life, from a person who has nothing to gain. The light output is 3x the stock reflector/halogen setup. It is about 2x the output of just putting an HID kit in the stock reflector housing. Is it like my S2000? Nope. But I am pleased with the product (again nobody has addressed the only complaint I did have, which was not light related, but related to me having to file off metal because threads were catching due to jagged edges and the retainer tabs being too far out). Cheers!
There is still something not right here though, look at the difference between the left and right projectors separately. Cover one lamp at a time with a towel to see better what I mean here, but the driver's side is too narrow compared to the passenger side, indicating the bulb is sitting to too far back for some reason.
We understand completely what you are saying, they are not comparable tot he best OE projectors out there, and hence the cost is not the same either. But for the price, the output is much better than just a conversion kit, no glare, and the projectors do produce results better than OE projectors people were retrofitting in just a a few years back.
At the same rate, we want you to get the most out of them as well, and right now the two sides are not producing the same beam pattern. Take no offense to it, we are just trying to help you get the best you can from them.
In regards to the retainers and the locking nut on the back, there is some overlap. During installation it is meant for the projectors to be taken apart to get the mounting hardware off obviously, and this does require removing the bulbs and retaining hardware. They do need to fit a fairly confined space to install into the lamps without requiring any cutting, etc. But they only have to be installed once, so all the hardware only comes off and goes back on once. Filing is another method that can be used, no harm done there doing that instead.
According to the client the Accord photos are shot at 25ft. and honestly just by looking at the photos I think you can afford to come up a bit on the headlamp vertical adjustment. This is difficult to tell from photos alone, but you can get maximum performance (distance) with a slope of ~1" over every 25' of distance. Then the heaviest weighted portion of the beam pattern should be at the furthest point in front of you.
06-20-2010, 10:17 AM
#172
Honda-Tech Member
Join Date: Sep 2005
Location: Memphis, TN, 38135
Posts: 27
Likes: 0
Received 0 Likes
on
0 Posts
There is still something not right here though, look at the difference between the left and right projectors separately. Cover one lamp at a time with a towel to see better what I mean here, but the driver's side is too narrow compared to the passenger side, indicating the bulb is sitting to too far back for some reason.
It would be nice if others could post their pictures using the same methods I used (outside the car showing cutoff and the full range, and inside the car on the road) and also showing the backs of their projectors. I think it takes more than pictures of one Accord and one Civic to give a good representation...although I will continue to say I am pleased with the results.
Last edited by PolePosition08; 06-20-2010 at 10:01 PM.
06-23-2010, 08:19 AM
#175
Join Date: Jan 2010
Posts: 204
Likes: 0
Received 0 Likes
on
0 Posts