
The LMA Blues! - Writeup on theory and replacement w/pics!
 05-07-2009, 10:47 AM
#1
Honda-Tech Member
Thread Starter
Join Date: Mar 2005
Location: Fairfield, ca, USA
Posts: 137
Likes: 0
Received 0 Likes
on
0 Posts
Ok, first I'd like to start by saying that I know with the amount of B-series heads that are still running the original style LMA's in 94-01 integras and 92-95 civic swaps, you have to realize how many miles and years of abuse these things have had! As the B-series gets older and older, more and more cars will start requiring them to be replaced. I'd also like to add that even if they do-not <U>Need</u> to be replaced right now, Upgrading them to the new honey comb spring style can be worth a few HP in the higher RPM's believe it or not.. Here, I'll explain..
When your engine is running in any condition outside of Vtec (99% of the time you're actually driving), you are operating on the non-Vtec cams which are small and require very little spring force to operate. When you go beyond cruise and start running into VTEC territory, the VTEC assembly locks all 3 rockers together and operates off the "VTEC lobe" on the cam.. This is a double negative for the valve springs.. Not only are you increasing lift which requires more spring pressure to operate properly without valve float/bounce, but you are also increasing the reciprocating assembly's weight by adding the 3rd rocker to the valve springs!! Some of this added weight is relieved or assisted by the lost motion assembly but if your lost motion assy's are weak or bad at worst, your valve springs have to take up the slack and this is where your valves start to bounce/float in the upper RPM's and you lose horsepower!! Make sense??
I noticed my LMA's were going out when I would rev the engine past around 6-7k rpm when it was cold (No VTEC) and you can hear the lost motion assy's bouncing off the VTEC lobes. NOT GOOD! Some people can tell by doing a proper valve adjustment and it still sounds like the valves are out of adjustment. Driving with bad LMA's will pit your cams and I know you don't want to buy some more at $400-1000 a set.. And with LMA's being offered for less than $200 a set (of 8) it's well worth it! So here's a semi thorough write up on how to replace your LMA's while the engine is still in your car.. It took me about 2 hours from jacking the car up to putting the last tool away including stopping to take pictures for you guys, but I'm an experienced mechanic so plan on it taking you a little longer..
I'm doing this through the Driver side for 2 reasons.. 1, it's just 2 mounts that realistically take you an extra 10 minutes to remove, but save you time and effort when dealing with the timing belt and tensioner.. Trust me, you try and access your tensioner bolt with everything in the way, including your frame rail... It also gives you MUCH more room to work and you're less likely to mess up your timing belt install because of this added room..
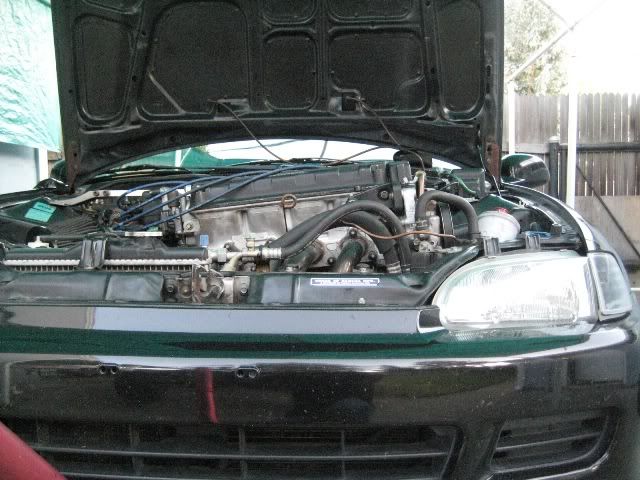
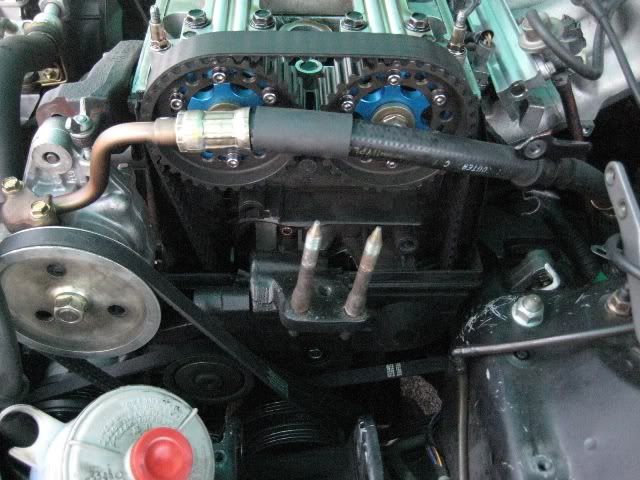
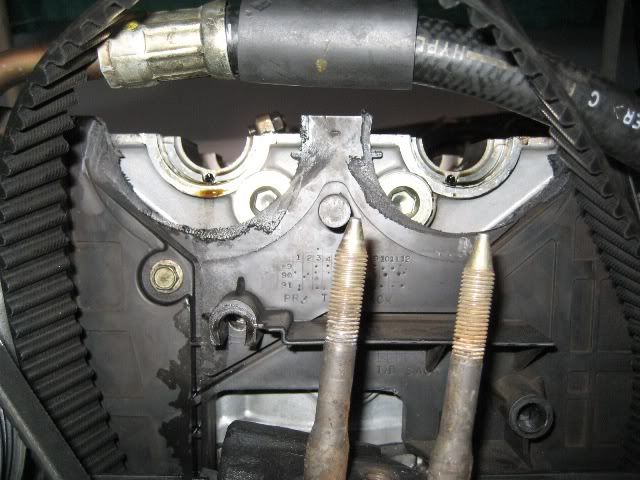
First take your driver wheel loose, jack the car and place on jackstands and finish removing the driver wheel. Using a 19mm socket wrench set your timing tab to 0-degrees on the crank pulley (It's the single line by itself, to the right of the 3 lines that are grouped together)..
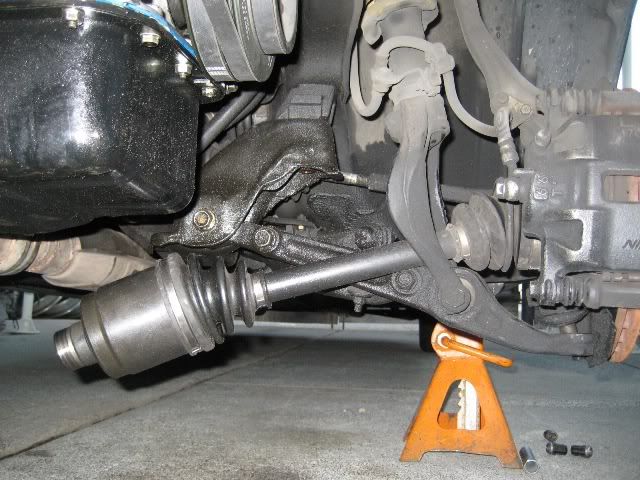
break your lower ball joint loose to remove your inboard axle CV from the midshaft behind the engine. I usually loosen the castle nut on the balljoint a few threads and lift the hub by jacking on the hub of the brake rotor. after your spring is compressed a little you can wack the control arm a few times with a big hammer and the balljoint will make a "Boing" noise and you can see the arm resting on the nut.. Lower the jack, pull your spindle lower ball joint from the control arm and remove your inner CV from the midshaft.
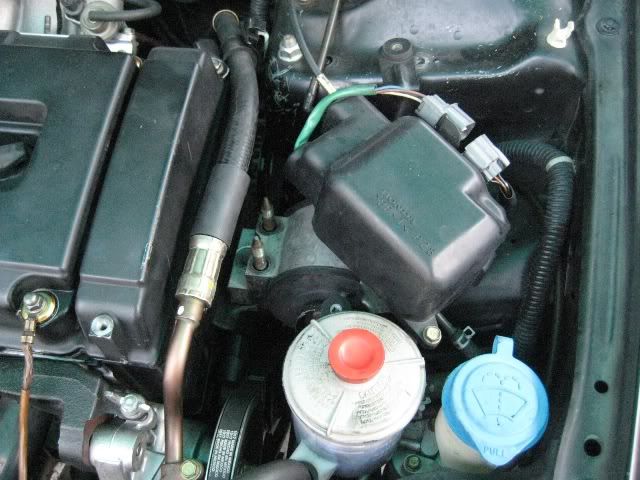
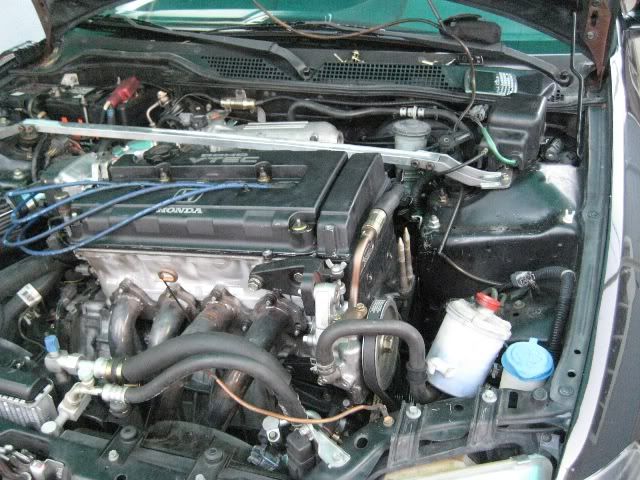
remove your valve cover ground, your power steering hose support bracket (bolted to valve cover or intake manifold) and remove your front mount. (The one on the driver side strut tower). remove your plug wires and distributor.
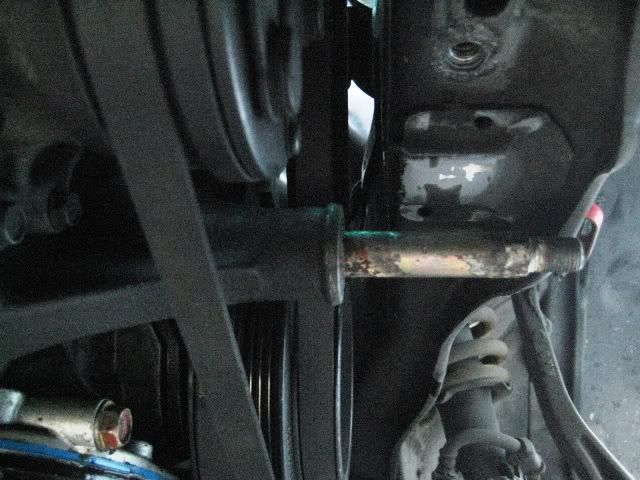
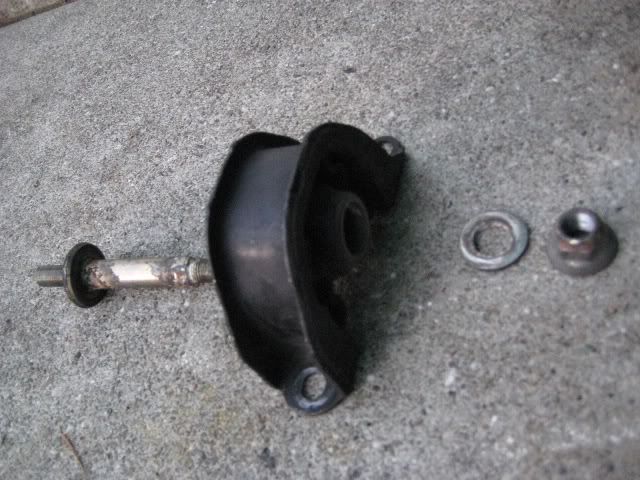
Now you need to place a floor jack under your oil pan (Preferably with a piece of plywood between so you don't dent it) and support the weight of the engine, but DON'T try jacking it up! Unbolt your driver torque mount from the bottom of the frame rail (2x 14mm bolts) and remove the nut from the torque mount stud on your A/C bracket (1x 19mm).. Lower the engine slightly and slide the torque mount off the stud..
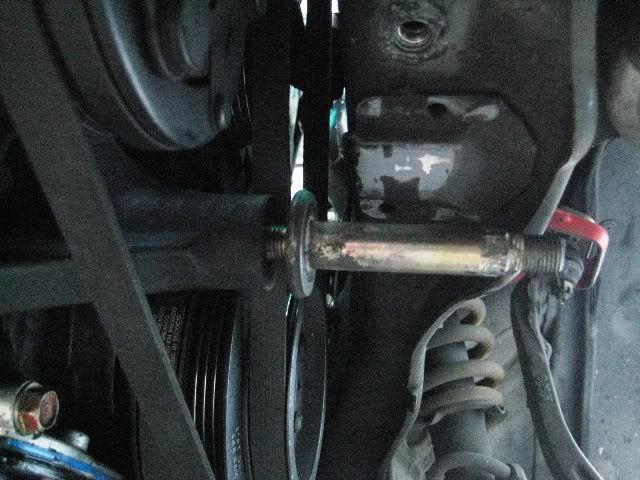
Now, preferably using a 6 point deep socket (14mm) and a 1/2" breaker bar, remove the torque mount stud from the A/C bracket.
Now you should make note how the assembly goes together so you don't forget.. I threaded it together after this pic so I don't lose the parts..
Now you have room to lift the engine with the floor jack.
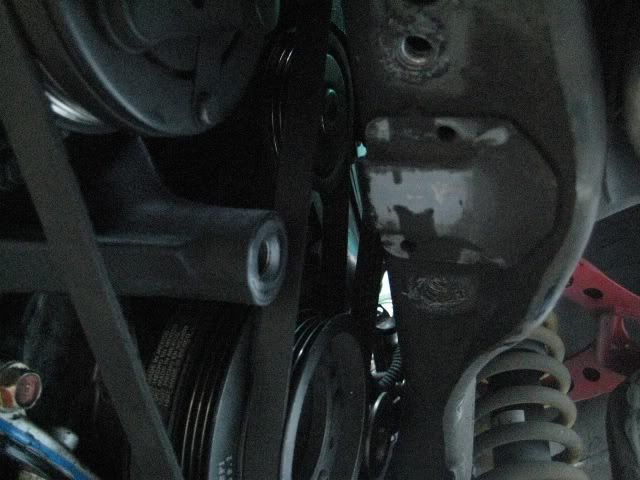
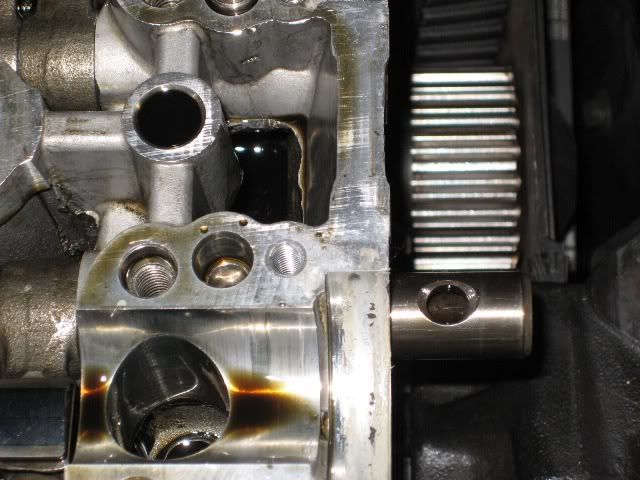
Looking at these pics you have more than enough room to remove the rocker shafts after lifting the engine.. <font color=red>WARNING!</font> It is <U>YOUR</U> Fault if you jack the engine too far and break something.. Things I noticed you might want to pay attention to are your intake tube and possibly your TPS sensor hitting the fuel filter bracket and your Fuel pressure regulator hitting your strut bar.. Double check everything before going too far! If I did it in my civic, you can also do it in an integra..
Now after having done this, you can remove your valve cover and your front upper timing cover (all 10mm)
Now.. Using a deep 6-point 14mm socket, loosen the tensoner adjustment bolt. It's hidden just behind the removable rubber plug, just above your crank pulley in the lower timing cover.. After you have it loose, push the timing belt below the rear cam toward the front of the car. This compresses the tensioner. While holding the belt or having a friend hold it for you, snug up the tensioner bolt. this will help you later!

Now remove all your cam cap/sprayer bar bolts EXCEPT the 4 that hold the valve cover on. (16x 14mm 8x 10mm)

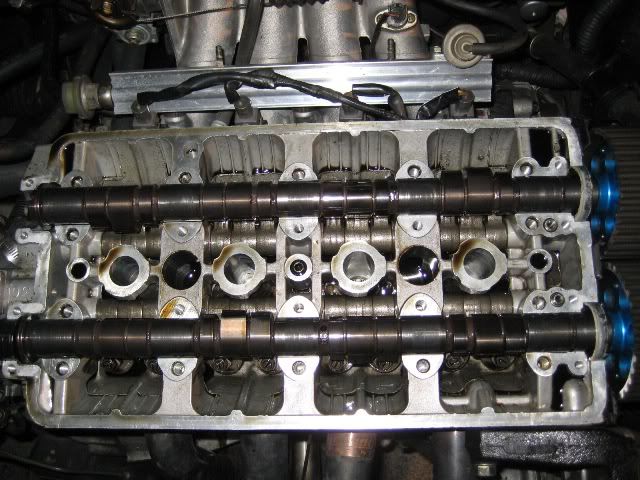
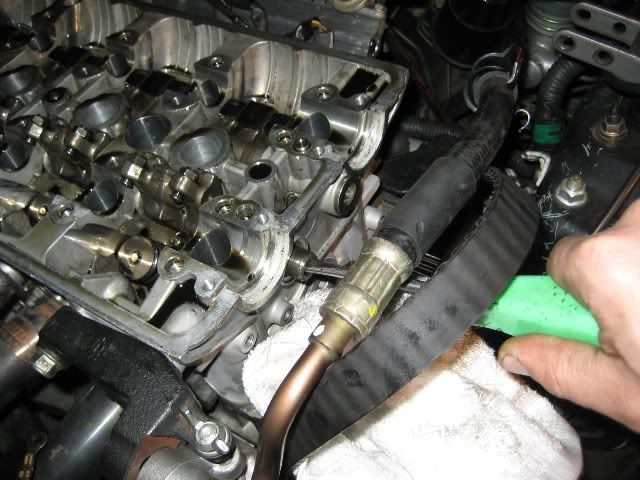
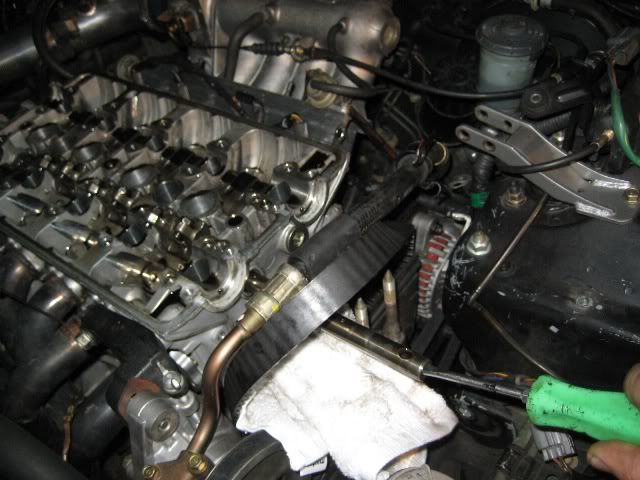
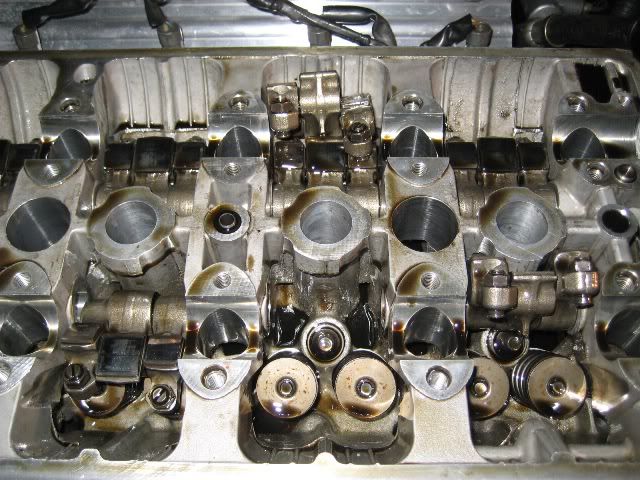
Remove the Timing belt from the cam gears. Be careful not to kink or get oil on the belt! After removing the belt, slowly and evenly remove the 4 remaining bolts in a circular pattern a couple turns at a time. this will let the cams up fairly evenly and will prevent damage. After caps are removed your engine should look like this..
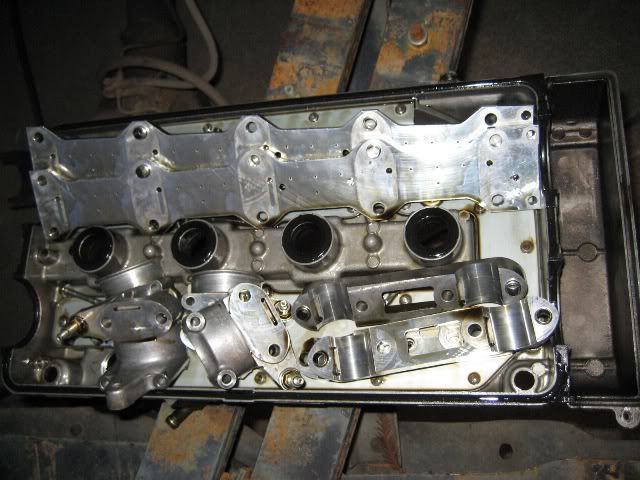
I like to try keeping my parts clean and together so I don't lose any.. since everything is already oiled, I usually keep all the valve parts in the valve cover..
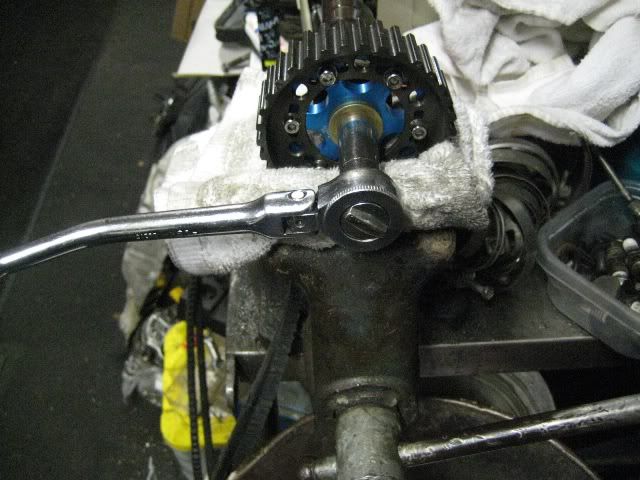
Now, Remove your cams. If you're going to replace with some cam gears or in the future, or if if you're going to swap cams and need to torque your cam gears, this is one proper way to torque the cam gears.. NEVER torque against the timing belt!! This can damage the root of the belt teeth, stretch, loosen, or otherwise mess things up!! Don't do it! And never use an impact gun! That is one easy way to find yourself buying new cams!
Ok, back to the LMA's..
Now the cams are out, you have to remove the top timing cover backing from the head by removing the one 10mm bolt by the exhaust cam. BE CAREFUL!! If you drop this bolt in the timing cover, you will be either fishing for it or removing all your belts and removing your crank pulley to get it out! DON'T DROP IT! =] Since my backing is trimmed to make room for my cam pulleys, you can see the 2x 10mm allen plugs covering the rocker shafts.
Now your ready to get into the deep stuff. All I can say is be careful. When you remove the rocker assemblies, there is a pin that kind of ties 2 of the 3 rockers together. They must be paired as if installed when you're installing them. Now with that said, you can remove the 10mm Rocker shaft plugs and the rocker shaft locking pins. These pins can be removed 2 ways. You can grab them with some wire dikes from the top or you can push them out from inside using a medium flat head screw driver.

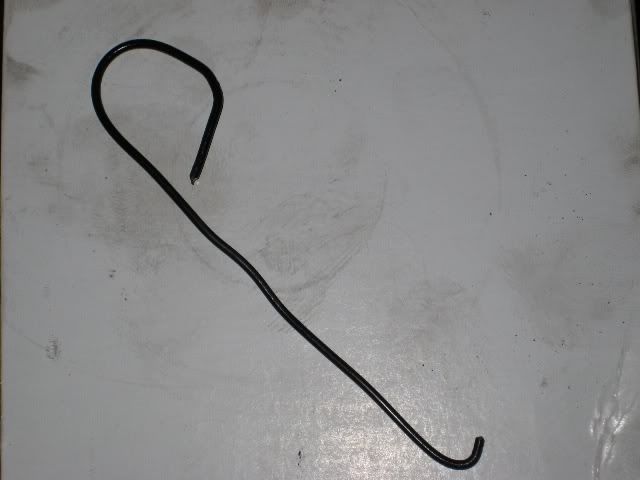
Now you can insert a hooked piece of bailing wire or a medium screw driver and drag the rocker shaft out by binding it at an angle.

after the rocker shaft is removed, now you can freely remove the rockers to gain access to the LMA's. I usually take the rockers out one at a time to replace the LMA's 1 at a time. this way I don't have to RE-Adjust the valves I just did last week.
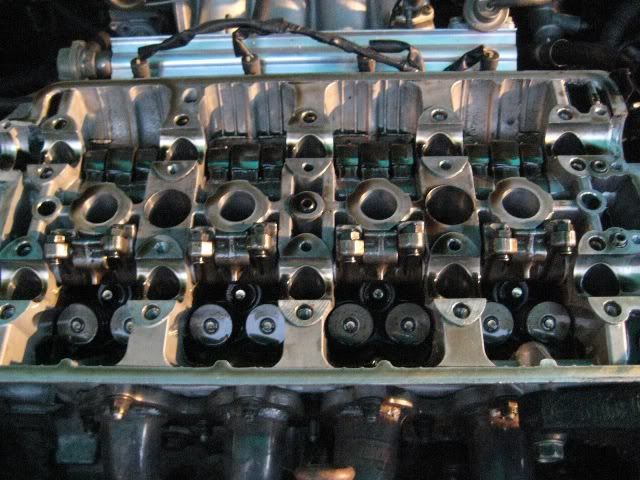
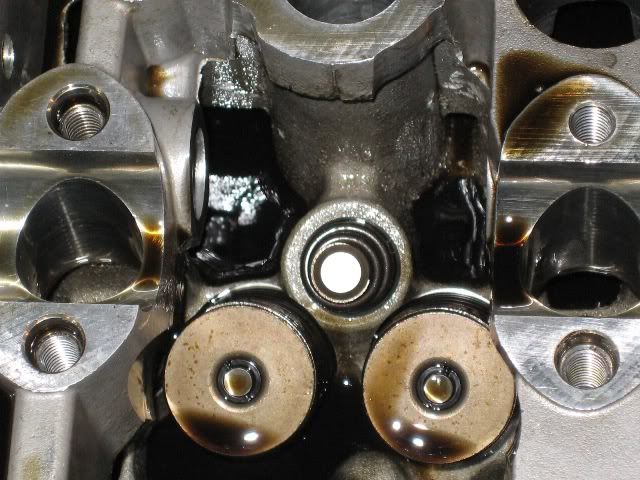
Here you can see the old LMAs under the middle rockers..
Here I removed ONE set of rockers, and set in the other side of the head. Be careful. If the pin falls out of one of the rockers, you'll be fishing for them with a magnet, or in your oil pan.. or....??
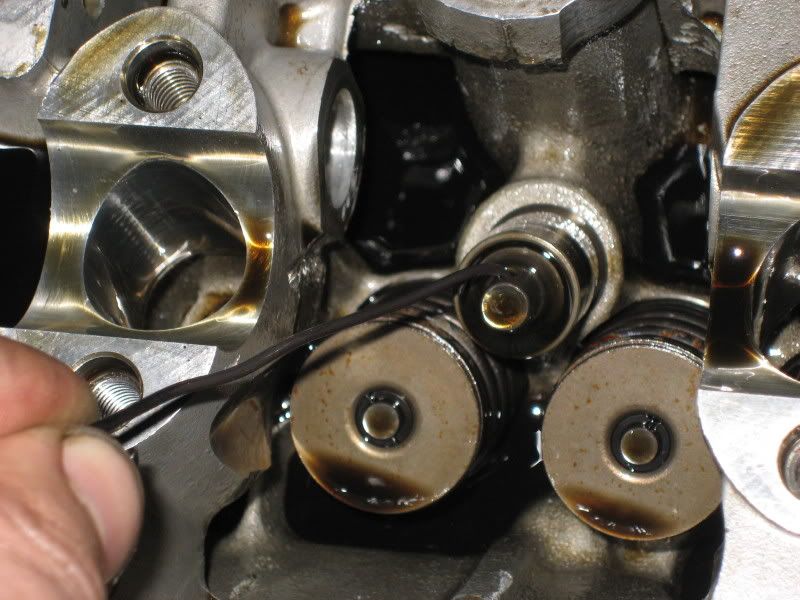
Remember that little bailing wire hook I was telling you about?? It comes in handy when removing the LMA's.. Just hook one of the holes in the tip of it and they should slide right out..
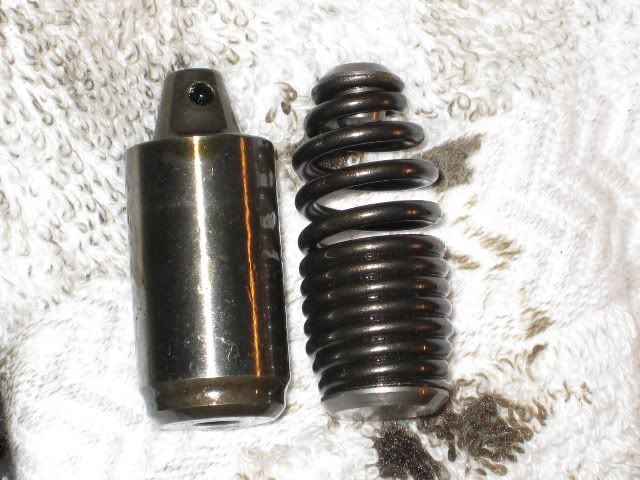
Here's the difference between the NEW and OLD LMA. NEW being the spring style.
Now drop the NEW LMA in the hole!
Grab your rockers and drop them back in and move to the next cylinder.
re-install your rocker shaft but MAKE SURE THE HOLE IS FACING UP so the lock pin can slide in..
Install the rocker shaft plug and do the other side..
when you're done, clean all surfaces and install cams with timing marks lined up. (It's ok if they move or are not perfect just yet. it won't hurt anything.. (Remember, your crank is STILL on TDC from when you took it apart.)
Use Hondabond on any of the 4 outter cap surfaces that touch the valve cover rail so it won't leak oil.
install cam caps and spray bars and snug the assembly down using just the 4 bolts that the valve cover bolts to. after the assembly is snug, you can complete assembly by installing all valve train bolts and torque to spec.
install timing belt using a 14mm wrench to perfectly line up your cam marks. After the belt is on and all marks are lined up (on cams and crank), loosen your timing belt tensioner bolt. and lower the jack under the engine so you can rotate the crankshaft.
rotate the crankshaft to the left (counter clockwise) just so the front and top parts of the belt are tight. Jack the engine back up and tighten the tensioner bolt to spec and re-install rubber plug.
Install everything else in reverse order of removal and make sure everything is tight and properly connected. (torque mount, engine mount, intake, axle, distributor, strut brace, ball joint and wheel, etc.)
Now you're ready to start your car! WEWT!
Good luck! =]
When your engine is running in any condition outside of Vtec (99% of the time you're actually driving), you are operating on the non-Vtec cams which are small and require very little spring force to operate. When you go beyond cruise and start running into VTEC territory, the VTEC assembly locks all 3 rockers together and operates off the "VTEC lobe" on the cam.. This is a double negative for the valve springs.. Not only are you increasing lift which requires more spring pressure to operate properly without valve float/bounce, but you are also increasing the reciprocating assembly's weight by adding the 3rd rocker to the valve springs!! Some of this added weight is relieved or assisted by the lost motion assembly but if your lost motion assy's are weak or bad at worst, your valve springs have to take up the slack and this is where your valves start to bounce/float in the upper RPM's and you lose horsepower!! Make sense??
I noticed my LMA's were going out when I would rev the engine past around 6-7k rpm when it was cold (No VTEC) and you can hear the lost motion assy's bouncing off the VTEC lobes. NOT GOOD! Some people can tell by doing a proper valve adjustment and it still sounds like the valves are out of adjustment. Driving with bad LMA's will pit your cams and I know you don't want to buy some more at $400-1000 a set.. And with LMA's being offered for less than $200 a set (of 8) it's well worth it! So here's a semi thorough write up on how to replace your LMA's while the engine is still in your car.. It took me about 2 hours from jacking the car up to putting the last tool away including stopping to take pictures for you guys, but I'm an experienced mechanic so plan on it taking you a little longer..
I'm doing this through the Driver side for 2 reasons.. 1, it's just 2 mounts that realistically take you an extra 10 minutes to remove, but save you time and effort when dealing with the timing belt and tensioner.. Trust me, you try and access your tensioner bolt with everything in the way, including your frame rail... It also gives you MUCH more room to work and you're less likely to mess up your timing belt install because of this added room..
First take your driver wheel loose, jack the car and place on jackstands and finish removing the driver wheel. Using a 19mm socket wrench set your timing tab to 0-degrees on the crank pulley (It's the single line by itself, to the right of the 3 lines that are grouped together)..
break your lower ball joint loose to remove your inboard axle CV from the midshaft behind the engine. I usually loosen the castle nut on the balljoint a few threads and lift the hub by jacking on the hub of the brake rotor. after your spring is compressed a little you can wack the control arm a few times with a big hammer and the balljoint will make a "Boing" noise and you can see the arm resting on the nut.. Lower the jack, pull your spindle lower ball joint from the control arm and remove your inner CV from the midshaft.
remove your valve cover ground, your power steering hose support bracket (bolted to valve cover or intake manifold) and remove your front mount. (The one on the driver side strut tower). remove your plug wires and distributor.
Now you need to place a floor jack under your oil pan (Preferably with a piece of plywood between so you don't dent it) and support the weight of the engine, but DON'T try jacking it up! Unbolt your driver torque mount from the bottom of the frame rail (2x 14mm bolts) and remove the nut from the torque mount stud on your A/C bracket (1x 19mm).. Lower the engine slightly and slide the torque mount off the stud..
Now, preferably using a 6 point deep socket (14mm) and a 1/2" breaker bar, remove the torque mount stud from the A/C bracket.
Now you should make note how the assembly goes together so you don't forget.. I threaded it together after this pic so I don't lose the parts..
Now you have room to lift the engine with the floor jack.
Looking at these pics you have more than enough room to remove the rocker shafts after lifting the engine.. <font color=red>WARNING!</font> It is <U>YOUR</U> Fault if you jack the engine too far and break something.. Things I noticed you might want to pay attention to are your intake tube and possibly your TPS sensor hitting the fuel filter bracket and your Fuel pressure regulator hitting your strut bar.. Double check everything before going too far! If I did it in my civic, you can also do it in an integra..
Now after having done this, you can remove your valve cover and your front upper timing cover (all 10mm)
Now.. Using a deep 6-point 14mm socket, loosen the tensoner adjustment bolt. It's hidden just behind the removable rubber plug, just above your crank pulley in the lower timing cover.. After you have it loose, push the timing belt below the rear cam toward the front of the car. This compresses the tensioner. While holding the belt or having a friend hold it for you, snug up the tensioner bolt. this will help you later!
Now remove all your cam cap/sprayer bar bolts EXCEPT the 4 that hold the valve cover on. (16x 14mm 8x 10mm)
Remove the Timing belt from the cam gears. Be careful not to kink or get oil on the belt! After removing the belt, slowly and evenly remove the 4 remaining bolts in a circular pattern a couple turns at a time. this will let the cams up fairly evenly and will prevent damage. After caps are removed your engine should look like this..
I like to try keeping my parts clean and together so I don't lose any.. since everything is already oiled, I usually keep all the valve parts in the valve cover..
Now, Remove your cams. If you're going to replace with some cam gears or in the future, or if if you're going to swap cams and need to torque your cam gears, this is one proper way to torque the cam gears.. NEVER torque against the timing belt!! This can damage the root of the belt teeth, stretch, loosen, or otherwise mess things up!! Don't do it! And never use an impact gun! That is one easy way to find yourself buying new cams!
Ok, back to the LMA's..
Now the cams are out, you have to remove the top timing cover backing from the head by removing the one 10mm bolt by the exhaust cam. BE CAREFUL!! If you drop this bolt in the timing cover, you will be either fishing for it or removing all your belts and removing your crank pulley to get it out! DON'T DROP IT! =] Since my backing is trimmed to make room for my cam pulleys, you can see the 2x 10mm allen plugs covering the rocker shafts.
Now your ready to get into the deep stuff. All I can say is be careful. When you remove the rocker assemblies, there is a pin that kind of ties 2 of the 3 rockers together. They must be paired as if installed when you're installing them. Now with that said, you can remove the 10mm Rocker shaft plugs and the rocker shaft locking pins. These pins can be removed 2 ways. You can grab them with some wire dikes from the top or you can push them out from inside using a medium flat head screw driver.
Now you can insert a hooked piece of bailing wire or a medium screw driver and drag the rocker shaft out by binding it at an angle.
after the rocker shaft is removed, now you can freely remove the rockers to gain access to the LMA's. I usually take the rockers out one at a time to replace the LMA's 1 at a time. this way I don't have to RE-Adjust the valves I just did last week.
Here you can see the old LMAs under the middle rockers..
Here I removed ONE set of rockers, and set in the other side of the head. Be careful. If the pin falls out of one of the rockers, you'll be fishing for them with a magnet, or in your oil pan.. or....??
Remember that little bailing wire hook I was telling you about?? It comes in handy when removing the LMA's.. Just hook one of the holes in the tip of it and they should slide right out..
Here's the difference between the NEW and OLD LMA. NEW being the spring style.
Now drop the NEW LMA in the hole!
Grab your rockers and drop them back in and move to the next cylinder.
re-install your rocker shaft but MAKE SURE THE HOLE IS FACING UP so the lock pin can slide in..
Install the rocker shaft plug and do the other side..
when you're done, clean all surfaces and install cams with timing marks lined up. (It's ok if they move or are not perfect just yet. it won't hurt anything.. (Remember, your crank is STILL on TDC from when you took it apart.)
Use Hondabond on any of the 4 outter cap surfaces that touch the valve cover rail so it won't leak oil.
install cam caps and spray bars and snug the assembly down using just the 4 bolts that the valve cover bolts to. after the assembly is snug, you can complete assembly by installing all valve train bolts and torque to spec.
install timing belt using a 14mm wrench to perfectly line up your cam marks. After the belt is on and all marks are lined up (on cams and crank), loosen your timing belt tensioner bolt. and lower the jack under the engine so you can rotate the crankshaft.
rotate the crankshaft to the left (counter clockwise) just so the front and top parts of the belt are tight. Jack the engine back up and tighten the tensioner bolt to spec and re-install rubber plug.
Install everything else in reverse order of removal and make sure everything is tight and properly connected. (torque mount, engine mount, intake, axle, distributor, strut brace, ball joint and wheel, etc.)
Now you're ready to start your car! WEWT!
Good luck! =]
Last edited by gotz2b16; 05-07-2009 at 11:28 AM.
 05-07-2009, 12:37 PM
#2
Honda-Tech Member
iTrader: (1)
Join Date: Apr 2003
Location: Vancouver, BC, Canada
Posts: 2,020
Likes: 0
Received 0 Likes
on
0 Posts
Great write up and pics dood. thanks for taking the time to do this!
Do you have a price in regards to the new LMA's you put in? i know there's a discussion about the old style being discontinued and people using H22 LMA's with shims now (there's a thread in the all-motor forum).
your theory of losing HP in the upper RPM range; does that apply to people with aftermarket valvesprings and cams?
05-07-2009, 01:15 PM
#3
Honda-Tech Member
Thread Starter
Join Date: Mar 2005
Location: Fairfield, ca, USA
Posts: 137
Likes: 0
Received 0 Likes
on
0 Posts
"And with LMA's being offered for less than $200 a set (of 8) it's well worth it!"
As I said, if you shop the LMA's you can find them for less than $200.. I got mine for $23 from some honda store online.. like Cheaphondaparts.com or something like that..
I would never use H22 or any "old" style LMA.. It's just something you SHOULDN'T do.. there are some things you CAN reuse.. Power steering pumps, Valve retainers, stuff like that.. I would catagorize them as "non-wearing and non catastrophic" parts that may fail.. If a Power steering pump fails, big whoop.. put a new one one, nothing horrible usually result from one failing.. Valve retainers are non wearing parts and therefore are not likely to break or become "out of spec".. These are justifiable.. But rebuilding an engine and using a 200K timing belt, or a 180K Lost motion assemblies is a bad idea.. They are wearing parts and if one fails it can cause some expensive damages! There's another post I was reading where a guy with Blox cams was pissed cause he had 2 or 3 cam lobes that were pitting on the VTEC lobe only. This is the result of an aggressive cam and some worn out or "lazy" LMA's...
To your answer, YES, Aftermarket springs DO help in the higher RPM, That's what they're designed for.. But as for the LMA with aftermarket springs, How much of the time are you in VTEC? Realistically most people are in VTEC less than 1% of the time you're driving unless you are a serious road course racer or VERY aggressive street driver... That means that even though you have Good valve springs, if you have a worn or lazy LMA, it can still damage your cam the rest of the 99% of the time that you're driving if it fails to make the rocker follow the profile of your cam, ESPECIALLY when the engine is cold and VTEC operation is disabled..
While in VTEC the valve springs are responsible for controlling the entire locked rocker assembly through the entire aggressive profile of the VTEC lobe, while the LMA only helps in ASSISTING the assembly do it's job.. However, the more the LMA assists this operation, the more efficient the valve springs, stock or aftermarket can become..
05-15-2009, 04:26 PM
#6
Honda-Tech Member
Join Date: Jun 2003
Location: lafayette, la, u.s.a
Posts: 131
Likes: 0
Received 0 Likes
on
0 Posts
what year model and engine are the new style lma? and i have a ticking noise at idle but when u rev it , it goes away

Trending Topics
05-27-2009, 07:53 PM
#9
Honda-Tech Member
Join Date: Jan 2005
Location: b00sting my D16s, SoWis, USA
Posts: 7,015
Likes: 0
Received 7 Likes
on
5 Posts
Do you have a part number for the new lma's? Hondapartsdeals lists both P30 and PCB (14820-PCB-305) for LMA's for a '97 Del Sol VTEC, but the '01 ITR lists a P73 number. The PCB's are around $23ish/ea, so that's under $200 shipped.
http://www.autodynamics-honda.com/hopclomoas.html Notes that the PCB number apparently works for all dohc vtec h/b models, I just want to be sure.
http://www.autodynamics-honda.com/hopclomoas.html Notes that the PCB number apparently works for all dohc vtec h/b models, I just want to be sure.
05-28-2009, 07:51 PM
#10
Honda-Tech Member
Join Date: Sep 2007
Location: Kansas City, Kansas
Posts: 1,488
Likes: 0
Received 0 Likes
on
0 Posts
Anyone that knows there LMA's are bad and can hear it, Would you mind taking a short video of what it sounds like
My B16A2 has under 60k and is making a very odd noise
I have a small video where you can kinda hear something but I'm not sure

If anyone can help me or maybe know the sound lmk please and thank you
My B16A2 has under 60k and is making a very odd noise
I have a small video where you can kinda hear something but I'm not sure
If anyone can help me or maybe know the sound lmk please and thank you
06-20-2009, 02:37 PM
#11
Honda-Tech Member

Join Date: Apr 2009
Posts: 13
Likes: 0
Received 0 Likes
on
0 Posts
Iam doing my LMAs this weekend and i found my LMAs the srping type for the H22 for $7.89 from www.hondapartsdeals.com. I went to the dealer they had no idea what i was talking about i had to show them on there computer what a Lost Motion Assemblies was it was funny and they wanted $71 bucks a piece for them and ya need 8 thats a frig joke nice right up will come in handy thanks
07-19-2009, 05:41 PM
#12
Honda-Tech Member
Join Date: Jul 2006
Posts: 134
Likes: 0
Received 0 Likes
on
0 Posts
This is whats wrong with my car as well. it goes away after i drive it and warms up to temperature. Is that normal? I will take a video and post it. The noise from this video is hard to hear.
Are the ITR ones ok for replacing?
Are the ITR ones ok for replacing?
10-31-2009, 12:15 PM
#14
Honda-Tech Member
Im wondering, what did you do about the rear tranny mount when you jacked up the engine? was there enough slack that it let you raise it as high as you did?


Thread
Thread Starter
Forum
Replies
Last Post
crxmissing
Honda CRX / EF Civic (1988 - 1991)
107
12-31-2006 11:04 AM