
Discussion and Design of Extended Top Hats
 10-18-2007, 08:24 PM
#1
Honda-Tech Member
Thread Starter
Could someone direct me to where this thread is about how to make these? I was just wondering what size pipe I need to buy to make them. I couldnt seem to find it when I searched. Thanks!
 10-18-2007, 08:31 PM
#2
Honda-Tech Member

Join Date: Feb 2004
Location: Hello Friend, illinois
Posts: 4,670
Likes: 0
Received 0 Likes
on
0 Posts
step 1..
measure the Od of the stock shock mount
2.. buy pipe of same od.. decently thick walled.
3.. cut stock shock mount... add as much as you need..
4... weld.
measure the Od of the stock shock mount
2.. buy pipe of same od.. decently thick walled.
3.. cut stock shock mount... add as much as you need..
4... weld.
10-18-2007, 08:38 PM
#3
Honda-Tech Member
Thread Starter
Alright fine. I'll measure. Just wanted to see a how-to with the size pipe I would need to see if I had some lying around here instead of having to buy from.
10-24-2007, 09:12 AM
#4
Honda-Tech Member
Thread Starter
Wondering how high I can make the front ones without hood clearance issues.
Anyone want to chime-in on this so I don't have to remove my suspension yet?
I found some scrap metal to work at the correct size, which I believe I found to be about 1.75 inches.
Anyone want to chime-in on this so I don't have to remove my suspension yet?
I found some scrap metal to work at the correct size, which I believe I found to be about 1.75 inches.


Trending Topics
10-24-2007, 02:31 PM
#8
Honda-Tech Member
Join Date: Feb 2007
Location: filthy C, MD
Posts: 795
Likes: 0
Received 0 Likes
on
0 Posts
i extended mine about 1.25" and on koni yellows. i had to drill holes in my hood to allow the adjuster for the strut to go through. well not all the way through the hood, just the reinforcment part of the hood. 
10-24-2007, 02:55 PM
#9
Honda-Tech Member
Thread Starter
<TABLE WIDTH="90%" CELLSPACING=0 CELLPADDING=0 ALIGN=CENTER><TR><TD>Quote, originally posted by slammed_93_hatch »</TD></TR><TR><TD CLASS="quote">The ID of the tubing you use, MUST be bigger then the OD of the shock, or else there is really no point in making/using these.</TD></TR></TABLE>
Thanks for the tip, I'll keep that in mind.
I looked it up, and the GC tops are extended about an inch, so that's how far I'll extend the back ones, and the front, I'll mock-up to be sure that will clear my hood.
Thanks for the tip, I'll keep that in mind.
I looked it up, and the GC tops are extended about an inch, so that's how far I'll extend the back ones, and the front, I'll mock-up to be sure that will clear my hood.
10-24-2007, 09:12 PM
#11
Honda-Tech Member
Thread Starter
<TABLE WIDTH="90%" CELLSPACING=0 CELLPADDING=0 ALIGN=CENTER><TR><TD>Quote, originally posted by welfarepc »</TD></TR><TR><TD CLASS="quote">you better use tube not pipe as well....</TD></TR></TABLE>
Damn...I need to understand the difference in the terminology I believe.
The factory piece seems to be out of pretty thin material. The metal I was going to use is a bit thicker, so it should work I believe...
Damn...I need to understand the difference in the terminology I believe.
The factory piece seems to be out of pretty thin material. The metal I was going to use is a bit thicker, so it should work I believe...
10-25-2007, 02:32 PM
#13
Honda-Tech Member
Join Date: Nov 2006
Location: altadena, CA, USA
Posts: 1,189
Likes: 0
Received 0 Likes
on
0 Posts
i think this is what you are talking about right?
https://honda-tech.com/zerothread?id=469485
https://honda-tech.com/zerothread?id=469485
10-25-2007, 07:26 PM
#14
Honda-Tech Member
Thread Starter
<TABLE WIDTH="90%" CELLSPACING=0 CELLPADDING=0 ALIGN=CENTER><TR><TD>Quote, originally posted by slammed_93_hatch »</TD></TR><TR><TD CLASS="quote">The ID of the tubing you use, MUST be bigger then the OD of the shock, or else there is really no point in making/using these.</TD></TR></TABLE>
Well after thinking about this, and fitting some pipes over the strut, I'm not sure if I understand it.
What I believe is that it should only be big enough to fit around the top of the strut since I don't think the strut is going to go deeper than about 1/4 inch into the tophat since I plan to have the tophat section of the strut's shaft with bumpstops on it just to make the ride smoother and get about another inch of suspension travel.
Here's where I'm talking about on the strut:

Someone please correct me if I'm wrong, though I think I'm going to make a little drawing to make sure that I am thinking correctly.
Well after thinking about this, and fitting some pipes over the strut, I'm not sure if I understand it.
What I believe is that it should only be big enough to fit around the top of the strut since I don't think the strut is going to go deeper than about 1/4 inch into the tophat since I plan to have the tophat section of the strut's shaft with bumpstops on it just to make the ride smoother and get about another inch of suspension travel.
Here's where I'm talking about on the strut:
Someone please correct me if I'm wrong, though I think I'm going to make a little drawing to make sure that I am thinking correctly.
10-25-2007, 08:54 PM
#17
Honda-Tech Member
Thread Starter
Well from looking at a picture in this thread...
https://honda-tech.com/zerothread?id=1847887
It looks to me like the diamater I am aiming for, is pretty good. Looks just like the one on the setup since the diameter I'm going with is similar to that of the factory bushing "housing". Hard to explain, but I think I get it at least...
https://honda-tech.com/zerothread?id=1847887
It looks to me like the diamater I am aiming for, is pretty good. Looks just like the one on the setup since the diameter I'm going with is similar to that of the factory bushing "housing". Hard to explain, but I think I get it at least...
10-25-2007, 11:16 PM
#18
Honda-Tech Member
Join Date: Jul 2007
Location: Roseville, CA, United States
Posts: 100
Likes: 0
Received 0 Likes
on
0 Posts
I use 2" OD .120 wall tubing for my DA integra. After welding the base of the top hat on the inside, the gold and black washers that go inside the top hat during assembly had to be grinded down a tiny bit to fit inside so a smaller inside diameter would be harder to work with, but probably possible. The shock body fit inside the new welded top hat no problem.
As for the outside diameter, it was a bit on the large side but about 2 or 3 minutes of grinding and it was able to slide right into the strut mounting hole.
What I'm getting at is any larger and it wouldn't have worked, any smaller and it may not have worked, I'm sure someone has done this successfully with smaller tubing though. Let me know if you have any questions or objections.
Before grinding the outside to fit, I welded the base on the inside because the weld would have made the tubing too wide to fit into the car.

The inside, and this is where the strut fits into and the gold and black washers barely fit into.

The other one after it was grinded down to fit into the shock mounting hole.

After paint and assembly. Tokico Illuminas and Skunk2s. I also did the fork trick on my Tokicos awhile back as you can see.

Modified by jcochran at 12:38 AM 10/26/2007
As for the outside diameter, it was a bit on the large side but about 2 or 3 minutes of grinding and it was able to slide right into the strut mounting hole.
What I'm getting at is any larger and it wouldn't have worked, any smaller and it may not have worked, I'm sure someone has done this successfully with smaller tubing though. Let me know if you have any questions or objections.
Before grinding the outside to fit, I welded the base on the inside because the weld would have made the tubing too wide to fit into the car.
The inside, and this is where the strut fits into and the gold and black washers barely fit into.
The other one after it was grinded down to fit into the shock mounting hole.
After paint and assembly. Tokico Illuminas and Skunk2s. I also did the fork trick on my Tokicos awhile back as you can see.
Modified by jcochran at 12:38 AM 10/26/2007
10-26-2007, 07:07 AM
#20
Honda-Tech Member
Join Date: Jul 2007
Location: Roseville, CA, United States
Posts: 100
Likes: 0
Received 0 Likes
on
0 Posts
the extended top hats doesn't lower the car, just gives more travel. I think you're talking about the fork trick though, and that does lower the car, but I cranked the coilover back up an inch so the end result was 1 more inch of travel and the same ride height. Now that my top hats are done though Ill probably lower the car some more since my suspension now has almost 3 inches of downward travel
10-26-2007, 07:52 AM
#21
Honda-Tech Member
Thread Starter
<TABLE WIDTH="90%" CELLSPACING=0 CELLPADDING=0 ALIGN=CENTER><TR><TD>Quote, originally posted by jcochran »</TD></TR><TR><TD CLASS="quote">the extended top hats doesn't lower the car, just gives more travel. I think you're talking about the fork trick though, and that does lower the car, but I cranked the coilover back up an inch so the end result was 1 more inch of travel and the same ride height. Now that my top hats are done though Ill probably lower the car some more since my suspension now has almost 3 inches of downward travel</TD></TR></TABLE>
Thanks for the first HELPFUL posts in this entire thread!
I was starting to think this entire sub-forum was filled with all ***-hats (no pun intended).
I was going to go with the 2inch pipe, but I was also thinking it would be a challenge to get it through the whole to mount it. The 1 3/4 inch ID pipe is what I was thinking of going with instead.
Thanks for the advice/explanation.
10-26-2007, 11:05 AM
#22
Honda-Tech Member
Join Date: Jul 2007
Location: Roseville, CA, United States
Posts: 100
Likes: 0
Received 0 Likes
on
0 Posts
oh yeah a side note on that 3 inches of downward travel I mentioned above, when I bought the car it had 1 inch of travel and bottomed out all the time so 3 inches is a vast improvement.
Post some pics when you're done, like to see how it turns out.
Post some pics when you're done, like to see how it turns out.
10-26-2007, 08:09 PM
#23
Honda-Tech Member
Thread Starter
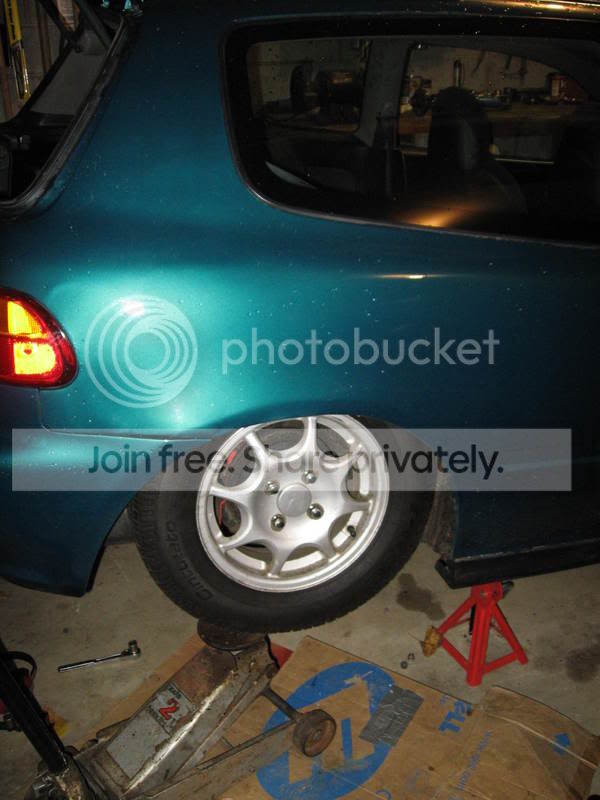
I was skeptical about all the info I've heard regarding where the civic suspension "bottoms out," in regards to how long I should make these top-hat. To make sure I don't make these top-hats so that they are too high and require too many bump-stops, and to see how far the strut can protrude inside the top-hat, when the suspension is fully compressed, I tested it out, and measured.
I did the front and rear compressed suspension test with the top-hats off, and no springs, just with the struts.
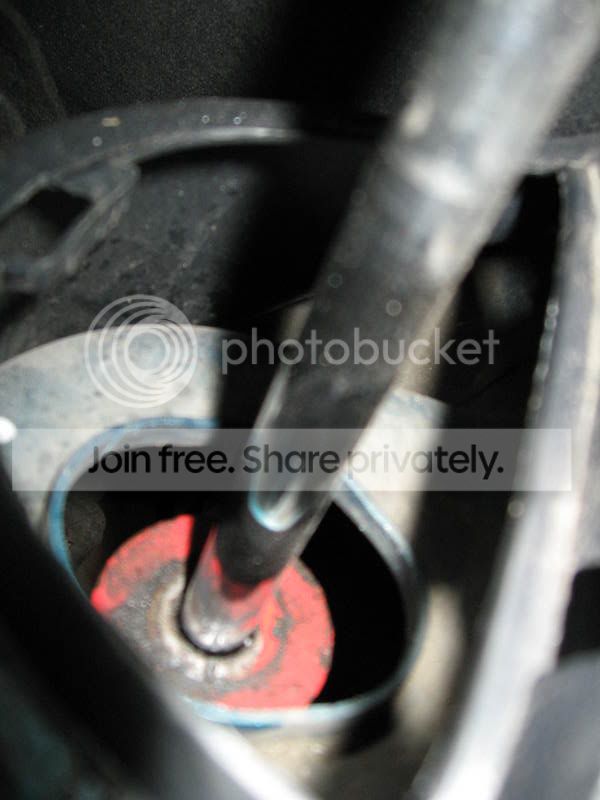
For the rear I found that when the tire was rubbing the wheelwell 100%, the strut sits 1/4 inch below the opening for the top-hat. Which means the top hat does not need to fit around the rear strut since the only way it would ever be inside the top-hat, is if your tire was against the wheelwell.
Rear pics:
tire is against the wheelwell (and these are only 13s)
strut is still about an 1/8 inch below the opening at this height
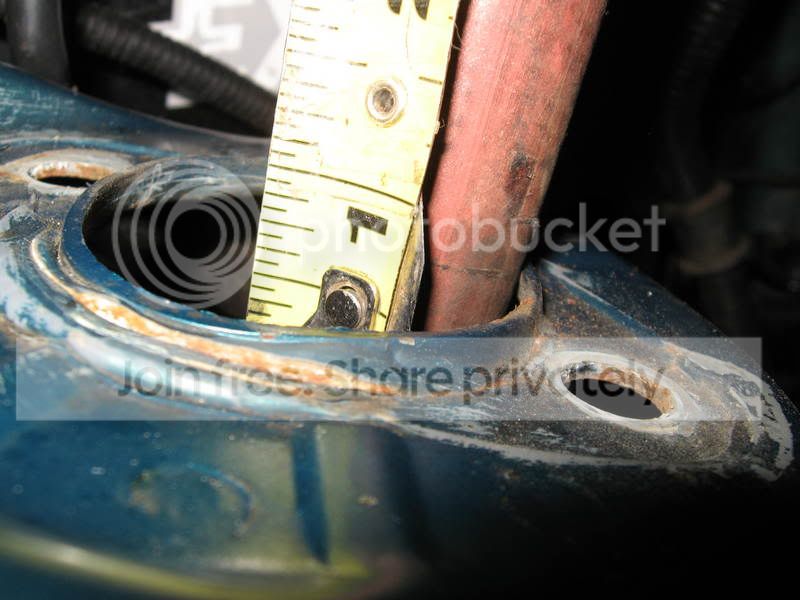
For the front I found that when the OEM Upper-Control-Arm was against the wheelwell, the strut was still sitting a half-inch below the opening for the top-hat. Which means the strut will never go inside the top-hat if you maintain the same upper-wheelwell dimensions (aka, leaving it stock).
Front pics:
At this height...
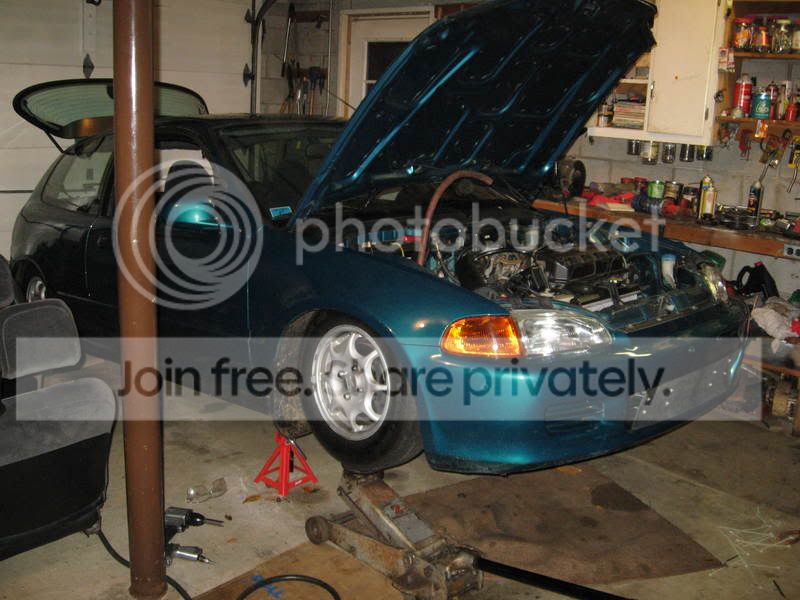
the UCA is against the upper wheel well...

and the strut is still a half inch below the opening for the top-hat.(hose on there to protect shaft)

side note: I also realized from doing the front suspension compression test that my car's ride height is about an 1/8th inch off the bumpstops... damn it.
So overall, as usual, all internet sources were 100% WRONG for this myth regarding that the strut will go into the top-hat. The only way this could happen, is if you were to modify the wheelwells of the car so that your tire in the rear doesn't bottom out first, and so that the UCA in the front doesnt slam agains the wheelwell.
So if you're going to make these, simply stick to about an inch extension (if they clear your hood) for the front and back, fill the extension with bump-stops, and your ride should be better and now with about a 1/2 inch more suspension travel. Kinda seems stupid to do all of this work for this little bit of travel, but I've heard it's worth it, and since it will be near free (and I'm sure I could sell the ones I made later.. :Cool, I'll give it a try to see if this actually helps the ride at all.
I took pics of the clearance of everything, and will post them later.
Still need to put the one side of the suspension back together on the front....yaya
Modified by Danronian at 6:15 AM 10/27/2007
I did the front and rear compressed suspension test with the top-hats off, and no springs, just with the struts.
For the rear I found that when the tire was rubbing the wheelwell 100%, the strut sits 1/4 inch below the opening for the top-hat. Which means the top hat does not need to fit around the rear strut since the only way it would ever be inside the top-hat, is if your tire was against the wheelwell.
Rear pics:
tire is against the wheelwell (and these are only 13s)
strut is still about an 1/8 inch below the opening at this height
For the front I found that when the OEM Upper-Control-Arm was against the wheelwell, the strut was still sitting a half-inch below the opening for the top-hat. Which means the strut will never go inside the top-hat if you maintain the same upper-wheelwell dimensions (aka, leaving it stock).
Front pics:
At this height...
the UCA is against the upper wheel well...
and the strut is still a half inch below the opening for the top-hat.(hose on there to protect shaft)
side note: I also realized from doing the front suspension compression test that my car's ride height is about an 1/8th inch off the bumpstops... damn it.
So overall, as usual, all internet sources were 100% WRONG for this myth regarding that the strut will go into the top-hat. The only way this could happen, is if you were to modify the wheelwells of the car so that your tire in the rear doesn't bottom out first, and so that the UCA in the front doesnt slam agains the wheelwell.
So if you're going to make these, simply stick to about an inch extension (if they clear your hood) for the front and back, fill the extension with bump-stops, and your ride should be better and now with about a 1/2 inch more suspension travel. Kinda seems stupid to do all of this work for this little bit of travel, but I've heard it's worth it, and since it will be near free (and I'm sure I could sell the ones I made later.. :Cool, I'll give it a try to see if this actually helps the ride at all.
I took pics of the clearance of everything, and will post them later.
Still need to put the one side of the suspension back together on the front....yaya
Modified by Danronian at 6:15 AM 10/27/2007
10-26-2007, 09:31 PM
#24
Honda-Tech Member
Join Date: Jul 2007
Location: Roseville, CA, United States
Posts: 100
Likes: 0
Received 0 Likes
on
0 Posts
In addition to the top hats I cut out my inner fenderwell for my upper control arm to clear but that only helps so much, and I cut out and rewelded the pinch that sits right above the tire, and smaller tires will help here also when I can get 15s. But the control arm hitting the inner fender Ill probably never get around and that limits us a lot unfortunately.
10-27-2007, 04:26 AM
#25
Honda-Tech Member
Thread Starter
I may cut and reweld the upper front wheel well to get a little more clearance for the UCA, but on my car at least, I found that the entire UCA, not just the end of it is hitting, so I don't even think I could make a difference unless a LOT of modifying was done....
In the "Slammed Thread" here, I saw some people who modified their Honda wheel wells but not very many really, and the ones who did, either simply cut a hole, or welded a box so the UCA wouldn't make a hole in their wheel well into the engine bay. The thing I don't get is how this would help with the situation at all since on my car (with an OEM UCA) the entire arm hits, not just the end of it where people often cut that hole.
I've never really seen someone do a good explanation of modifitying the front wheel well of a civic/integra (something common in the VW world for slammed cars), but hopefully that will happen soon.