
how to: V2V and P2V
 02-11-2007, 12:28 PM
#1
B*a*n*n*e*d
Thread Starter

Join Date: Jan 2002
Location: retired 2/13/10
Posts: 7,177
Likes: 0
Received 0 Likes
on
0 Posts
alright, i havent posted much up lately but "use the search function" so i thought i might do something helpful. 
im going to try to do a little writeup on properly checking V2V clearance and P2V clearance. if anyone that has more experience finds something wrong with my steps please post up.
to start things out i received my head on friday with all valvetrain installed minus cams.
1. pull the rockers out of cylinder #1
2. take out all 16 valve springs or just take out the #2,3,4 rocker arms (its easier)
3. install 2 "check springs" (1 IN 1 EX) using your retainers into cylinder #1 with them installed in the #2 valve position. should look like this:
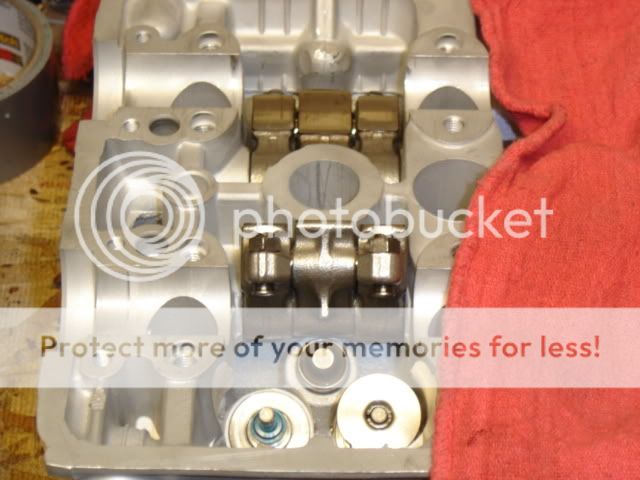
4. take a regular BB and install it in the rocker arm behind the small VTEC pin to hold the 3 rockers in "VTEC". do this on both IN and EX
5. install rockers
6. lube journals and install cams as if the motor was in the car (i just snug the cam journals down)
7. set valve lash at 0
8. wrap old timing belt around cam gears and keep it held there with a set of vice grips should look like this:

9. secure cylinder head to bench with cylinder #1 hanging over the edge
10. set cam gears to 0,0 (watch closely so you dont run them into one another)and rotate over while looking underneath at the valves and when they get to their closest to touching one another stop there. should look like this:
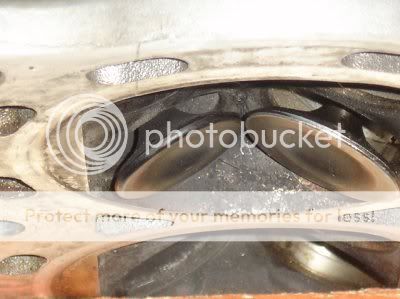
11. take feeler guages and slide them between the valves to get your V2V clearance. (write this down on paper so you wont forget)
12. change 1 cam gear at a time and continue. i change my cam gears in 2* increments, you may want to do each and every degree its your choice (remember to write down all your findings)
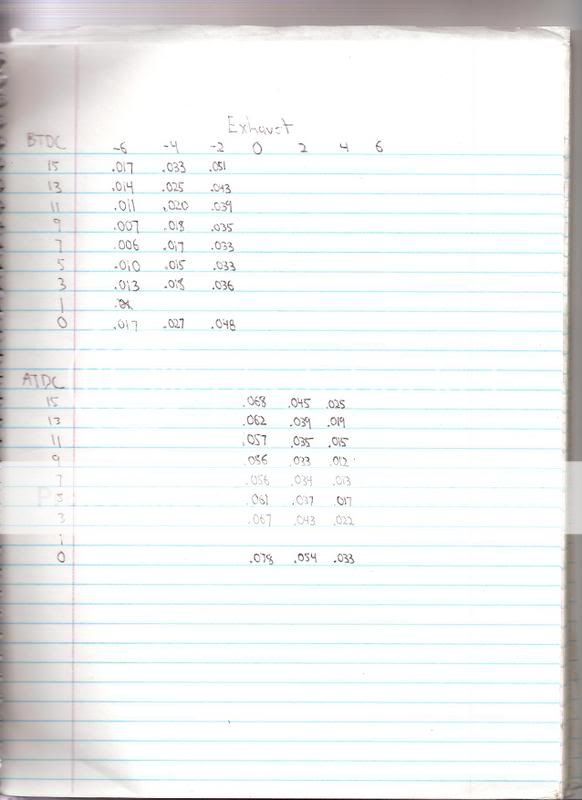
13. so lets assume you did all your cam gear changes, what did you find out? on this particular head these cams need MINIMUM 3* more advancement on the exhaust cam gear compared to the intake cam gear. this is my chart i made for this cam install:

notice at cam gear settings of 0,0 i have about .005 clearance.
also note how at 0,+4 i have about .030 clearance. this is MINIMUM on a race motor IMO. some go as far as .040. this is the reason these particular cams need 3-4 degrees advancement on the exhaust cam compared to the intake cam.
heres another chart i did using JUN 3 cams:

14. next rotate the cams till they are at their maximum lift, set your dial indicator to 0 and push down on the rockers. let them up, re-zero the dial indicator, then push them back down again. note how much movement there was until the dial indicator stopped. this will be your retainer to valve seal measurement, note that and then do the same to the other cam.
in this particular head i had .040 R2VS on the EX and .021 R2VS on the IN side.
Modified by 1 2 NV at 10:01 PM 5/28/2007
Modified by 1 2 NV at 7:44 PM 6/3/2007
im going to try to do a little writeup on properly checking V2V clearance and P2V clearance. if anyone that has more experience finds something wrong with my steps please post up.
to start things out i received my head on friday with all valvetrain installed minus cams.
1. pull the rockers out of cylinder #1
2. take out all 16 valve springs or just take out the #2,3,4 rocker arms (its easier)
3. install 2 "check springs" (1 IN 1 EX) using your retainers into cylinder #1 with them installed in the #2 valve position. should look like this:
4. take a regular BB and install it in the rocker arm behind the small VTEC pin to hold the 3 rockers in "VTEC". do this on both IN and EX
5. install rockers
6. lube journals and install cams as if the motor was in the car (i just snug the cam journals down)
7. set valve lash at 0
8. wrap old timing belt around cam gears and keep it held there with a set of vice grips should look like this:
9. secure cylinder head to bench with cylinder #1 hanging over the edge
10. set cam gears to 0,0 (watch closely so you dont run them into one another)and rotate over while looking underneath at the valves and when they get to their closest to touching one another stop there. should look like this:
11. take feeler guages and slide them between the valves to get your V2V clearance. (write this down on paper so you wont forget)
12. change 1 cam gear at a time and continue. i change my cam gears in 2* increments, you may want to do each and every degree its your choice (remember to write down all your findings)
13. so lets assume you did all your cam gear changes, what did you find out? on this particular head these cams need MINIMUM 3* more advancement on the exhaust cam gear compared to the intake cam gear. this is my chart i made for this cam install:
notice at cam gear settings of 0,0 i have about .005 clearance.
also note how at 0,+4 i have about .030 clearance. this is MINIMUM on a race motor IMO. some go as far as .040. this is the reason these particular cams need 3-4 degrees advancement on the exhaust cam compared to the intake cam.
heres another chart i did using JUN 3 cams:
14. next rotate the cams till they are at their maximum lift, set your dial indicator to 0 and push down on the rockers. let them up, re-zero the dial indicator, then push them back down again. note how much movement there was until the dial indicator stopped. this will be your retainer to valve seal measurement, note that and then do the same to the other cam.
in this particular head i had .040 R2VS on the EX and .021 R2VS on the IN side.
Modified by 1 2 NV at 10:01 PM 5/28/2007
Modified by 1 2 NV at 7:44 PM 6/3/2007
 02-11-2007, 12:50 PM
#3
B*a*n*n*e*d
Thread Starter
Join Date: Jan 2002
Location: retired 2/13/10
Posts: 7,177
Likes: 0
Received 0 Likes
on
0 Posts
ok, ill try to gather my thoughts on P2V checking. ok, so i take this head and throw it on the motor WITHOUT a head gasket. secure it down using 2-4 bolts snug. set up timing belt as though you were going to run the motor. now that im all set up this is what i do:
1. set cam gears at 0,0 (if you have proper V2V clearances)
2. rotate motor over till i get the piston at TDC. zero out your dial indicator. should look like this:

3. zero out the intake cam dial indicator to 0. should look like this but on the intake side:

4. push down and take reading off the dial indicator. this is your P2V clearance.
5. repeat as necessary the rest of the way through
this is the chart i made concerning P2V clearance. note how about every 2 degree increments = .020 thousandths difference of clearances. therefor every 1 degree changed on the cam gear = .010 change of P2V.

REMEMBER this is without a head gasket so you can feasibly still run tighter than this because you will need to include .026 to any measurement here with the head gasket installed on a running motor.
on this particular motor/head combo with the piston at TDC i didnt run the valve into the piston until -7.5* EX and +7.5*IN. add head gasket and this becomes .026 P2V.
now to have all your range of proper settings, check out this old chart i did regarding P2V clearance using JUN 3 cams in my motor BUT using a degree wheel for exactness:

there are some inconsistencies in my findings due to possible T belt slop, degree changes on cam gears not being exact etc etc.
NOTE in the chart above on these cams (JUN 3) installed in the motor ready to go that my P2V clearance got smaller at around 9* before and after TDC, this is the reason for using a degree wheel. the above method is getting approximate safe zones the more appropriate one is by using the degree wheel.
take a look above at my first post concerning V2V and the second chart (JUN 3)shows my "safe zone". how i got that is by using this chart (above) and seeing i could go approximately 1-2 degrees advanced on the intake cam gear and be marginally safe. i could then feasibly run -4 on the exhaust cam as long as there is proper margins of V2V at that point. you have to use both charts to combine the info to find your particular motors safe zone.
gathering this info is extremely useful yet time consuming. since i have only limited experience my findings have shown that the piston to valve clearance occurs at anywhere between 7-10 degrees BTDC and ATDC. you could shoot for this crank degree mark to be pretty damn accurate.
then after all that is done you can move on to degreeing your camshafts which is quickly covered in this thread. also a better version has been copied and pasted from skunk2s website.
https://honda-tech.com/zerothread?id=2003538
Modified by 1 2 NV at 10:07 PM 5/28/2007
Modified by 1 2 NV at 5:23 AM 6/5/2007
1. set cam gears at 0,0 (if you have proper V2V clearances)
2. rotate motor over till i get the piston at TDC. zero out your dial indicator. should look like this:
3. zero out the intake cam dial indicator to 0. should look like this but on the intake side:
4. push down and take reading off the dial indicator. this is your P2V clearance.
5. repeat as necessary the rest of the way through
this is the chart i made concerning P2V clearance. note how about every 2 degree increments = .020 thousandths difference of clearances. therefor every 1 degree changed on the cam gear = .010 change of P2V.
REMEMBER this is without a head gasket so you can feasibly still run tighter than this because you will need to include .026 to any measurement here with the head gasket installed on a running motor.
on this particular motor/head combo with the piston at TDC i didnt run the valve into the piston until -7.5* EX and +7.5*IN. add head gasket and this becomes .026 P2V.
now to have all your range of proper settings, check out this old chart i did regarding P2V clearance using JUN 3 cams in my motor BUT using a degree wheel for exactness:
there are some inconsistencies in my findings due to possible T belt slop, degree changes on cam gears not being exact etc etc.
NOTE in the chart above on these cams (JUN 3) installed in the motor ready to go that my P2V clearance got smaller at around 9* before and after TDC, this is the reason for using a degree wheel. the above method is getting approximate safe zones the more appropriate one is by using the degree wheel.
take a look above at my first post concerning V2V and the second chart (JUN 3)shows my "safe zone". how i got that is by using this chart (above) and seeing i could go approximately 1-2 degrees advanced on the intake cam gear and be marginally safe. i could then feasibly run -4 on the exhaust cam as long as there is proper margins of V2V at that point. you have to use both charts to combine the info to find your particular motors safe zone.
gathering this info is extremely useful yet time consuming. since i have only limited experience my findings have shown that the piston to valve clearance occurs at anywhere between 7-10 degrees BTDC and ATDC. you could shoot for this crank degree mark to be pretty damn accurate.
then after all that is done you can move on to degreeing your camshafts which is quickly covered in this thread. also a better version has been copied and pasted from skunk2s website.
https://honda-tech.com/zerothread?id=2003538
Modified by 1 2 NV at 10:07 PM 5/28/2007
Modified by 1 2 NV at 5:23 AM 6/5/2007
02-11-2007, 01:01 PM
#5
B*a*n*n*e*d
Thread Starter
Join Date: Jan 2002
Location: retired 2/13/10
Posts: 7,177
Likes: 0
Received 0 Likes
on
0 Posts
reading your build derek your on the brink of disaster with your motor and cams. thats just my findings. ive had V2V issues before where it left "dimples" in one another and after a failure that i suffered last year you tend to learn quickly when the old wallet has to repeat what you had just done months before. just some words of advice.
the failure i had last year was due to my own impatience and ignorance of not paying attention. it wasnt due to the V2V problem i mentioned above. i believe Tbone had some dimpling of the valves too if im not mistaken and hes much more careful than i.
the failure i had last year was due to my own impatience and ignorance of not paying attention. it wasnt due to the V2V problem i mentioned above. i believe Tbone had some dimpling of the valves too if im not mistaken and hes much more careful than i.
02-11-2007, 01:17 PM
#6
Honda-Tech Member
<TABLE WIDTH="90%" CELLSPACING=0 CELLPADDING=0 ALIGN=CENTER><TR><TD>Quote, originally posted by 1 2 NV »</TD></TR><TR><TD CLASS="quote">reading your build derek your on the brink of disaster with your motor and cams. thats just my findings. ive had V2V issues before where it left "dimples" in one another and after a failure that i suffered last year you tend to learn quickly when the old wallet has to repeat what you had just done months before. just some words of advice.
the failure i had last year was due to my own impatience and ignorance of not paying attention. it wasnt due to the V2V problem i mentioned above. i believe Tbone had some dimpling of the valves too if im not mistaken and hes much more careful than i. </TD></TR></TABLE>
While I appreciate the advice, the engine is actually running the best it ever has.
My oil consumption problem has been slowed considerably, the tune is near-perfect, and should be propelling the coupe into the 12's next month. That being said (as I knock on wood) the engine as not had any issues what-so-ever since the exhaust camshaft snapping last February.
Although, I may pull the head sometime to check for this valve-to-valve 'dimpling' you speak of.
...Either that, or I'll just do another build.
Once again, good write up.
- Derek
the failure i had last year was due to my own impatience and ignorance of not paying attention. it wasnt due to the V2V problem i mentioned above. i believe Tbone had some dimpling of the valves too if im not mistaken and hes much more careful than i.
</TD></TR></TABLE>While I appreciate the advice, the engine is actually running the best it ever has.
My oil consumption problem has been slowed considerably, the tune is near-perfect, and should be propelling the coupe into the 12's next month. That being said (as I knock on wood) the engine as not had any issues what-so-ever since the exhaust camshaft snapping last February.
Although, I may pull the head sometime to check for this valve-to-valve 'dimpling' you speak of.
...Either that, or I'll just do another build.
Once again, good write up.
- Derek

Trending Topics
 02-11-2007, 10:50 PM
#13
Honda-Tech Member
Join Date: Oct 2004
Location: Mid East Deserts
Posts: 1,073
Likes: 0
Received 0 Likes
on
0 Posts
great info! thanks for sharing 1 2 NV
very handy since i will be doing this process very soon once i receive Mike Belben's tools.
very handy since i will be doing this process very soon once i receive Mike Belben's tools.
02-12-2007, 02:23 AM
#16
Honda-Tech Member
Join Date: Aug 2005
Location: I miss the east coast, TX, USA
Posts: 2,695
Likes: 0
Received 1 Like
on
1 Post
Out of sheer curiosity, I have to ask. I was always taught to use an old headgasket when doing P2V clearances so that everything will be the same as when it's running.
Any particular reason you do it bear?
Any particular reason you do it bear?
02-12-2007, 03:47 AM
#17
B*a*n*n*e*d
Thread Starter
Join Date: Jan 2002
Location: retired 2/13/10
Posts: 7,177
Likes: 0
Received 0 Likes
on
0 Posts
the specs with the JUN 3 were with the head gasket installed and motor ready to go once the valve train was replaced.
i was told this way by a wise man. so i did it his way instead this time around. you can do it either way, its your choice. we know we have .026-.029 extra clearance with the gasket.
i was told this way by a wise man. so i did it his way instead this time around. you can do it either way, its your choice. we know we have .026-.029 extra clearance with the gasket.
02-12-2007, 07:41 AM
#18
Honda-Tech Member
Join Date: Aug 2005
Location: I miss the east coast, TX, USA
Posts: 2,695
Likes: 0
Received 1 Like
on
1 Post
Absolutely, I was just curious if there was an alterior motive for it. I keep an old oem headgasket in my shop for this, was just wondering if there was another reason behind it. I am all about learning new things.
02-15-2007, 05:08 AM
#19
B*a*n*n*e*d
Thread Starter
Join Date: Jan 2002
Location: retired 2/13/10
Posts: 7,177
Likes: 0
Received 0 Likes
on
0 Posts
i just wanted to add that ill get a degree wheel and then get P2V clearances while the motor is being turned over in relationship to crank degrees and watch my findings really change. this will be the no guessing way of doing things.
02-24-2007, 08:17 AM
#21
B*a*n*n*e*d
Thread Starter
Join Date: Jan 2002
Location: retired 2/13/10
Posts: 7,177
Likes: 0
Received 0 Likes
on
0 Posts
yes, thats what you use the degree wheel for. im grabbing my friends degree wheel here in a bit. not sure if im going to check my piston to valve clearance with the degree wheel today or tomorrow, but soon.
with the piston at TDC this doesnt necessarily mean this is where the piston to valve will be at its least amount of clearance.
im sure someone like donF has put out enough motors that he doesnt need to do all this crap constantly. hes probably done enough that he knows changing this will = X and changing that will = Y.
for example i changed my cam gear 2 degrees it equalled .020 difference in clearances. just a rule of thumb to follow.
 02-24-2007, 08:44 PM
#23
Honda-Tech Member
Join Date: Feb 2004
Location: not riding any bandwagons in, massachusetts, usa
Posts: 1,592
Likes: 0
Received 0 Likes
on
0 Posts
uh oh.. looks like theres a new up and comer from the northwest doing his homework.
btw guys.. use the headgasket you intend to run and erase any guesswork. just dont copperspray it till the last assembly. ive never had a HG leak in my life and ive always had the head on them atleast 3 times, as many as 6 on complex setups.. same gasket.
btw guys.. use the headgasket you intend to run and erase any guesswork. just dont copperspray it till the last assembly. ive never had a HG leak in my life and ive always had the head on them atleast 3 times, as many as 6 on complex setups.. same gasket.
02-24-2007, 09:34 PM
#24
Honda-Tech Member
Join Date: Oct 2004
Location: Mid East Deserts
Posts: 1,073
Likes: 0
Received 0 Likes
on
0 Posts
... and one from the Mid East soon, LOL 
thanks for contributing great ideas once again gentlemen! it helps a lot.
thanks for contributing great ideas once again gentlemen! it helps a lot.