
off topic - 97 CD5 project
 12-11-2010, 10:22 AM
#1001
Honda-Tech Member

 12-30-2010, 07:58 AM
#1002
Honda-Tech Member
Join Date: Jun 2007
Location: Plantation, florida, usa
Posts: 133
Likes: 0
Received 1 Like
on
1 Post
cant believe u put it back together damn my boy got skills. damn if only u were still in fl. we'd be driving dirty all day lol
01-10-2011, 05:10 PM
#1003
Honda-Tech Member
Thread Starter
Join Date: Aug 2005
Location: Pompano Beach, FL, USA
Posts: 3,495
Likes: 0
Received 5 Likes
on
4 Posts
Update... no pics for now.
I just had a bad experience today while swaping radiators on my accord. The OEM one had an area where transmission fluid (auto) could cool down, but the koyo aluminum one was meant for a 5sp like my last accord, and so... i just bypassed that making a "U" with the hoses.
Had lots of clearance issues with the subframe, problems with clearance with motor mount and even the air conditioning hose. I had to go to work at night, so i opted for the quickest and cheapest solution... using an electric jig saw.
I even had to chop pieces off the blades of the fan and the fan's case as well.
Pics of this will come soon....
01-10-2011, 06:25 PM
#1004
Honda-Tech Member
I've seen some posts of what people have had to do to fit some of the full sized aftermarket rads. Not fun!
I would figure that using Slim fans would be a must if it is a dual core.
I would figure that using Slim fans would be a must if it is a dual core.
01-11-2011, 11:27 AM
#1005
Honda-Tech Member
Thread Starter
Join Date: Aug 2005
Location: Pompano Beach, FL, USA
Posts: 3,495
Likes: 0
Received 5 Likes
on
4 Posts
Thanks for letting me know, i thought i had experienced this for some odd reason, maybe a different subframe in the euro model from the north american one.
I'll do a search on slim fans around here. Thanks man!
I'll do a search on slim fans around here. Thanks man!
01-13-2011, 10:40 AM
#1007
Honda-Tech Member

Join Date: Apr 2002
Location: 408
Posts: 406
Likes: 0
Received 0 Likes
on
0 Posts
The Koyo radiator is a tough fit even with slim fans. If you want the best available fans for your car you can use the Mr. Gasket 1986 fan.
The stock fans are way to large to fit in there, though what you did is what I have seen other people do.
The cross member problem you are having is the same problem with the US accords. Hammer, grinder and some pillars and you should have no problem making it fit.
The stock fans are way to large to fit in there, though what you did is what I have seen other people do.
The cross member problem you are having is the same problem with the US accords. Hammer, grinder and some pillars and you should have no problem making it fit.
02-21-2011, 10:23 AM
#1008
Honda-Tech Member
Thread Starter
Join Date: Aug 2005
Location: Pompano Beach, FL, USA
Posts: 3,495
Likes: 0
Received 5 Likes
on
4 Posts
Updating!!
What's up guys.
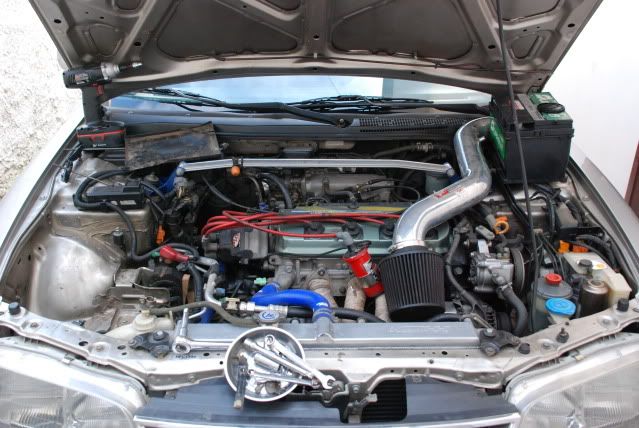
I've been seriously busy lately, but i just had to find to time to work on the car this weekend. First of all, let me post pics of the engine bay, how is looking with the koyo rad for now.
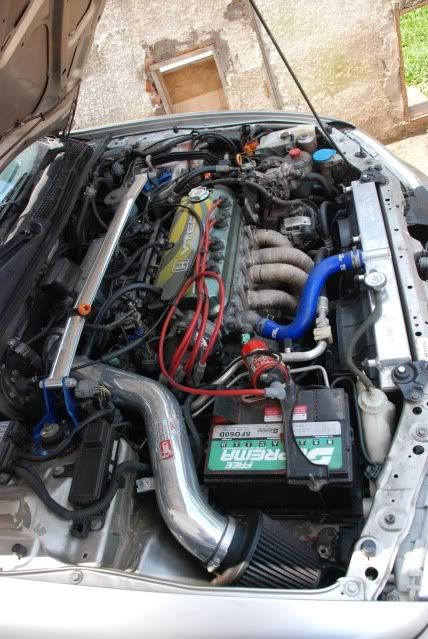
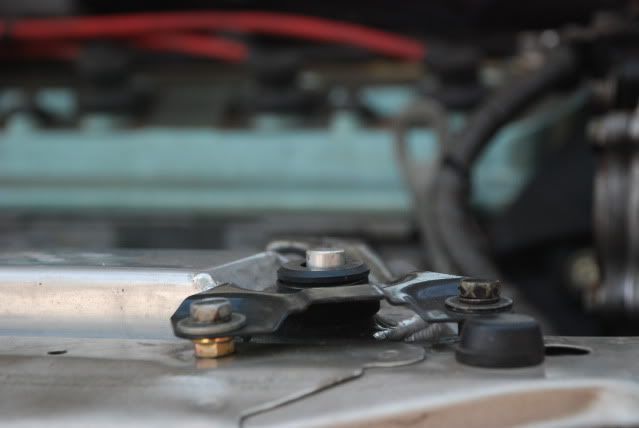
Added a couple of nuts under the stays to help them a little.
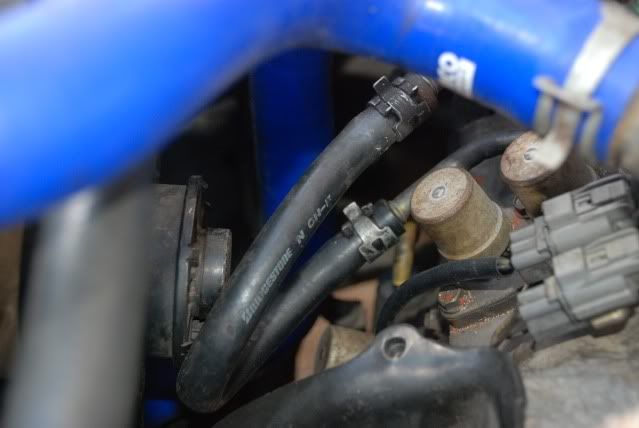
Bent AC lines to clear the fan.
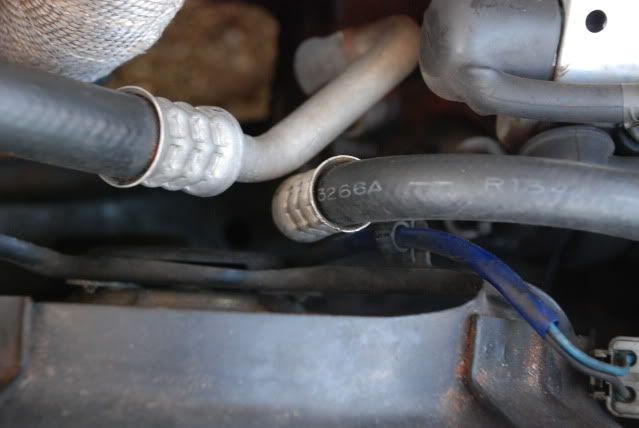
Bypassed auto transmission cooling line.
I changed the oil and decided it was time to replace the exhaust already, as much as i didn't want to put the Tanabe yet, i rather not the spend the money on a new muffler for now. The OEM muffler was rusted to hell when i bought this car, and the new muffler added in 2009 barely lasted 1 year, it had had 3 repairs done to it in less than 15 months.
It looks like it had been inside of a bathtub with acid...lol
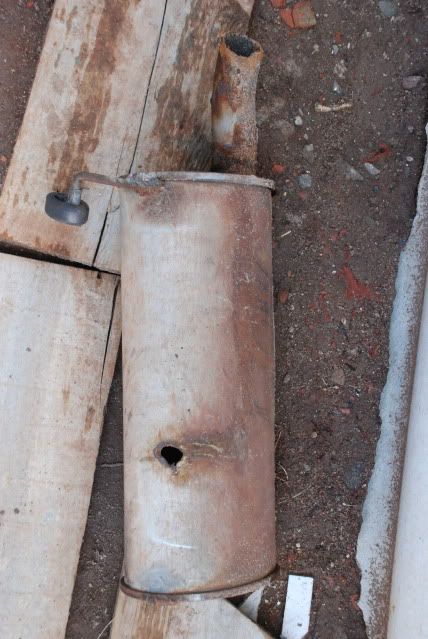
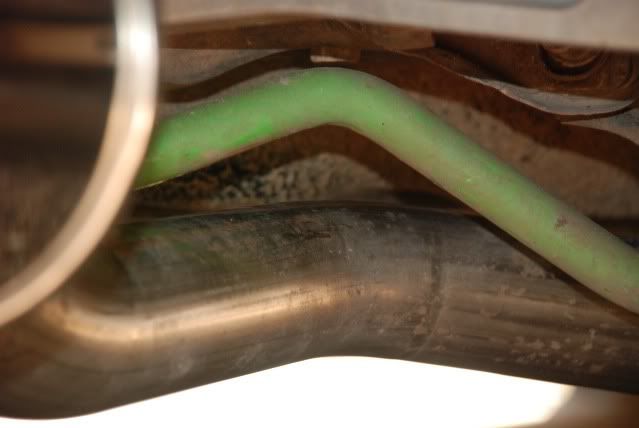
Piping looks in descent shape considering 14 years have passed already, but the end of has had better days.
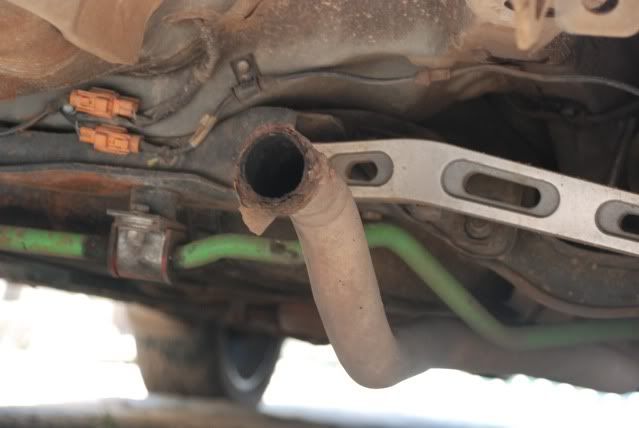
Removed the screws with springs between the header the OEM piping, took the piping off the rubber hangers.

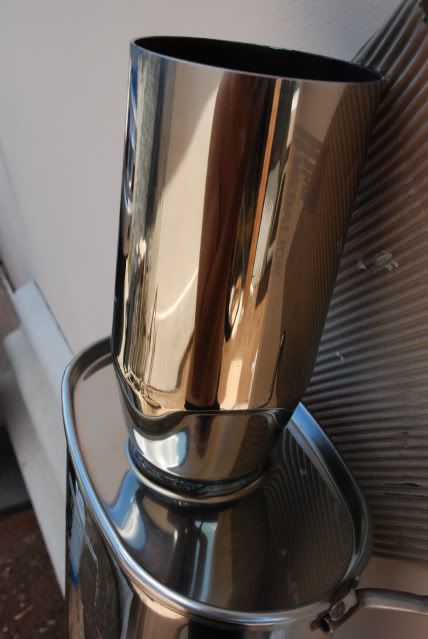
Side by side.
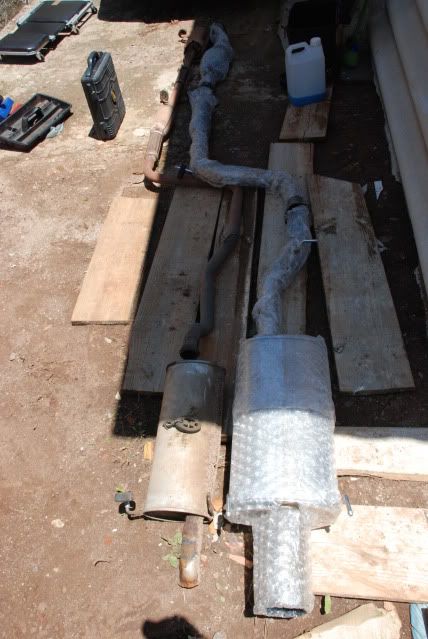
Tanabe Hyper Medallion before the cleaner for metals...
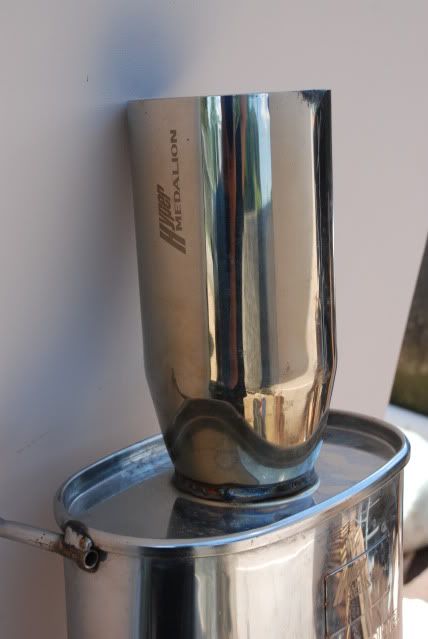
...and after:
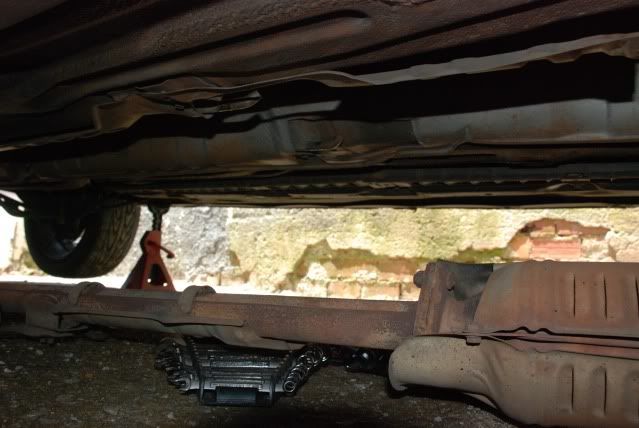
To me, the best way to install the exhaust is to hang the rubbers on the hooks of the car first. The starting working from the header towards the back of the car. I used a very handy tool, meant to pry off hoses of the radiator to help the hooks of the exhuast reach the rubber holes.
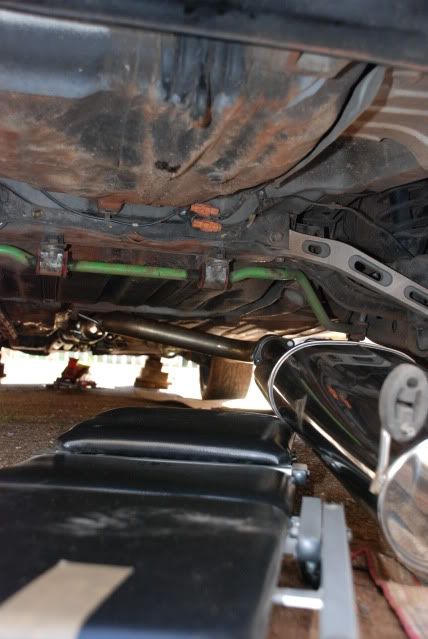
This seemed strange...
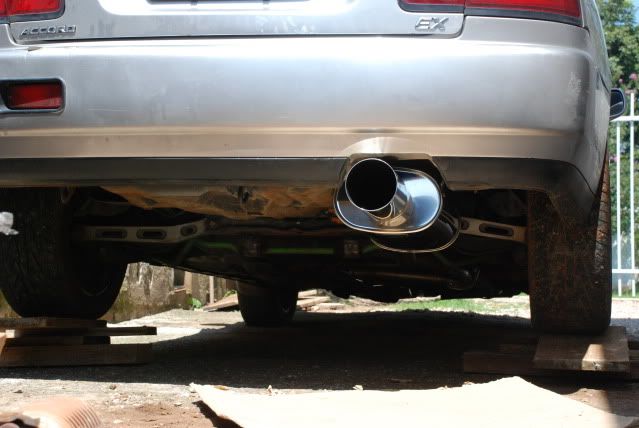
How it looked before i "tuned" the position of the exhaust. I started out with this because not only this "muffler" is bigger, but i also have to keep it away from the ST rear sway bar, which creates an annoying rattle sometimes. Thicker piping means closer distance to the sway bar, so it wasn't easy to find a good position.
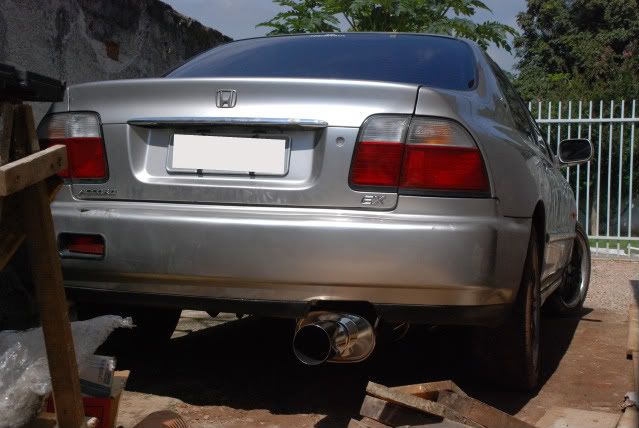
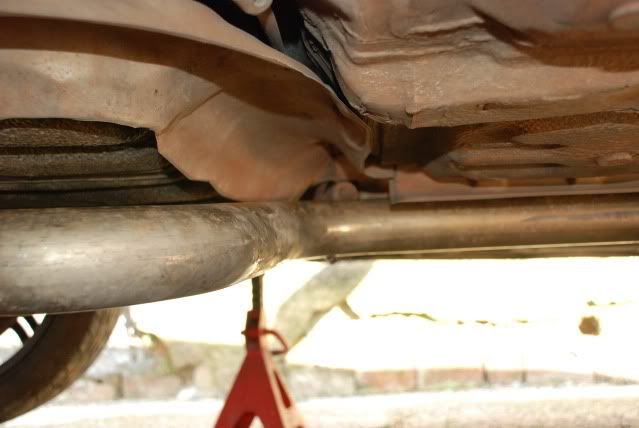
This was the distance with the old rubber hangings, but the downside was that the "muffler" was hanging too low, and with speed bumps like the ones we have around here, this wouldn't be a good idea.
After spending 15 minutes pulling, and pushing and hooking up new rubber hangers, i still needed to use a wire to tie the exhaust's hook to the side of the chassis (sad face). This was the final look. Loving how quiet the car is once again.
More stuff coming soon, i plan on getting the subframe out to reinstall the traction bar i've brought from Florida.
Peace out! Accord love, and don't forget to check the blog, i'm open for business! haha
What's up guys.
I've been seriously busy lately, but i just had to find to time to work on the car this weekend. First of all, let me post pics of the engine bay, how is looking with the koyo rad for now.
Added a couple of nuts under the stays to help them a little.
Bent AC lines to clear the fan.
Bypassed auto transmission cooling line.
I changed the oil and decided it was time to replace the exhaust already, as much as i didn't want to put the Tanabe yet, i rather not the spend the money on a new muffler for now. The OEM muffler was rusted to hell when i bought this car, and the new muffler added in 2009 barely lasted 1 year, it had had 3 repairs done to it in less than 15 months.
It looks like it had been inside of a bathtub with acid...lol
Piping looks in descent shape considering 14 years have passed already, but the end of has had better days.
Removed the screws with springs between the header the OEM piping, took the piping off the rubber hangers.
Side by side.
Tanabe Hyper Medallion before the cleaner for metals...
...and after:
To me, the best way to install the exhaust is to hang the rubbers on the hooks of the car first. The starting working from the header towards the back of the car. I used a very handy tool, meant to pry off hoses of the radiator to help the hooks of the exhuast reach the rubber holes.
This seemed strange...
How it looked before i "tuned" the position of the exhaust. I started out with this because not only this "muffler" is bigger, but i also have to keep it away from the ST rear sway bar, which creates an annoying rattle sometimes. Thicker piping means closer distance to the sway bar, so it wasn't easy to find a good position.
This was the distance with the old rubber hangings, but the downside was that the "muffler" was hanging too low, and with speed bumps like the ones we have around here, this wouldn't be a good idea.
After spending 15 minutes pulling, and pushing and hooking up new rubber hangers, i still needed to use a wire to tie the exhaust's hook to the side of the chassis (sad face). This was the final look. Loving how quiet the car is once again.
More stuff coming soon, i plan on getting the subframe out to reinstall the traction bar i've brought from Florida.
Peace out! Accord love, and don't forget to check the blog, i'm open for business! haha
02-21-2011, 11:16 AM
#1009
Honda-Tech Member

Join Date: Feb 2011
Posts: 6
Likes: 0
Received 0 Likes
on
0 Posts
i've read the whole thread throughout some weeks and you are by far one of the most dedicated i've seen. gotta respect that. car is looking though, keep the updates coming.
03-29-2011, 10:54 AM
#1010
Honda-Tech Member
Thread Starter
Join Date: Aug 2005
Location: Pompano Beach, FL, USA
Posts: 3,495
Likes: 0
Received 5 Likes
on
4 Posts
What's up guys! It's been crazy over here! I'm less than 4 weeks from becoming a dad, and as you can expect, every detail needs to be taken care of. OG as i am, i still have to find time to give some love to the accord, even if it means 10pm at night when i'll need to get up at 5:45am in the next day!!
As some of you may know, i've been working on creating a new short shifter for the 5th gen accords, it should fit the CB7's and preludes as well.
The current accord is automatic, so... gotta get all the stuff out before test fitting.
I feel confident about the idea, i believe it's the best short shifter for the 5th gen accord, and i wouldn't dare to say such thing if i had made something that's already available on the market.
More information to come, stay tuned!
Peace!!
04-22-2011, 07:06 PM
#1011
Honda-Tech Member
Thread Starter
Join Date: Aug 2005
Location: Pompano Beach, FL, USA
Posts: 3,495
Likes: 0
Received 5 Likes
on
4 Posts
Hey guys.
My car sometimes won't start, i thought it could be the relay, but then i remembed how the relay won't let the starter make any noise. I'm thinking i might need to change the brushes inside the alternator, or just simply clean up. I can hear this "clac" when i turn the keys, but it won't start. It happens randomly, might not happen for a few days, then i need to try like 10 times before it finally fires up.
Either way, i'll probably remove the starter and check it just to make sure, will post pics when i do that.
Happy easter everyone.
Peace!
04-23-2011, 05:38 AM
#1012
Honda-Tech Member
Test your battery and check all of your power & ground connections to make sure they are tight and clean. Same with the connections to your starter. The "clac" sound you are hearing is the starter engaging. A lot of times that is an indication that there aren't enough amps/power going to the starter to turn the engine over.
If you battery tests good then I would start looking at your starter or ignition switch.
If you battery tests good then I would start looking at your starter or ignition switch.
04-23-2011, 11:06 PM
#1015
Honda-Tech Member
That exhaust is sex. I didnt think they still made it.
LOL I never realized this sav was the same as my nix savinski "the paint wizard" claude over on hs.
LOL I never realized this sav was the same as my nix savinski "the paint wizard" claude over on hs.
04-24-2011, 03:36 PM
#1016
Honda-Tech Member
Thread Starter
Join Date: Aug 2005
Location: Pompano Beach, FL, USA
Posts: 3,495
Likes: 0
Received 5 Likes
on
4 Posts
I didn't have a chance to work on it today, i'll just have to see if i will have time next weekend, but it's going to be tough since my wife is giving birth to my baby daughter this week. We'll just have to wait and see.
07-17-2011, 08:34 PM
#1018
Honda-Tech Member
Thread Starter
Join Date: Aug 2005
Location: Pompano Beach, FL, USA
Posts: 3,495
Likes: 0
Received 5 Likes
on
4 Posts
Sup guys! It's me again. Fatherhood has been great if you ask me, lol. I've meant to come here and drop some pictures of things being done to the car, and i didn't... but today i have pics. The car continued to have the starting issue, turning the key and hearing a clic. Yesterday, the car finally didn't start at all, after 20 minutes turning the key, i was exhausted... didn't have a good night of sleep, had a fever, coughing and with a runny nose...oh...danm... i was going to be late for work. I ended up calling in sick, but the car really did this one for me...lol, it can happen right?!
I didn't have my multimeter around, it's actually at my parents house... and so i decided to go straight for the starter. I inspected the brushes, cleaned the thing a little and noticed that the brushes have a fair amount of life to go.
The contact points didn't have any green or white foamy stuff around, so they seemed in good shape as well.
I didn't test the starter, i placed it back and after lots of times turning the key, the car started once again.
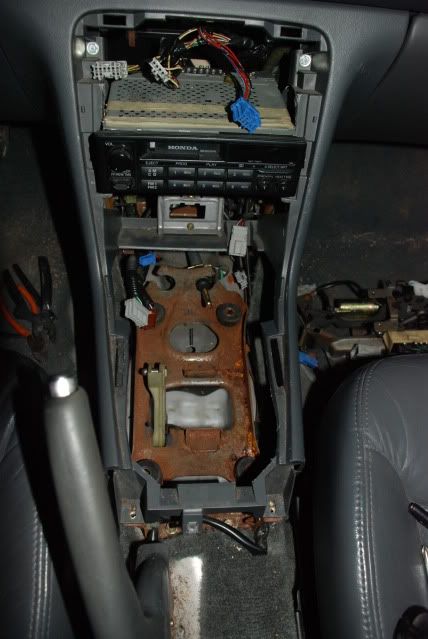
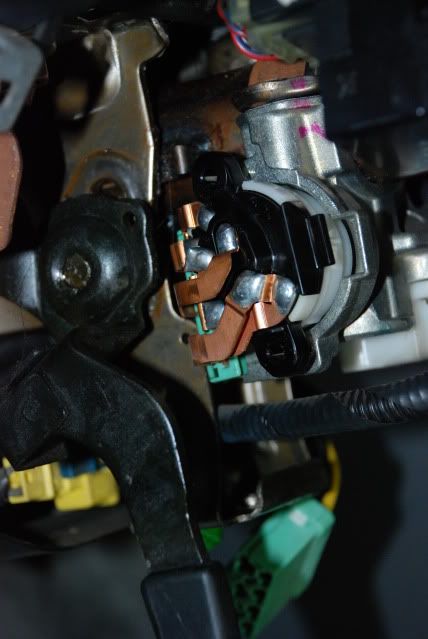
Later at night, i decided to check the ignition switch, now with a multimeter, the wiring seems ok from the back of the connector to the fuse box. I wanted to completelly take apart the ignition switch and inspect the inside of it.
I thought i was doing great until this point....
...where this piece of metal won't clear the green connector...
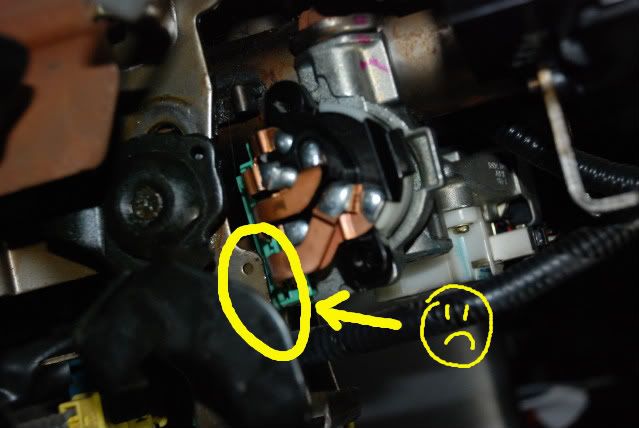
..and so... i can't completelly pull out the part to inspect its inner guts. From what i read, the ignition switch can get worn out in the inside, but what i don't get is... how it allows the starter to clic but not to completelly turn the flywheel.
Tomorrow i'm going to tackle this problem once again, i'll try touching a wire directly from the battery to the starter to see if cranks right away. I already missed a day of work, but weekdays are really demanding, i can't mess it up.
Thanks in advance for any replies concerning ignition switch failure.
I didn't have my multimeter around, it's actually at my parents house... and so i decided to go straight for the starter. I inspected the brushes, cleaned the thing a little and noticed that the brushes have a fair amount of life to go.
The contact points didn't have any green or white foamy stuff around, so they seemed in good shape as well.
I didn't test the starter, i placed it back and after lots of times turning the key, the car started once again.
Later at night, i decided to check the ignition switch, now with a multimeter, the wiring seems ok from the back of the connector to the fuse box. I wanted to completelly take apart the ignition switch and inspect the inside of it.
I thought i was doing great until this point....
...where this piece of metal won't clear the green connector...
..and so... i can't completelly pull out the part to inspect its inner guts. From what i read, the ignition switch can get worn out in the inside, but what i don't get is... how it allows the starter to clic but not to completelly turn the flywheel.
Tomorrow i'm going to tackle this problem once again, i'll try touching a wire directly from the battery to the starter to see if cranks right away. I already missed a day of work, but weekdays are really demanding, i can't mess it up.
Thanks in advance for any replies concerning ignition switch failure.
07-18-2011, 06:09 AM
#1019
Honda-Tech Member
Thread Starter
Join Date: Aug 2005
Location: Pompano Beach, FL, USA
Posts: 3,495
Likes: 0
Received 5 Likes
on
4 Posts
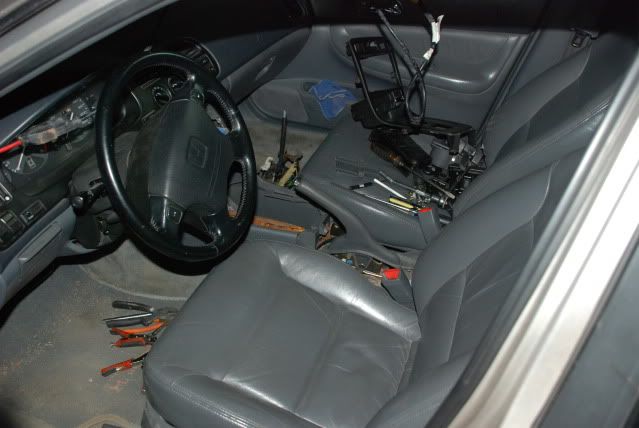
Tested voltage to starter, it's being fed the 12V normally. I drilled multiple holes in that piece of metal behind the steering wheel to make room for the ignition switch to come out.
Took the switch apart...
I'm going to clean it up, maybe smooth anything rough if there is any, and install it all back to check if the car will start or not. Wish me good luck.
Took the switch apart...
I'm going to clean it up, maybe smooth anything rough if there is any, and install it all back to check if the car will start or not. Wish me good luck.
07-18-2011, 06:48 AM
#1020
Honda-Tech Member
you are the man, i was just looking for this info.
do you know where to find parts if the starter points needed to be replaced
do you know where to find parts if the starter points needed to be replaced
07-18-2011, 08:06 AM
#1021
Honda-Tech Member
Thread Starter
Join Date: Aug 2005
Location: Pompano Beach, FL, USA
Posts: 3,495
Likes: 0
Received 5 Likes
on
4 Posts
Ghostaccord just sent me this link on another forum: http://www.team-integra.net/forum/19...than-20-a.html
Is the solenoid of the 5sp starter the same as the automatic one?
Is the solenoid of the 5sp starter the same as the automatic one?
07-18-2011, 08:44 AM
#1022
Honda-Tech Member
i read that last nite. i am not sure of they are the same. does those contacts look like the ones on your accord starter? do you think the toyota parts will work with the accord?
07-18-2011, 10:15 AM
#1023
Honda-Tech Member
Thread Starter
Join Date: Aug 2005
Location: Pompano Beach, FL, USA
Posts: 3,495
Likes: 0
Received 5 Likes
on
4 Posts
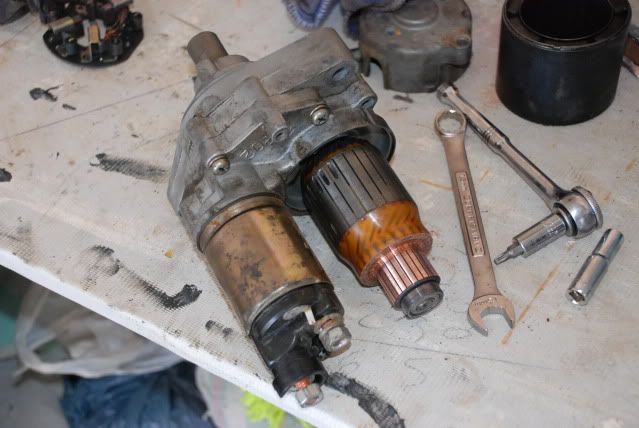
I will check the starter at my parents house tonight, i'm hoping for the best and expecting the worst. I broke the solenoid while finding out that it was indeed the cause of the problems, the copper contacts are burnt to hell.
07-20-2011, 07:36 PM
#1024
Honda-Tech Member
Thread Starter
Join Date: Aug 2005
Location: Pompano Beach, FL, USA
Posts: 3,495
Likes: 0
Received 5 Likes
on
4 Posts
The nightmare...
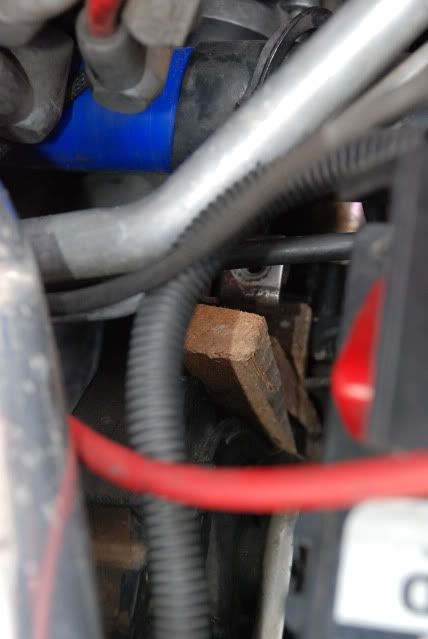
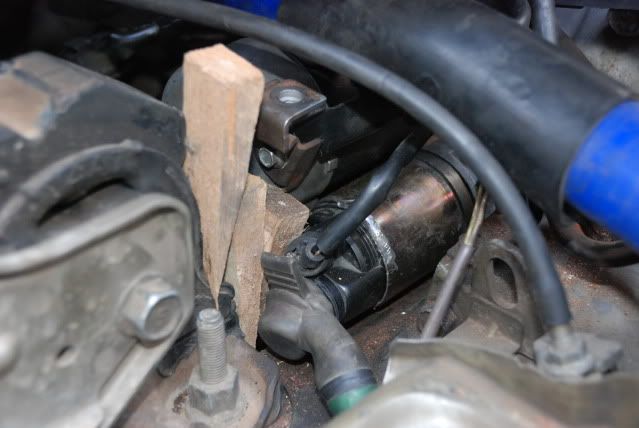
Yes, pieces of wood pushing the solenoid in so that the copper plates could make contact when trying to turn on the car.
So, if you looked at the previous posts, you saw pics of what the brushes inside the starter look like. If they stick out enough to make contact with the center piece, you can keep the brushes when rebuilding your starter. You need the multimeter to make sure that shaft with copper in its tip, called commutator is in working condition.
Just keep in mind that when you need to remove your starter, you MUST disconect your battery, and ALWAYS, ALWAYS disconect the negative (-) first, because if you start by loosening the positive (hot) side and the wrench makes contact with a grounded part of the car, which is the entire body of the car...haha, you will simply be sorry that you started on that side, it can damage things like the computer and etc.
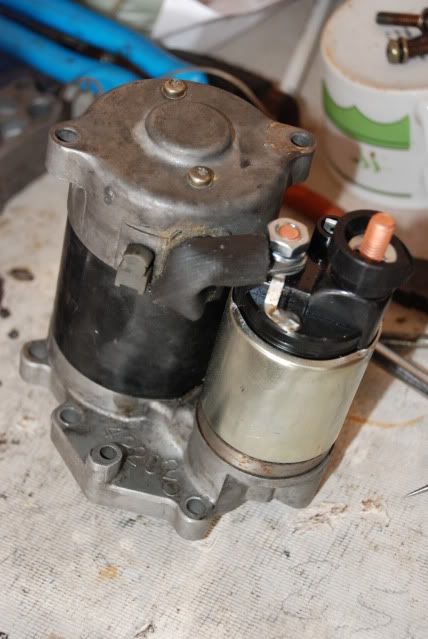
Take out your air filter, your battery and make room to remove the 2 bolts that hold the starter in the transmission/engine.
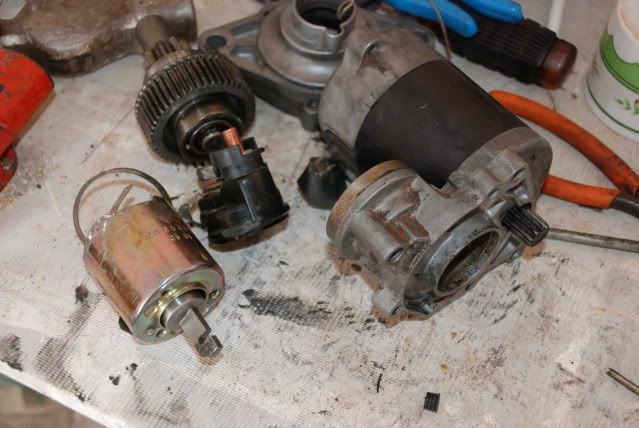
Inspect the new part and make sure it's the same as the one you are replacing. I found out the hard way that the contact plates inside the automatic tranny starter are not meant to be replaced, in fact... you're supposed to ditch the solenoid and replace it whole.
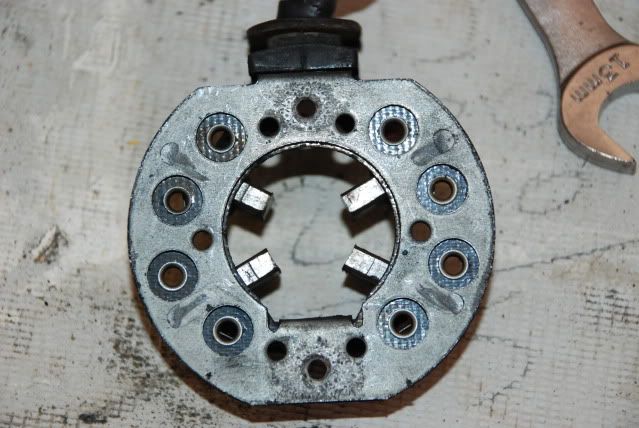
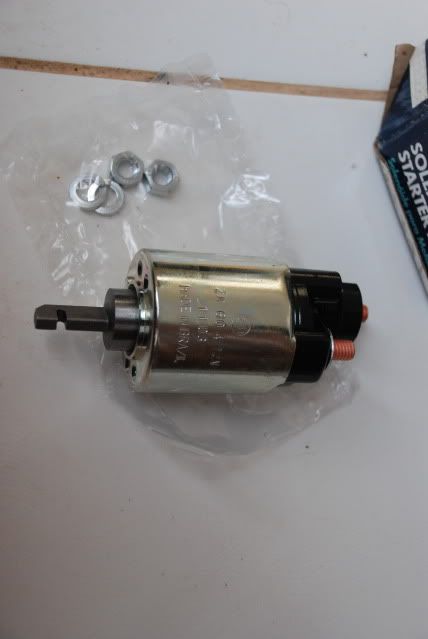
OLD SOLENOID - Worn contact plates.
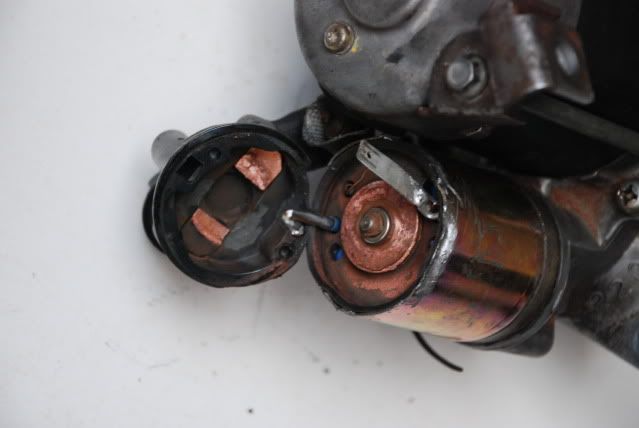
NEW PART - Looks just like the old part, that's the way to go.
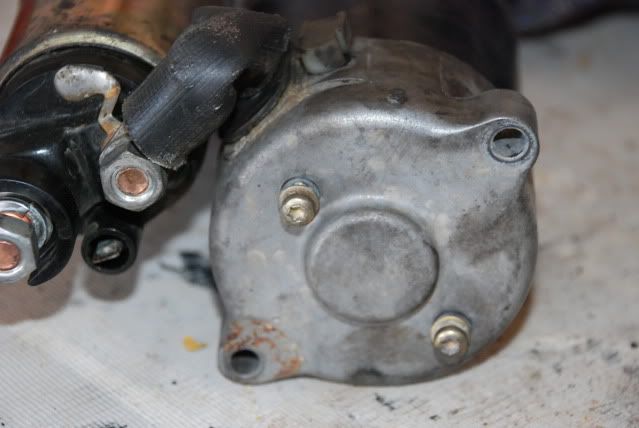
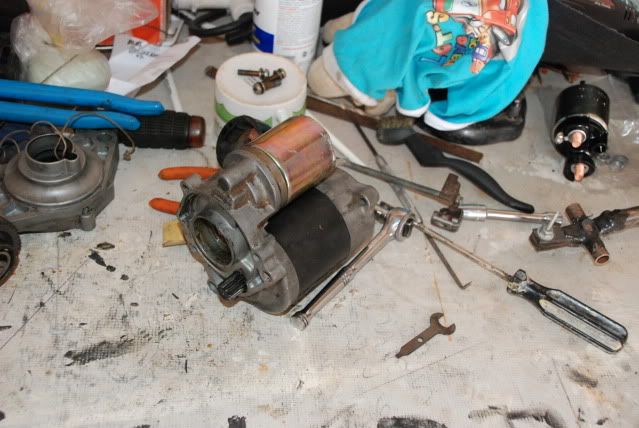
Remove the 3 philips screws on the lower body of the starter. (don't mind the blown cover).
Remove the 2 long bolts.
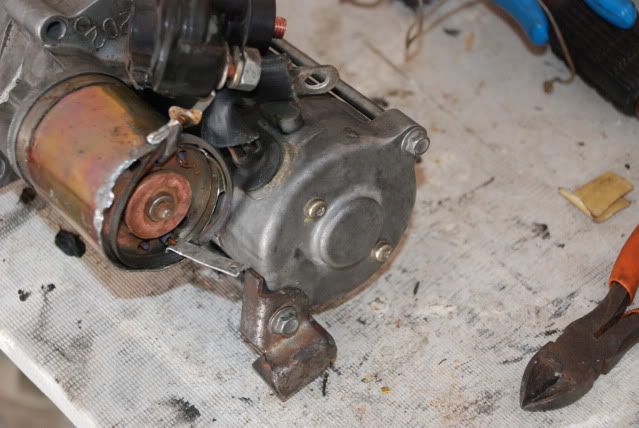
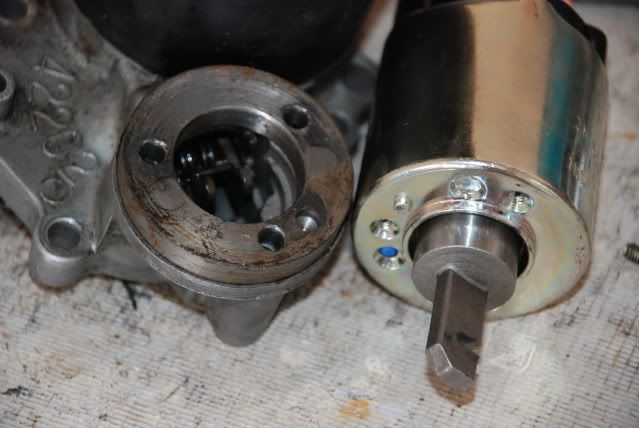
Separate the lower part of the housing from the rest of the starter.
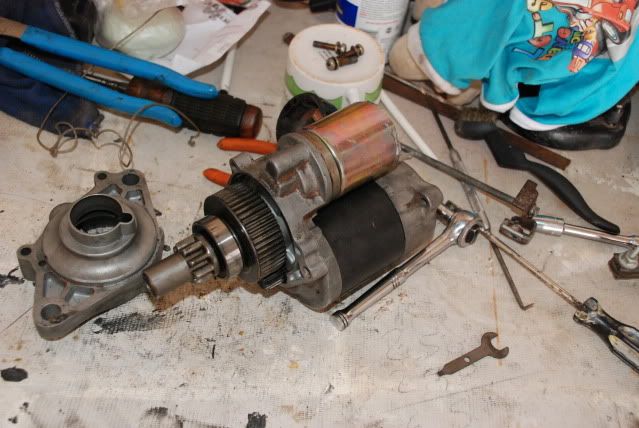
Slide the gear off the housing.
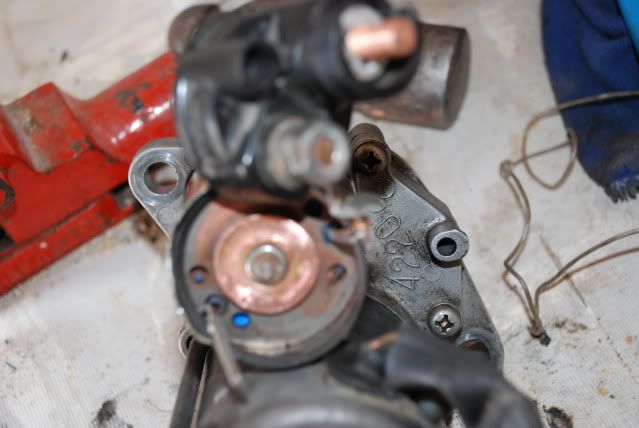
Looking at the starter this way, there are 3 small screws that need to be removed, they will free the solenoid from the body.
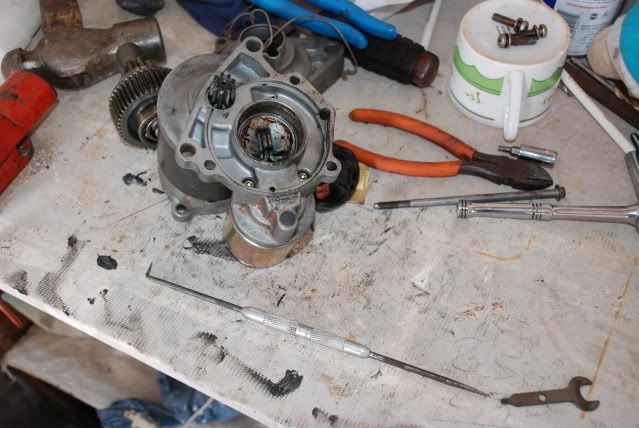
There's a small rubber covering one of the 3 screws, pry it off without distroying it.
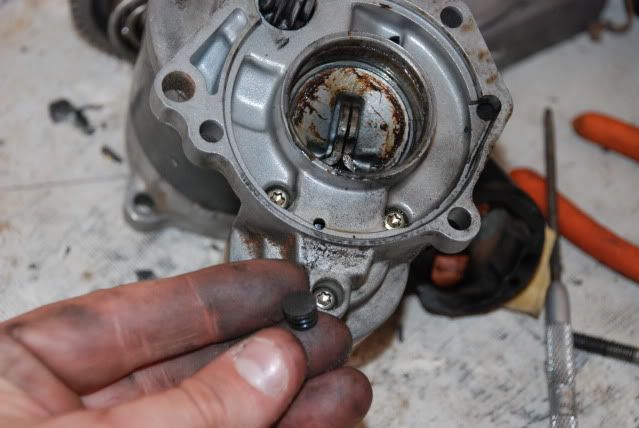
The solenoid is "hooked" to a small piece of metal inside the housing, free it from there, it should come right out.
When installing the new solenoid in, make sure to have the metal pin inside the small hole of the case, this assures the alignment of the screws, and of course, make sure that the "hook" is facing the right direction when installed.
You can reassemble the starter, use the new crush washers provided with the replacement part. The other cable must be connected once the starter is bolted back to the transmission, don't forget to attach the small wire on the cover of the solenoid, reinstall your battery, positive first, then negative. Your car should crank right away.
It's great to DIY, you're doing exactly what companies out there will do, but you'll save a lot of money by not buying their REBUILT starter... same applies to alternators and etc. Sometimes, people will push new parts down your throat when all you need is maintenance, for example... spark plugs: they have a specific working gap range, every now and then, you can check them and assure that they are running with the correct gap, all you need is a small tool to check the distance of the tip of the plug to the insert.
That's all for today guys, i will come back with more stuff soon. Peace out! Be sure to check out the blog on my signature!
Accord love!
Yes, pieces of wood pushing the solenoid in so that the copper plates could make contact when trying to turn on the car.
So, if you looked at the previous posts, you saw pics of what the brushes inside the starter look like. If they stick out enough to make contact with the center piece, you can keep the brushes when rebuilding your starter. You need the multimeter to make sure that shaft with copper in its tip, called commutator is in working condition.
Just keep in mind that when you need to remove your starter, you MUST disconect your battery, and ALWAYS, ALWAYS disconect the negative (-) first, because if you start by loosening the positive (hot) side and the wrench makes contact with a grounded part of the car, which is the entire body of the car...haha, you will simply be sorry that you started on that side, it can damage things like the computer and etc.
Take out your air filter, your battery and make room to remove the 2 bolts that hold the starter in the transmission/engine.
Inspect the new part and make sure it's the same as the one you are replacing. I found out the hard way that the contact plates inside the automatic tranny starter are not meant to be replaced, in fact... you're supposed to ditch the solenoid and replace it whole.
OLD SOLENOID - Worn contact plates.
NEW PART - Looks just like the old part, that's the way to go.
Remove the 3 philips screws on the lower body of the starter. (don't mind the blown cover).
Remove the 2 long bolts.
Separate the lower part of the housing from the rest of the starter.
Slide the gear off the housing.
Looking at the starter this way, there are 3 small screws that need to be removed, they will free the solenoid from the body.
There's a small rubber covering one of the 3 screws, pry it off without distroying it.
The solenoid is "hooked" to a small piece of metal inside the housing, free it from there, it should come right out.
When installing the new solenoid in, make sure to have the metal pin inside the small hole of the case, this assures the alignment of the screws, and of course, make sure that the "hook" is facing the right direction when installed.
You can reassemble the starter, use the new crush washers provided with the replacement part. The other cable must be connected once the starter is bolted back to the transmission, don't forget to attach the small wire on the cover of the solenoid, reinstall your battery, positive first, then negative. Your car should crank right away.
It's great to DIY, you're doing exactly what companies out there will do, but you'll save a lot of money by not buying their REBUILT starter... same applies to alternators and etc. Sometimes, people will push new parts down your throat when all you need is maintenance, for example... spark plugs: they have a specific working gap range, every now and then, you can check them and assure that they are running with the correct gap, all you need is a small tool to check the distance of the tip of the plug to the insert.
That's all for today guys, i will come back with more stuff soon. Peace out! Be sure to check out the blog on my signature!
Accord love!