When your ignition system isn't performing at its best, your engine can't properly make use of the available fuel. Find out how to inspect your plugs and wires to ensure that your ignition coil is delivering adequate spark.
This article applies to the Honda Civic/Del Sol (1992- 2000)
The combustion chamber needs to receive an adequate source of ignition to make use of the incoming air and fuel charge. Worn out plugs and faulty wires will rob your motor of power, as well as cause it to run rough. These are simple and inexpensive maintenance items that can end up making a big difference in the way your Honda Civic performs. Find out how to inspect your ignition system and regain lost performance with this easy repair.
Materials Needed
5/8ths spark plug socket
6 inch extension
3/4 drive ratchet
Vice grip pliers
Masking tape and marker
Ohm meter
Step 1 – Disable fuel system
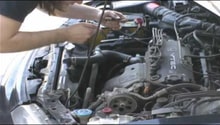
To avoid flooding your cylinders with fuel or to allow fuel vapor to escape during the spark test, disconnect the plugs on your injectors.
Figure 1. Injector wiring highlighted.
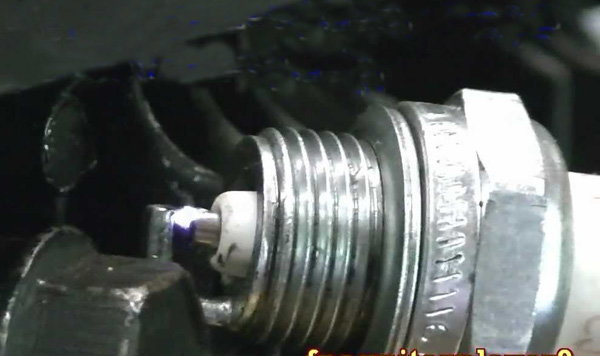
Step 2 – Test for spark
Grab your vice grip pliers and a new spark plug. Without damaging the threads, ground it to the block by clamping it to the engine hook or an exposed metal accessories bracket. If the visual image of this is not clear, hold the spark plug at an angle from the grounding point (with the ground touching the threads of the spark plug), and the electrode free of any obstructions. Take the engine spark plug wires, and plug them onto the end of the spark plug one at a time. Have an assistant crank the engine, while you watch the plug for a spark. You should see white light arcing between the electrodes of the plug. Make note of any wires that fail to deliver a spark to the plug.
Figure 2. Testing for a spark.
Pro Tip
Avoid letting the wires hang loose, while testing for a spark. Coming into contact with stray arcing can be painful, and the discharge from the wires can damage control modules. Test them one at a time, and plug them back in before you move on to the next one.
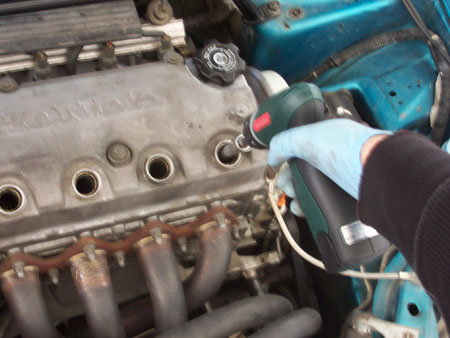
Step 3 – Remove spark plugs
Mark the spark plug wires using masking tape and a pen. You will need to know where they go later. Using your spark plug socket, extension, and ratchet, remove the plugs from the cylinder head.
Figure 3. Spark plugs removed.
Pro Tip
Make sure you keep track of which cylinders your plugs came out of. When you identify a problem, it is useful to know which cylinder is the culprit.
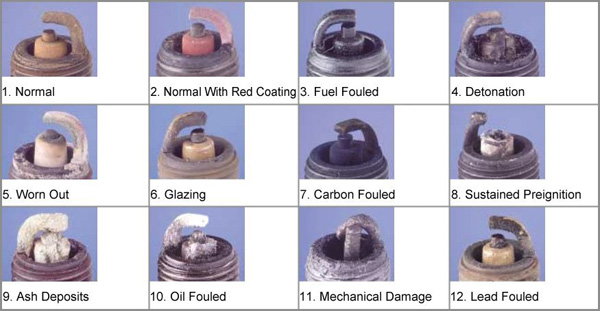
Step 4 – Inspect spark plugs
Look over your spark plugs for evidence of wear (the electrode should not be damaged). Also, check the white ceramic housing of the plugs for cracks or carbon tracking. If they are physically damaged, it is a sign of major internal problems.
Figure 4. Spark plug conditions.
Step 5 – Install new spark plugs
Clean out any oil or debris in the spark plug channels. Using your spark plug socket and extension, install your new set of spark plugs. Twist them into place by hand until they are seated. Never start your plugs with a ratchet. Stripped spark plug holes can ruin a cylinder head.
Pro Tip
Use a little anti-seize on the threads of the plugs to help them spin into place smoothly.
Step 6 – Inspect and replace wires
Swap your spark plug wires out one at a time. These wires are going to need to supply spark from the cap to the plug in the same order they were in before you started working. If you switch them around, your engine will not start.
Look at the condition of your wires and inspect for damage in the shielding. Use your Ohm meter to check the resistance of the line. Hold the test leads at either end, and take a reading. As a general rule, a spark wire should have no more than 1,000 Ohms per foot. Too much resistance reduces the intensity of the spark.
Then plug your injectors back in, and start your engine.
Why is My Check Engine Light Flashing?
Find the source of that glaring check engine light with this helpful article.
This article applies to the Honda Civic (1992-2000).
All modern cars have an on-board computer ...
Why Are My Cylinders Misfiring?
Autotap, Honda-Tech, 2carpros
Is your car misfiring? There are a number of reasons why your Honda Civic could be misfiring, but you need to get to the bottom of it. Here is how!
This ...
How to Replace Spark Plugs and Wires
Spark plugs do become less effective with time. It's best to replace them at the suggested intervals.
This article applies to the Honda Accord (1992-2002).
Changing the spark ...
Why Won't My Car Start?
Troubleshoot a no-start problem from your home garage.
This article applies to the Honda Accord (1990-2002).
Four main processes (among others) must occur for a car to start: the ignition ...
Why Won't My Civic Start?
Get your Honda Civic back up and running with this handy walkthrough.
This article applies to the Honda Civic (1992-2000).
All cars need four things to run: Fuel, spark, compression and ...
Why is My Engine Hesitating?
EricTheCarGuy
Here's how to solve your Honda Civic's or Accord's idle issues once and for all.
This article applies to the Honda Civic/Del Sol (1992-2000), and Accord (1990-2002).
So ...